Advertisement
Quick Links
Product Installation Guide
Product Overview
Product Setup
Prior to set up of the sendQuick SMS appliance gateway, it is absolutely necessary to familiarise yourself with the hardware set up information as
documented in the Product Information Guide. Please refer to the sendQuick user manual for a comprehensive list of system set up instructions.
PREREQUISITES
Power Socket / Source / Point
SIM Card (Pre-paid or Post-paid from any operator)
Monitor and Keyboard (applicable to Desktop Editions sendQuick Alert, sendQuick Alerter & sendQuick Enterprise)
Guide To Using The Modem
2G Modem
Antenna
USB Connectors
SIM Card Slot
3G Modem
Antenna
Main Antenna Connector
SIM Card Slot
Auxiliary Antenna Connector
Power Adaptor
Contact Us
TALARIAX PTE LTD
76 Playfair Road #08-01 LHK 2 Building Lobby 1 Singapore 367996
Tel: +65 6280 2881
Fax: +65 6280 6882
Email: info@talariax.com
Support: support@talariax.com
Website: www.talariax.com
Copyright © 2001 - 2015 TalariaX Pte Ltd. All Rights Reserved. sendQuick product name is a registered trademark of TalariaX Pte Ltd, a company incorporated in the Republic of Singapore.
Troubleshoot
RJ 45 Cable / LAN Cable
IP Address / Netmask / Gateway IP
1. It is important that you do not place the modem's antenna
on/near any machines. Place the antenna on metal surfaces like
the top of the server rack or non-machine surface.
2. The modem LED indicator should blink to indicate normal
operation (blink in a regular interval). If the LED indicator is not
blinking, it could be due to the following errors:
a) The external antenna is not connected
Please ensure the external antenna is connected to the main
antenna connector.
b) The SIM Card PIN number is not disabled
Please remove the SIM card from the modem and transfer it
to a mobile phone. Go to the mobile phone's Menu>Security
Settings>Disable PIN (This is to disable the PIN in the SIM card, if
any)
c) The SIM Card cover is not properly covered and the SIM Card
is not properly inserted
Remove the insert the SIM Card and ensure that the GSM
modem cover is properly covered
d) The modem is not connected properly
Please remove the modem and the USB cable from the
system (wait for 20 seconds) and subsequently plug in the
modem again. (This is to allow the modem task to restart when
the modem is plugged in)
3. If you intend to remove the SIM Card from the modem for
USB Connectors
more than a day, please detach the modem and USB Cable from
the system.
4. Should you use more than two GSM modems, please use the
USB Hub which has an external power supply. The external
power supply from the USB Hub must be connected and turned
on, to ensure sufficient power to the multiple USB modems.
5. Please connect both ends of the USB connector to the USB
slots on the sendQuick® server.
Contact Us
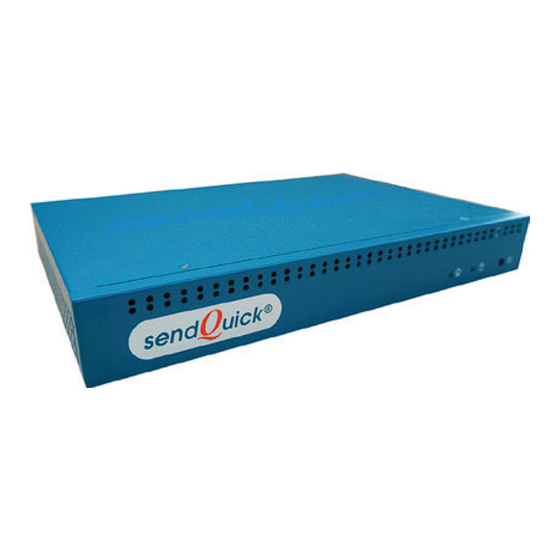
Product Overview
Hard Disk Activity Indicator
Product Setup
Network Connector
Power Status Indicator
Power On Button
Power Input Connector
Front View
Network Ports
USB Ports
USB Ports
Serial & VGA Ports
Console Port
Front Panel & Configuration Buttons
Power/Status/Hard Disk Activity Indicators
Front View
Network Ports
USB Ports
Console Port
Front Panel & Configuration Buttons
Power/Status/Hard Disk Activity Indicators
Front View
Product Installation Guide
Troubleshoot
Contact Us
Alert
Alerter
Enterprise
Eth0 Eth1
USB Ports
USB Ports
Serial & VGA Ports
Serial Ports
Rear View
Alert Plus
ConeXa 100
Communications
Power On/Off Switch
Power Connector
Rear View
Avera
Entera
ConeXa 300
Serial & VGA Ports
USB Ports
Power On/Off Switch
Power Connector
Rear View
Advertisement

Summary of Contents for SendQuick Alert
- Page 1 Power/Status/Hard Disk Activity Indicators Website: www.talariax.com Front View Rear View Copyright © 2001 - 2015 TalariaX Pte Ltd. All Rights Reserved. sendQuick product name is a registered trademark of TalariaX Pte Ltd, a company incorporated in the Republic of Singapore.
- Page 2 The default IP address of sendQuick appliance is 192.168.1.8 manual provided in the CD-ROM. Step 1: Connect each end of the cross cable to the sendQuick server (Eth0 Port) and your laptop. If you need any assistance, please email support@talariax.com.
Need help?
Do you have a question about the Alert and is the answer not in the manual?
Questions and answers