
Related Manuals for Denver Electronics DENVER DAB-39


Summary of Contents for Denver Electronics DENVER DAB-39
- Page 1 Instruction manual DAB+/DAB FM Radio DENVER DAB-39 COPYRIGHT DENVER ELECTRONICS A/S www.denver-electronics.com www.facebook.com/denverelectronics ENG-1...
-
Page 2: Important Safety Information
IMPORTANT SAFETY INFORMATION CAUTION! RISK OF ELECTRIC SHOCK DO NOT OPEN TO REDUCE THE RISK OF ELECTRIC SHOCK DO NOT REMOVE COVER (OR BACK) This symbol indicates that there are important operating and maintenance instructions in the literature accompanying this unit. This symbol indicates that dangerous voltage constituting a risk of electric shock is present within this unit. -
Page 3: Electrical Information
Caution: Usage of controls or adjustments or performance of procedures other than those specified herein may result in hazardous exposure. To prevent possible hearing damage, do not listen at high volumes for long periods. IMPORTANT This equipment generates, uses and can radiate radio frequency energy and, if n not installed and used in accordance with the instructions, may cause harmful interference to radio communication. -
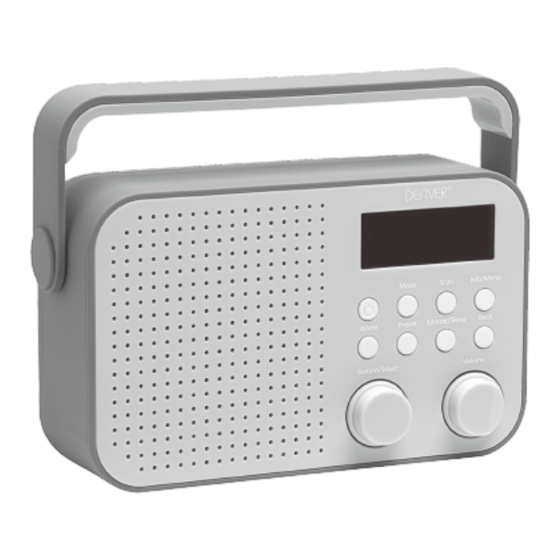
Page 4: Controls And Connections
CONTROLS & CONNECTIONS FRONT VIEW Handle Alarm button Standby button Display Info/Menu button Back button Mode button Scan button Station/Select control Preset button Snooze/Sleep button Volume control... - Page 5 BACK VIEW Aerial Earphone jack DC In jack AUX In jack Battery compartment (Batteries not included) ENG-5...
-
Page 6: Connecting Power
GETTING STARTED DAB/FM AERIAL Before using your radio for DAB or FM reception, always fully extend the telescopic aerial. The telescopic aerial has a swivel base to enable it to be adjusted to different positions for the clearest sound. CONNECTING POWER Before connecting the power, check that the mains voltage on the rating plate of the AC adapter is the same as the voltage in your area. -
Page 7: Auto Standby
Number of stations found Progress bar The radio scans all usable stations (full scan) and stores them alphanumerically -1 Radio, 2 Radio, AA Radio, AB Radio... The initial scan will take a few minutes. After the scan, the radio will play the first station in the sequence. To browse for another station, refer to the next section. -
Page 8: Listening To Fm Radio
Volume bargraph DAB SCANNING RE-SCANNING FOR DAB STATIONS When first used, your radio scanned the DAB band for available stations .The station services found were then stored in your system's memory. You can re-scan the band at any time if you move to a different area or just to refresh the stored list of available stations. - Page 9 To manually tune to FM stations Turn the Station/Select control clockwise to tune up the band or anti-clockwise to tune • down the band. The frequency will change in 50kHz steps. Mono reception When listening to a weak or distant FM station in stereo via earphones, there may be a high level of background noise.
-
Page 10: Station Presets
Time Date Date RDS Radiotext: This is a scrolling message giving realtime information - song titles, news headlines, etc. PROGRAMME TYPE: This describes the style of the programme being broadcast. FREQUENCY: This option will display the station frequency. STEREO/MONO: This option displays the audio mode for the station playing. TIME AND DATE: Time and date are updated by broadcasted information. - Page 11 Music will continue to play for the time you selected, then the unit will set to Standby. ENG-11...
- Page 12 SETTING THE ALARMS SETTING THE ALARMS NOTE: The alarms can only be used when powered from the mains AC adapter, not when battery powered. You can set two completely separate alarm times (ALARM 1 and ALARM 2) and activate either or both of them to wake you with a buzzer or radio. You can also pre-set the station preset and volume settings that the alarms will wake you with.
- Page 13 ALARM SETTING SEQUENCE Alarm 1 Time Set the alarm hours, then minutes Alarm 1 Duration Set the duration of the alarm Alarm 1 wake-up mode (Source) Choose from DAB,FM, Buzzer Alarm 1 preset* Choose a preset for radio alarm modes ENG-13...
- Page 14 Alarm 1 Repeat Set the alarm Daily, Once, Weekends or Weekdays Alarm 1 Date Option appears if Repeat is set 'Once Alarm 1 Volume Set the volume for Alarm 1 Alarm 1 On/Off Choose to set Alarm 10n or off Alarm Saved The alarm settings have been saved To make a change to a setting...
-
Page 15: Waking To The Alarms
SWITCHING THE ALARMS ON OR OFF The alarm indicators on the display show when the alarms are activated. Alarm 1 set Alarm 2 set To switch the alarms on or off once set: Set the radio to Standby. • Press the Alarm button. •... - Page 16 When the alarm sounds you can choose to set snooze, which will reset the alarm for a further 5 minutes, or to switch it off. To set snooze To set snooze, press the Snooze/Sleep button when the alarm sounds. • The alarm will stop and the snooze time will count down on the display.
- Page 17 ALL RIGHTS RESERVED, COPYRIGHT DENVER ELECTRONICS A/S Electric and electronic equipment contains materials, components and substances that can be hazardous to your health and the environment, if the waste material (discarded electric and electronic equipment) is not handled correctly. Electric and electronic equipment is marked with the crossed out trash can symbol, seen below.
Need help?
Do you have a question about the DENVER DAB-39 and is the answer not in the manual?
Questions and answers