Table of Contents
Advertisement
Quick Links
Maunal Edition 1.4,Dec.2010
IB-200-S05500-02
www.edifier-international.com
2010 Edifier International Limited. All rights reserved.
Printed in China
NOTICE:
For the need of technical improvement and system upgrade,information contained herein may be subject to change
from time to time without prior notice.
Products of Edifier will be customized for different applications. Pictures and illustrations shown on this manual
may be slightly different from actual product. If any difference is found, the actual product prevails.
Important safety instruction
Thank you for purchasing this Edifier product. For generations, Edifier tries to provide powered speaker products to satisfy the need of our end
customers, even the most demanding ones. This product can add to your home entertainment, personal computer, and mini home theater great
sound performance. Please read this manual carefully to obtain the best of this system.
The lightning flash with arrowhead inside
To prevent the risk of electric shock, do not
thetriangle, is intended to alert the user
remove cover (or back). No user-serviceable
to the presence of un-insulated dangerous
Parts inside. Refer servicing to qualified
voltage within the product's enclosure
Service personnel only.
that may be of a sufficient magnitude to
constitute a risk of electric shock to persons.
SAFETY INSTRUCTIONS
Please read all the instructions herein.
Please retain this manual safely for future reference.
Please heed all safety warnings.
Please install in accordance with the manufacturer's instructions.
Please adjust the volume control to a comfortable level to avoid damaging your hearing and the system.
• Do not expose this apparatus to rain or moisture.
• Do not use the speakers near water, and do not immerse them in any liquid or pour any liquid on them.
• Do not defeat the safety purpose of the polarized plug. A polarized plug has two blades with one wider than the other.
• For added protection during lightning storms, unplug the speakers from the electrical outlet and turn off the computer.
• Unplug this apparatus when unused for long periods of time.
• Place the speakers away from all heat sources, such as heaters, stoves, and direct sunlight.
• Do not block the openings in the speaker cabinets. Never push objects into speaker vents or slots. Prevent risk of fire or
electric shock hazards, and provide sufficient space around the speakers for proper ventilation.
• Place the speakers in a stable location so that it will not fall causing damage to the speakers or bodily harm.
• Unplug the speakers from the computer and from the electrical outlet before cleaning them with a damp cloth.
• Servicing is required when the apparatus has been damaged in any way, such as the power-supply cord or plug is damaged, liquid has been
spilled or objects have fallen into the apparatus, the apparatus has been exposed to rain or moisture, does not operate normally, or has been
dropped. Refer all servicing to qualified service personnel only.
• Use the plug or the coupler inlet to disconnect with mains.
Correct Disposal of this product. This marking indicates that this product should not be disposed with other household wastes
throughout the EU. To prevent possible harm to the environment or human health from uncontrolled waste disposal, recycle it
responsibly to promote the sustainable reuse of material resources. To return your used device, please use the return and collection
systems or contact the retailer where the product was purchased. They can take this product for environmental safe recycling.
This equipment is a Class II or double insulated electrical appliance. It has been designed in such a way that it does not require a
safety connection to electrical earth.
1
English
Illustrations and Functional Depict
1. AUX input
2. 5.1 CHL input
3. Wired controller jack
4. Satellite speaker output
5. Power switch
6. Fuse
7. Socket for power cord
8. LCD display on wired controller
9. "Function" key
Press the "Function" key embedded in the volume control knob to access each item of the system
settings, the LCD display will display "VOL" -- "FRNT" -- "CEN" -- "REAR" -- "SW" -- "TRE" -- "BASS"
-- "LIGHT" -- "VOL" sequentially. Rotate the knob to adjust the selected item, the LCD display will
show the value adjusted.
Adjustment details:
• Master Volume: Default volume setting is "30" if no customized adjustment memorized from last
power-off. Rotate the volume knob to adjust the master volume, from 0 to 50; a sudden wrench at the
maximum volume will bring the system to "BOOST" mode while you can get extra power and 6 more steps
up; LCD will display current volume adjusted.
• Front Channels/Center speaker/Rear Channels: Press the "Function" key embedded in the volume control
to access the trimmer for Front / Center / Rear speakers, the LCD display will show "FRNT" / "CEN" / "REAR" accordingly. Rotate the knob
to adjust the output level, minimum -9 and maximum +9 for all these channels.
• Subwoofer: Press the "Function" key embedded in the volume control to access the subwoofer output adjustment, the LCD display will show
"SW". Rotate the knob to adjust the output level, from minimum -13 to maximum +9.
• Treble/Bass: Press the "Function" key embedded in the volume control to access the Treble / Bass trimmers, the LCD display will show
"TRE" / "BASS" accordingly. Rotate the knob to adjust the trimmers, from minimum -9 to maximum +9 for both treble and bass.
• Back Light: Press the "Function" key embedded in the volume control to access the backlight dimmer of the display, the LCD will show
"Light 5" as the default brightness. Rotate knob to adjust the brightness of the display panel from 1 to 7.
10. STBY/ON
Press this button to wake up the system when it is in STBY mode;
Press and hold this button to set the system back to STBY when it is in active mode.
11. Input/ESC
When system is active, press this key to select between 5.1CHL and stereo input.
During adjustment of trimmers, balance and back light dimmer, press this button will instantly get the
system back to master volume control interface.
12. Headphone output
Connecting the headphone will cut off the speaker output, with LCD showing "PHONE". Master
volume and EQ setting still work in headphone mode.
3
English
Guidance for using remote controller
Point the remote controller to the IR window on wired controller when operating the remote controller.
The optimum operational distance is 7 meters. When a remote command is received and executed,
figures shown in LCD display will blink.
1. "
" -- STBY/ON
Press this button to select from STBY and active mode.
When system is set to STBY, it still keeps the original settings.
Please switch off the system if it is not used for a long time.
2. "MUTE"
Press this button when system in working mode will instantly
shut off the speaker output. Press one more time this button
will recall the speaker output.
3. "VOLUME +/-" keys -- Adjust the master volume
Adjust the master volume level from 0 to 50, then from 50 to
BOOST+6. "0" means minimum volume, "BOOST+6" means
maximum volume; press and hold "VOLUME+" to turn up the
volume; and press "VOLUME-" to turn it down. The default
setting is "30".
4. "Function" keys – "FRNT", "REAR", "C", "SW", "TRE.", "BAS."
When system is in active mode, press the key "FRNT",
"REAR", "C", "SW", "TRE.", "BAS."
to access each of the system settings, the LCD display will show "FRNT", "REAR", "CEN",
"SW", "TRE", "BASS" accordingly,
press "ADJ +" / "ADJ –" keys to each of the system settings. All default values are "0".
5."ADJ+/-" keys
Press "ADJ+" to increase the value of each system setting, press "ADJ-"to decrease it.
5
English
Specification
Power output:
Satellite speaker: FL/FR/C/SL/SR:5×32W RMS(THD=10%,f
Subwoofer:120W RMS(THD=10%,f
Signal to noise ratio:
≥ 85dBA
Distortion:
≤ 0.5%
Input sensitivity:
E.I.D.C.
Input sensitivity:
Satellite:450~ 500mV±50mV
Subwoofer:250~280mV±50mV
Adjustment:
Master volume and trimmer control on wired controller, remote controller
Input type:
Stereo / 5.1RCA jack
Bass unit:
10 inch, magnetically shielded,8Ω
Mid-range unit:
FR/FL/SR/SL:3½ inch, magnetically shielded,8Ω
C:3½ inch, magnetically shielded,4Ω
Treble unit:
Ø25mm silk dome tweeter, magnetically shielded,6Ω
Dimension:
Subwoofer:367mm×397mm×489mm(W×H×D)
Front speaker:116mm×203mm×160mm(W×H×D)
Center speaker:316mm×117mm×157mm(W×H×D)
Gross Weight:
Approx 37.4kg
Warnings:
Please do not feed powered signal from another amplifier into the input ports of this system!
Please adjust to a comfortable volume to avoid damaging your hearing and the system!
Dangerous voltage inside the subwoofer enclosure, please do not open the chassis.
Refer to qualified personnel for servicing.
Please remove the power plug if the system is unused for long period of time.
Please do not expose the system in rain or moisture environment.
Please do not place vase or utensil full of liquid on the speaker.
7
English
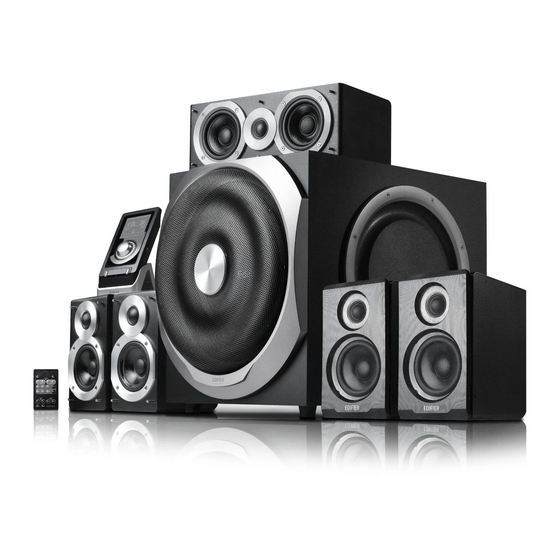
Box content
1 × Subwoofer
5 × Satellite speakers (2 front satellite speakers,
2 rear satellite speakers, 1 center speaker)
1 × Wired controller
The exclamation point inside the triangle is
intended to alert the user to the presence
1 × Remote controller
of important operating and maintenance
3 × Audio extension cable
(servicing) instructions in the literature
accompanying the product.
1 × 6P RCA to RCA connector cable
5 × Speaker cable
1 × User manual
S550
Multimedia Speaker
User manual | Manuel d'utilisateur | Manual de usuario | Bedienungsanleitung | Manuale dell'utente
User manual
6P RCA to RCA connector cable
Center speaker
Surround right speaker
6."LIGHT+/-" keys (Adjust the back light level of LCD display from 1 to 7.)
Press "LIGHT+" & "LIGHT-" to adjust the brightness of the LCD display. The default setting is 5.
7. "INPUT" key
Press "2CH", the display on wired controller will show "IN 2CHL", now system is in 2.1CHL input mode.
Press "5.1", the display on wired controller will show "IN 5.1", now system is in 5.1CHL input mode.
The default input is 5.1CHL.
8."RESET" key
Press "RESET" to bring system setting back to default value
Battery loading:
Please refer to the illustration on the right side to open the
battery compartment, load the included CR 2025 battery and
shut the compartment.
Note:
• Do not place the remote controller in places that are hot and moist.
▪ Unload the battery when unused for long period of time.
▪ The battery (battery or batteries or battery pack) shall not be
exposed to excessive heat such as sunshine, fire or the like.
Not all speakers function:
Please first check if the speaker wires are connected securely;
=1KHz)
0
then check if the Line-in connectors are reversed; check also if the audio source is at fault.
=80Hz)
0
One satellite speaker does not function when playing CD from computer:
This kind of phenomena is prone to happen on new computer systems that one satellite does not function when playing CD,
but system works fine when playing WAV formatted files. This is mainly due to the fault connection of CD-ROM and sound
card, that one channel of signal is shorted to the ground. Please refer to the manual of CD-ROM and sound card to adjust
the wire connection.
System does not work at all
1. Please check if power is connected, and if the wall outlet is switched on.
2. Please check if the amplifier is still in STBY mode
3. Please check if the master volume is turned to minimum
4. Please check if the audio input cable is connected correctly
5. Please check if there is signal from audio source
Noise coming from speakers
Amplifier circuitry of this product generates little noise, while the background noise of some VCD/DVD player or computer
sound card are too high. Please keep the system in active mode and remove the audio source, if no sound can be heard at
1 meter away from the system, then there is no problem with this product.
Magnetic interference
This system is complete magnetically shielded, and can be placed near TV or monitor. But since magnet of the subwoofer
driver is large, some magnetism leakage is inevitable when the system is too close to the monitor, and it is recommended to
keep a 1 meter distance between the speaker system and monitor or TV set.
System can not switch to analog signal input with digital input ports plugged in
Some digital signal source like CD or VCD play will still output tangible digital signal even when the source is shut down.
These tangible signals are used to mute the decoder; therefore the system can not switch to analog inputs (digital inputs
have higher priority). Power off the source of digital signal or unplug the optical or coaxial inputs, then the system will switch
to analog inputs.
System does not work with Dolby Digital (AC-3) signal
Digital inputs on this system do not support Dolby Digital (AC-3) formatted signals, so the system will not work when such
signals are fed in.
When product can not memorize the settings from last power-off
Please turn on the system and adjust to the desired volume and EQ setting. Before powering off the system, MAKE SURE
to send the system to STBY mode first by pressing the STBY button on wired controller or wireless remote controller;
otherwise the current setting will be lost.
If you have any further questions or concerns regarding Edifier Products
Please visit our website at: www.edifier.com, or email Edifier Support for further
assistance at: main@edifier.com, If you prefer, you may contact us by phone,
Toll Free: 1-877-EDIFIER (334-3437).
S550
Multimedia Speaker
User manual
Center speaker
Wired controller
Remote controller
Satellite speaker
Subwoofer
Satellite speaker
Audio extension cable
Speaker cables
English
5.1CHL input
To PC/CD/MP3 input
Wired controller
Front right speaker
Front left speaker
To A.C. power
Note: The illustrations contained herein are for reference only.
English
Guidance for using remote controller
English
English
Unpack the box
2
Making connections
Surround left speaker
4
6
Troubleshooting
8
Advertisement
Table of Contents


Need help?
Do you have a question about the S550 and is the answer not in the manual?
Questions and answers