
Summary of Contents for Kantech IP Link
- Page 1 Kantech IP Link Enhanced Ethernet Device Installation Manual DN1670-1609 Tear-out Quick Setup Sheet on last page!
-
Page 3: Table Of Contents
Configuring the IP Link at the Remote Site ........18 Confirming IP Link Communication with the Gateway ..... 20 Configuring the IP Link with the Web Configuration Page ......... 21 Upgrading the IP Link Firmware ................23 How to Reset the IP Link ................... 26... - Page 4 DN1670-1609...
-
Page 5: General Information
© 2016 Tyco International Ltd. and its Respective Companies. All Rights Reserved. All specifications were current as of publication date and are subject to change without notice. Kantech and the Kantech logo are trademarks of Tyco International Ltd. and its Respective Companies. -
Page 6: Compliance Specifications
Each IP Link enclosure will be installed in a secured and protected location. • Each IP Link will be equipped with an AC powered LED installed outside the IP Link and connected to an inboard relay, and visible at all time to monitor relay status, as per UL 294, section 32.1.5. -
Page 7: Overview
The IP Link is essential in determining what to do with specific events and commands. The IP Link directs specific events it receives from any controller to the EntraPass Gateway. On the other hand, it sends commands from the EntraPass Gateway to the appropriate controller. -
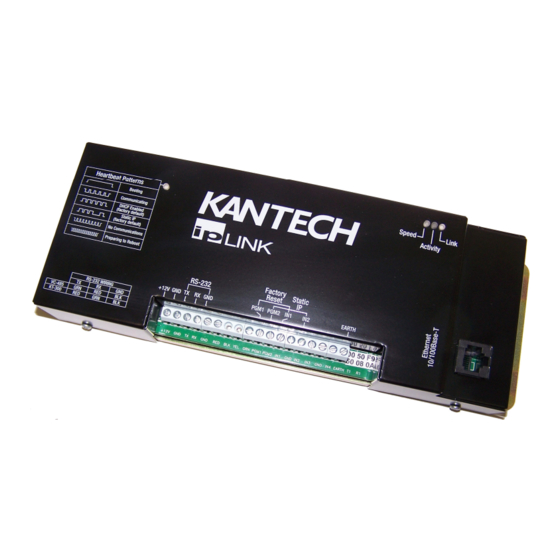
Page 8: Cover Description
Cover Description The IP Link has a red status LED called Heartbeat Patterns (with cover) or STAT (without cover). The main purpose is to indicate if EntraPass is present and if the polling occurs. Table 1 describes the various heartbeat patterns that are used. See Table 2 for the description of the other status LEDs. -
Page 9: Configurations Options
The IP Link can be configured through 3 different options: • With EntraPass, when the IP Link is within the same local area network (LAN) • With the KT-Finder application locally through the LAN or remotely through the Internet or wide area network (WAN). -
Page 10: Ordering Information
DN1693 - Italian Site Survey Before starting the installation of the IP Link, you have to determine the configuration that best corresponds to your network architecture. This information is crucial for the proper operation of the Kantech products that you will install. Contact the Network Administrator of the site(s) where you will install the IP Link so that they can provide you with all the network information. -
Page 11: Wide Area Network (Wan)
IP Link. LAN Configurations There are two LAN configurations for the IP Link: Note: Kantech recommends the use of a Static or Reserved DHCP IP address for the IP Link and the Gateway. Static IP Addressing You will use this type of configuration in an environment where the Network Administrator will determine the IP address for communication between EntraPass and the IP Link. -
Page 12: Wan Configurations
Internet Service Provider (ISP) which controls the IP address. Note: Kantech recommends the use of a Static or Reserved DHCP IP address for the remote IP Link and the Gateway since the routers must be configured for port forwarding. -
Page 13: Reserved Dhcp Ip Addressing
You will use this type of addressing in an environment where the customer DHCP server assigns the IP address automatically to the IP Link. Since the EntraPass application is at the host site, you must use the KT-Finder to configure the IP Link. -
Page 14: Reading Checklist
All preliminary site work is completed and the site is clean and free of dust or other contaminants. Task Lists Table 7 lists the tasks for the configuration of the IP Link in a LAN Table 7: Task list for a LAN configuration... -
Page 15: Mounting The Ip Link
2- Connecting the Earth Ground Connect the provided green ground wire from the EARTH terminal to the cover screw. Use a single conductor solid copper wire to ground the IP Link to a good earth ground as per the local building code. -
Page 16: Connecting The Ip Link To The Controller Loops
3- Connecting the IP Link to the Controller Loops The IP Link can connect to all Kantech controllers such as the KT-100, KT-200 and the KT-300. The KT-100 only uses RS-485, the KT-200 and KT-300 accept both. • See Table 9 and Figure 1 for RS-232 connection to a VC-485 with RJ12 connector •... -
Page 17: Connecting Power
4- Connecting Power For KT-300 Controllers only • Use the 12V DC from the 12V AUX terminals. For KT-100 and KT-200 Controllers • You will need a separate 12V DC power supply with battery backup for the IP Link. DN1670-1609... -
Page 18: Powering Up The Ip Link
6. Complete the other settings as required. 7. Click on the IP Device IP Configuration tab. 8. Look on the IP Link for the MAC address sticker next to the terminal strip and complete the MAC address of the IP Link. - Page 19 For TCP: No port required. • For UDP: Enter the Port number used by the IP Link (port 18810 by default). If more than one IP Link resides at the same IP address (WAN/Internet applications) then it will require the use of a unique port number per IP Link.
- Page 20 Gateway before it operates in stand-alone mode. • Retry count: The range value is 1 to 15. This is the number of times that the IP Link will retry to confirm communication failure with the Gateway. •...
-
Page 21: Verifying Communication With The Ip Link
Preparing the WAN for the When using the IP Link in a WAN configuration behind a router/firewall, it is necessary to forward port(s) for both the local (Gateway) and the remote (IP Link) sites. Typically, this will be performed by the Network Administrator. -
Page 22: Configuring The Ip Link At The Remote Site
80 (Note 2) Note 1: If you are using more than one IP Link at the same remote site, it is necessary to use a unique port number for each IP Link. This information is used in Procedure 6, Step •... - Page 23 IP Link Installation Manual 5. Enter the MAC address of the IP Link then click on Connect. 6. When the IP Link is found, the configuration page will display. 7. Verify your Network Configuration Information Sheet: • Enter the EntraPass IP address or the Domain name of the EntraPass Special Edition / Corporate Gateway.
-
Page 24: Confirming Ip Link Communication With The Gateway
12.Verify that the IP Link heartbeat pattern LED is flashing 1 quick flash/sec. as per Table 1 on page 4. 13.Verify communication between the new IP Link and the Gateway. From the EntraPass workstation Operation menu, select Site and then select the Gateway from the Gateway List. -
Page 25: Configuring The Ip Link With The Web Configuration Page
1. Make sure the IP Link is in Forced Static IP before starting the configuration. Verify the heartbeat patterns to determine the status, see Table 1 on page 4 and Table 13 on page 26 to put the IP Link in Forced Static IP. - Page 26 5. Remove the wire between PGM2 and IN2 on the IP Link. 6. Click on the Save configuration to IP Link button. 7. When you will go to the site with the configured IP Link, you will have to enter the same details into the EntraPass workstation.
-
Page 27: Upgrading The Ip Link Firmware
You will loose communication with all your controllers for up to 5 minutes during Warning: this upgrade. This must be planned accordingly. 1. Verify the communication status between the IP Link and the Gateway. From the EntraPass workstation Operation menu, select Site. 2. Select the Gateway from the Gateway List. - Page 28 18.The IP Link will reset and restart with the new firmware. Warning: That process could take up to 5 minutes. The communication status in the Operation > Site will say IP Link Communication Failed then back to IP Link Communication OK. DN1670-1609...
- Page 29 21.Two very important status messages must be listed as well: • IP Link communication OK for IP Link communication status with the Gateway. • Site communication OK for controllers communication, through the IP Link, with the Gateway. 22.Click Close. DN1670-1609...
-
Page 30: How To Reset The Ip Link
How to Reset the IP Link For maintenance or configuration purposes, the IP Link can be reset. Two types of resets can be performed: Factory Default (DHCP) and Forced Static IP. Table 13: Reset options Resets Instructions Factory Default WARNING: This reset will clear all IP Link configuration including the (DHCP) IP address. - Page 31 DN1670-1609...
- Page 32 DN1670-1609...
- Page 35 Company Name: Site Name: LAN or WAN (see other side) IP Link Configuration in a Local Area Network (LAN) For more details, see Procedure 6: Defining the EntraPass Site on Page 14. MAC Address: 00:50:F9: ______:______:______ Protocol: _________ Port (UDP only) _________...
- Page 36 Domain name: ____________________________ Port Forwarding Checklist Note 1: If you are using more than one IP Link at the same remote site, you must use a unique port number for each IP Link Note 2: No port to forward in TCP.
- Page 37 DN1670-1609...
Need help?
Do you have a question about the IP Link and is the answer not in the manual?
Questions and answers