Table of Contents
Advertisement
INSTALLATION INSTRUCTION
& OWNER'S MANUAL
System Tested and Certified by NSF International against NSF/ANSI 42 for the reduction of Chlorine, Taste
and Odor and 58 for the reduction of Total Dissolved Solids. Please refer to the Performance Data Sheet for
complete reduction data.
Olympia Water Systems • www.olympiafiltration.com
Manual Version 1.4, 2017 Dec. All Rights Reserved.
Advertisement
Table of Contents

Summary of Contents for Olympia Water Systems OROS-50
-
Page 1: Installation Instruction
System Tested and Certified by NSF International against NSF/ANSI 42 for the reduction of Chlorine, Taste and Odor and 58 for the reduction of Total Dissolved Solids. Please refer to the Performance Data Sheet for complete reduction data. Olympia Water Systems • www.olympiafiltration.com Manual Version 1.4, 2017 Dec. All Rights Reserved. -
Page 3: Table Of Contents
Please retain this Owner’s Manual for future reference. It includes information for operation and maintenance of your Olympia Water Systems Reverse Osmosis water filter system. Table of Content Introduction About Your Reverse Osmosis System Filter Stages Before Installation Inspect the System... -
Page 4: Introduction
These claims are based on manufacturer testing. These claims are not certified by NSF. Replacement Filters Olympia Water Systems offers replacement filters for both the OROS-50 and OROS-80 Re- verse Osmosis water filtration systems. For purchasing information for replacement filters, please visit our website at www.olympiafiltration.com. -
Page 5: Before Installation Inspect The System
Before Installation Inspect the System Remove the system and all the included components from the box. Inspect the system and the connection fittings to ensure nothing has been damaged during shipment. If any part of the system has been cracked or broken, do NOT proceed with installation. Contact Olympia Water Systems for an exchange or further information. -
Page 6: Included Components
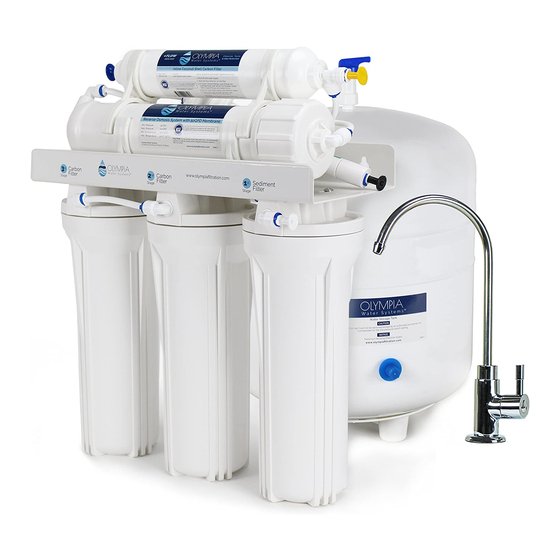
Included Components Please ensure you have all of these parts before starting installation. RO System Head 3 Filters and Housings Storage Tank Faucet Kit Tank Ball Valve 3/8” Feed Water Drain Saddle Valve Angle Valve 4 Colors of 1/4” Tubing Housing Wrenches Teflon Tape System Itemization... -
Page 7: Installation
Installation Filter Housing Assembly Remove main system bracket, 3 filters and housings from packaging and assemble the filter housings onto the main system bracket as follows: I. Install Filters into Housings: See Fig. 1. Stand 3 housings upright. Check each housing to ensure the black O-ring is properly seated in its groove. -
Page 8: Ro Membrane Installation
RO Membrane Installation **Important! The tubing connection on the membrane housing cap MUST be removed prior to opening the membrane housing to pre- vent the tubing connection elbow from breaking inside the housing cap. Refer to page 5 for Quick Connect Instructions. Remove the provided RO membrane from the plastic packaging and install into the RO hous- ing on the main system bracket as follows: I. -
Page 9: Positioning The System
Positioning the System Note Mounting screws for the RO system are NOT included. Space: Ensure there is sufficient space for installation (approximately 16” L x 7” W x 20” H for the system, 12” D x 18” H for the tank). The RO system is best installed under a kitchen sink. -
Page 10: Drain Saddle Connection
Drain Saddle Connection Important! To avoid possible system drainage noise, install drain saddle on the top of horizontal tailpiece or as low as possible on the vertical tailpiece. Do not install drain saddle close to a garbage disposal outlet as this may cause a blockage in the RO system drain line. -
Page 11: Mounting The Faucet
If drilling a hole in the sink or counterop is required to install the faucet, professional installa- tion by a plumber is highly recommended. Olympia Water Systems is not responsible for any damage resulting from faucet installation. -
Page 12: Connecting The Tank
Connecting the Tank I. Attach Tank Ball Valve: See Fig. 13. Apply 3-5 wraps of the provided Teflon tape to the threaded output stem on the top of the tank. Screw the provided tank ball valve onto the tank output stem. II. -
Page 13: Connecting The System
Connecting the System I. Check Tubing Connections: See Fig. 16. Ensure that both ends of all tubing connec- tions are installed and secured with provided BLUE tubing lock clips. II. System Water Inlet Connection: See Fig. 17. Check that the feed water angle valve is in the OFF position. -
Page 14: System Start-Up
To flush out the carbon and chlorine, you may need to fill and empty the storage tank up to 5 times, where the water will be clear and you cannot taste the chlorine. Congratulations, you have successfully completed the installation of your Olympia Water Systems Reverse Osmosis water filter system! -
Page 15: Maintenance Maintenance Schedule
Usually replaced at the same time as the RO membrane. Replacement Filters Olympia Water Systems offers replacement filters for both the OROS-50 and OROS-80 Re- verse Osmosis water filtration systems. For purchasing information for replacement filters, please visit our website at www.olympiafiltration.com. -
Page 16: Filter Replacement
Filter Replacement I. Turn off Cold Water & Tank Valve: Turn cold water supply and tank ball valve to OFF positions. Turn system faucet to the ON position to release any built up pressure in the RO system. Once pressure has been released, turn system faucet to OFF position. II. -
Page 17: Ro Membrane Replacement
RO Membrane Replacement I. Turn off Cold Water & Tank Valve: Turn cold water supply and tank ball valve to OFF positions. Turn system faucet to the ON position to release any built up pressure in the RO system. Once pressure has been released, turn system faucet to OFF position. II. -
Page 18: Post Filter Replacement
Post Filter Replacement It is recommended to replace the post carbon filter at the same time the RO membrane is replaced. I. Turn off Cold Water & Tank Valve: Turn cold water supply and tank ball valve to OFF positions. Turn system faucet to the ON position to release any built up pressure in the RO system. -
Page 19: System Service Record
System Service Record Date of Purchase: Date of Install: Installed By: Date 1st Stage 2nd Stage 3rd Stage Post-Filter Sediment Carbon Carbon Membrane Carbon Notes:... -
Page 20: Technical Information Performance Data Sheet
Olympia Water Systems • 25 South 51st Avenue Phoenix, AZ 85043 • 1-800-516-2495 Olympia Water Systems’ OROS-50 and OROS-80 have been tested according to NSF/ANSI 42 and 58 for reduction of the substances listed below. The concentration of the indicated sub- stances in water entering the system was reduced to a concentration less than or equal to the permissible limit for water leaving the system, as specified in NSF/ANSI 42 and 58. -
Page 21: Warranty
Limited Product Warranty Scope Olympia Water Systems, LLC (“Olympia”) expressly warrants to the original purchaser that it’s Reverse Osmosis System and components (the “Product”) will be free of defects in material and workmanship for use under normal care for a period of one (1) year from the date of pur- chase (the “Warranty Period”). - Page 22 Non-Covered Defects This Limited Product Warranty does not cover defects caused by: I. Improper storage, installation, maintenance, handling, use and/or alterations of the Product, including but not limited to non-compliance with the installation, maintenance and standard operation conditions stated in the Instruction and Owner’s Manual. II.
- Page 24 Olympia Water Systems 25 South 51st Avenue Phoenix, AZ 85043 For questions or comments please visit our website at: OlympiaFiltration.com For technical support contact us at: Support@OlympiaFiltration.com 1-800-516-2495...
Need help?
Do you have a question about the OROS-50 and is the answer not in the manual?
Questions and answers
At the bottom of water tank is an air valve,what air pressure is safe to maintain