Table of Contents
Advertisement
8_716_115_495a
9/2/09
11:49
Page 1
INSTRUCTION MANUAL
OPERATING AND INSTALLATION
DT20RF PROGRAMMER
DIGISTAT - Radio frequency controlled room thermostat
with twin channel digital programmer
FOR GREENSTAR CDi, GREENSTAR i JUNIOR AND GREENSTAR Si MODELS
ALSO GREENSTAR i SYSTEM AND GREENSTAR CDi SYSTEM MODEL
(ONLY WHEN USED WITH THE OPTIONAL INTEGRAL DIVERTER VALVE)
UK/IE
Advertisement
Table of Contents

Related Manuals for Worcester DT20RF


Summary of Contents for Worcester DT20RF
- Page 1 11:49 Page 1 INSTRUCTION MANUAL OPERATING AND INSTALLATION DT20RF PROGRAMMER DIGISTAT - Radio frequency controlled room thermostat with twin channel digital programmer FOR GREENSTAR CDi, GREENSTAR i JUNIOR AND GREENSTAR Si MODELS ALSO GREENSTAR i SYSTEM AND GREENSTAR CDi SYSTEM MODEL...
- Page 2 PLEASE READ THESE INSTRUCTIONS CAREFULLY BEFORE STARTING TECHNICAL 08705 266241 THESE INSTRUCTIONS ARE APPLICABLE TO THE WORCESTER BOSCH MODEL(S) STAT- SERVICE 08457 256206 ED ON THE FRONT COVER OF THIS MANUAL ONLY AND MUST NOT BE USED WITH ANY OTHER MAKE OR MODEL...
-
Page 3: Table Of Contents
DT20RF RECEIVER ........10... -
Page 4: Technical Data
8_716_115_495a 9/2/09 11:49 Page 4 TECHNICAL DATA DIGISTAT TRANSMITTER DT20RF RECEIVER ROOM THERMOSTAT Power supply 2xAA 1.5V alkaline batteries 24Vd.c. less than 65mA Radio frequency 433 MHz 433 MHz Radio signal range The range may be affected by the composition / density and number of walls between the Digistat RF and receiver. -
Page 5: Digistat Room Thermostat
OPERATING & INSTALLATION DT20RF PROGRAMMER INSTRUCTION MANUAL INSTRUCTIONS 8 716 115 495a (02.2009) -
Page 6: Advanced Settings
SET button. The Preset mode will be cancelled and the product will return to normal operation and the display will show the current room temperature as shown. OPERATING & INSTALLATION DT20RF PROGRAMMER INSTRUCTION MANUAL INSTRUCTIONS 8 716 115 495a (02.2009) - Page 7 Preset higher than the maximum temperature setting. To return to normal operation, either press the Set button for more than 5 seconds or wait for 1 minute and it will return automatically. OPERATING & INSTALLATION DT20RF PROGRAMMER INSTRUCTION MANUAL INSTRUCTIONS 8 716 115 495a (02.2009)
- Page 8 To return to normal operation, either press the Set button for more than 5 seconds or wait for 1 minute and it will return automatically. OPERATING & INSTALLATION DT20RF PROGRAMMER INSTRUCTION MANUAL INSTRUCTIONS 8 716 115 495a (02.2009)
- Page 9 To return to normal operation, either press the Set button for more than 5 seconds or wait for 1 minute and it will return automatically. OPERATING & INSTALLATION DT20RF PROGRAMMER INSTRUCTION MANUAL INSTRUCTIONS 8 716 115 495a (02.2009)
- Page 10 To return to normal operation, either press the Set button for more than 5 seconds or wait for 1 minute and it will return automatically. OPERATING & INSTALLATION DT20RF PROGRAMMER INSTRUCTION MANUAL INSTRUCTIONS 8 716 115 495a (02.2009)
-
Page 11: Fault Diagnosis/ Battery Replacement
Remove the battery compartment by pinching the tabs and withdrawing down. Replace the spent batteries with 2 x AA 1.5V alkaline batteries ensuring correct orientation. Replace the battery compartment pressing fully home. OPERATING & INSTALLATION DT20RF PROGRAMMER INSTRUCTION MANUAL INSTRUCTIONS 8 716 115 495a (02.2009) -
Page 12: Dt20Rf Receiver
GENERAL INFORMATION DT20RF Receiver Programmer This section also details how to program the DT20RF Receiver for new weekday and weekend The Programmer has factory set programs for times to suit your lifestyle requirements. ON/OFF periods for central heating and hot water pre-heat, which are described on the following How to set the clock, time and date. -
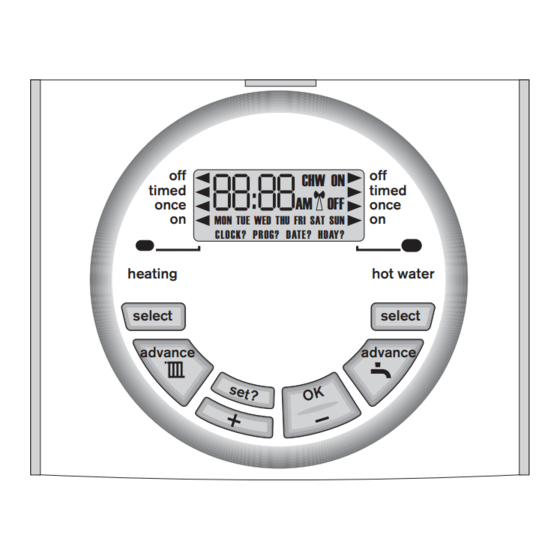
Page 13: Operating Controls
8_716_115_495a 9/2/09 11:49 Page 13 DT20RF RECEIVER OPERATING CONTROLS Central heating: Hot Water: 1. Press select button to 3. Press select button to choose choose off = constantly OFF off = constantly OFF timed = up to 3 ON &... -
Page 14: Pre-Programmed Settings
8_716_115_495a 9/2/09 11:49 Page 14 DT20RF RECEIVER PRE-PROGRAMMED SETTINGS NOTE: The ON/OFF periods pre-programmed for Central Heating and Hot Water pre-heat are shown in the table below. These factory installed settings can be used without any further programming of the receiver. -
Page 15: Programmable Settings
8_716_115_495a 9/2/09 11:49 Page 15 DT20RF RECEIVER PROGRAMMABLE SETTINGS Setting Central Heating (CH) MON - FRI 1. Press set? until SET and PROG? are shown in the display. 2. Press OK to enter program. 3. Press OK to select MON-FRI. - Page 16 8_716_115_495a 9/2/09 11:49 Page 16 DT20RF RECEIVER PROGRAMMABLE SETTINGS Setting individual weekdays: NOTE: If you do not require individual weekday times, then press set? until SET SAT-SUN are displayed and continue on the next page. If you do not wish to change the setting for the day displayed, then press set? until the first day you want to change is displayed.
- Page 17 8_716_115_495a 9/2/09 11:49 Page 17 DT20RF RECEIVER PROGRAMMABLE SETTINGS Setting Central Heating (CH) SAT - SUN: 1. Press OK to select weekend. 2. Press OK to select CH. NOTE: Speed up the display by holding down the + or - buttons.
- Page 18 8_716_115_495a 9/2/09 11:49 Page 18 DT20RF RECEIVER PROGRAMMABLE SETTINGS Setting individual weekend days: NOTE: If you do not require individual weekend day times, then press set? until the normal display is shown. If you do not wish to change the settings for SAT, then press set? to move to SUN.
- Page 19 8_716_115_495a 9/2/09 11:49 Page 19 DT20RF RECEIVER PROGRAMMABLE SETTINGS Setting holidays: 1. Press the set? button until SET and HDAY are displayed. 2. Press OK and the display shows 00. 3. Press + or - to set the number of days you require the system to be off.
- Page 20 8_716_115_495a 9/2/09 11:49 Page 20 DT20RF RECEIVER PROGRAMMABLE SETTINGS Setting the clock and time 1. Press the set? button until SET and CLOCK are shown in the display. 2. Press OK to display 24hr and ON. 3. Press + to switch between 24hr and 12hr display.
- Page 21 8_716_115_495a 9/2/09 11:49 Page 21 DT20RF RECEIVER PROGRAMMABLE SETTINGS Setting the date: 1. Press the set? button until SET and DATE? are displayed. 2. Press the OK button once, the year flashes on the display. 3. Press + or - to set the correct year, e.g. 07.
-
Page 22: Installation
8_716_115_495a 9/2/09 11:49 Page 22 DT20RF RECEIVER INSTALLATION Cover panel DANGER: 230 VOLTS Screw DO NOT TOUCH THE ELECTRICAL COMPONENTS OR CIRCUITS Clips CAUTION: ISOLATE THE MAINS ELECTRICITY SUPPLY BEFORE STARTING ANY WORK OBSERVE ALL RELEVANT SAFETY PRECAUTIONS OBSERVE ELECTRO-STATIC... -
Page 23: Digistat Installation
8_716_115_495a 9/2/09 11:49 Page 23 DIGISTAT DIGISTAT / DT20RF RECEIVER INSTALLATION SETTING UP THE RF LINK Receiver set up: After initial start up, the colon, CH and antenna symbols should be flashing on the display. 1. Press the set? button 4 times 2. - Page 24 8_716_115_495a 9/2/09 11:49 Page 24 DIGISTAT / DT20RF RECEIVER DIGISTAT INSTALLATION SETTING UP THE RF LINK 6. Remove the batteries from the Digistat and wait for the display to fade. 7 Press and hold the ‘SET’ button while re-inserting the batteries and keep the button depressed until the display shows ‘rF’.
-
Page 25: Mounting The Digistat
8_716_115_495a 9/2/09 11:49 Page 25 DIGISTAT DIGISTAT / DT20RF RECEIVER INSTALLATION MOUNTING THE DIGISTAT Positioning the Digistat RF room thermostat The Digistat is a radio frequency device which is very flexible for positioning as there is no need for hard wiring to the appliance. -
Page 26: To Cancel Signal Strength Mode
8_716_115_495a 9/2/09 11:49 Page 26 DIGISTAT / DT20RF RECEIVER DIGISTAT INSTALLATION TO CANCEL SIGNAL STRENGTH MODE To cancel signal strength mode: 1. Remove the batteries from the transmitter to cancel the constant transmission. 2. After a few seconds the receiver display will show ‘---’... -
Page 27: To Check Previously Installed Unit
8_716_115_495a 9/2/09 11:49 Page 27 DIGISTAT DIGISTAT / DT20RF RECEIVER INSTALLATION TO CHECK PREVIOUSLY INSTALLED UNIT To check signal strength on previously installed and paired units : 1. Press the ‘set’ button 4 times. 2. Press ‘OK’ once. 3. Press the ‘set’ button 5 times. The display will show ‘SSI and OFF’. - Page 28 8_716_115_495a 9/2/09 11:49 Page 28 DIGISTAT / DT20RF RECEIVER DIGISTAT INSTALLATION TO CHECK PREVIOUSLY INSTALLED UNIT Transmitter code (may be different) Signal strength indicators LED indicator shows different colour depending on signal strength (see table below) LED Indication Chevrons RF Strength...
- Page 29 8_716_115_495a 9/2/09 11:49 Page 29 DIGISTAT DIGISTAT / DT20RF RECEIVER INSTALLATION NORMAL OPERATION During normal operation The LED on the receiver will flash red, approximately every 5 minutes. This denotes that a radio signal is being received from the transmitter.
-
Page 30: Maintenance
These units can not be serviced. Should the existing units fail to function correctly, check that the: DT20RF Receiver times and program settings are correct. RF signal link is set up (Refer to page 2 for RF signal range details). - Page 31 8_716_115_495a 9/2/09 11:49 Page 31...
- Page 32 01905 752640 WEBSITE: worcester-bosch.co.uk WEBSITE (EIRE): worcester-bosch.ie Worcester, Bosch Group Cotswold Way, Warndon, Worcester WR4 9SW. Tel. 01905 754624 Fax. 01905 754619 worcester-bosch.co.uk Worcester, Bosch Group is a brand name of Bosch Thermotechnology Ltd. 8 716 115 495a (02.2009) 06515058001 ISSB...
Need help?
Do you have a question about the DT20RF and is the answer not in the manual?
Questions and answers