
Related Manuals for Fujiimpulse V-301

Summary of Contents for Fujiimpulse V-301
-
Page 1: Operating Instructions
Printed OCT 2008 1st Edition 1.02E Table top, Nozzle type vacuum sealer V-301 series Operating Instructions http://www.fujiimpulse.co.jp... - Page 2 V-301 series Operating Instructions Ver1.02E When V-301 model is re-packaged We would like to request the following items at re-packaging to transport this machine. 1. Don’t move the machine with the nozzle combined between. 2. At transporting, please fix the machine with packing as following illustration.
- Page 3 Also sufficient cooling time and pressure adjustment produce beautiful sealing performance. As a result of research to further improve the V-301 series, some details in the operating instructions may differ from your actual machine. For operating problems or product information, please contact your local dealer.
-
Page 4: Table Of Contents
Table of contents Specifications ………………………………………………………………………………………… 5 Accessories …………………………………………………………………………………………… 6 Replacement parts …………………………………………………………………………………… 6 Proper operating boundaries for the V-301 series ……………………………………………… 7 Warning - Caution label location and content …………………………………………………… 7 Operating precautions ………………………………………………………………………………… 8 For safety operating ………………………………………………………………………………………………………………………… 8 For smooth operation ………………………………………………………………………………………………………………………... -
Page 5: Specifications
V-301 series Operating Instructions Ver1.02E V-301 series "V-301 series" vacuum sealer is provided with a vacuum pump for reducing the air in the pouch prior to sealing. Set the suitable pressure and heating time according to the material or thickness of film, and take sufficient cooling time to make a beautiful and strength seal without burning or melting of film. -
Page 6: Accessories
1pcs. 1pc. Glass tape 25mm(W) X10M roll 1pcs. Silicone rubber (white) 2pcs. 1pc. (12x310mm) Filter cartridge 3pcs. 2pc. Sarcon sheet 2pcs. 1pc. (13x320mm) Caution V-301 and V-301-10D have different parts. When you order the parts, please specify the model exactly. -
Page 7: Proper Operating Boundaries For The V-301 Series
Film thickness limits for the V-301 and V-301-10D are described below. The machine cannot seal pouches which are thicker than the indicated. The machine may malfunction if you try to exceed the limits of the machine. -
Page 8: Operating Precautions
V-301 series Operating Instructions Ver1.02E 6 Operating precautions For safety operating In an emergency, unplug the power cord Warning immediately This sealer incorporates a number of safety devices and is carefully designed to prevent fires or other malfunctions. However, should all of the safety devices fail simultaneously,... - Page 9 V-301 series Operating Instructions Ver1.02E Do not modify the machine Warning Modification of the sealer or the use of unspecified parts may not only lead to damage of the machine. but there is also a risk of danger to the operator. Please do not tamper with machine.
-
Page 10: For Smooth Operation
V-301 series Operating Instructions Ver1.02E Take care with nozzle Caution After the sealing process, nozzle comes forward automatically. Please take sufficient care not to put hand or face close to nozzle, beside if the sealed pouch is still left on the sealing area, advanced nozzle might hurt the contents. -
Page 11: Other Safeguards
● The Fuji Impulse V-301 series is an impulse sealer Do not become alarmed if the sealing area does not become hot after the power switch is turned to the ON position. The machine has not malfunctioned. -
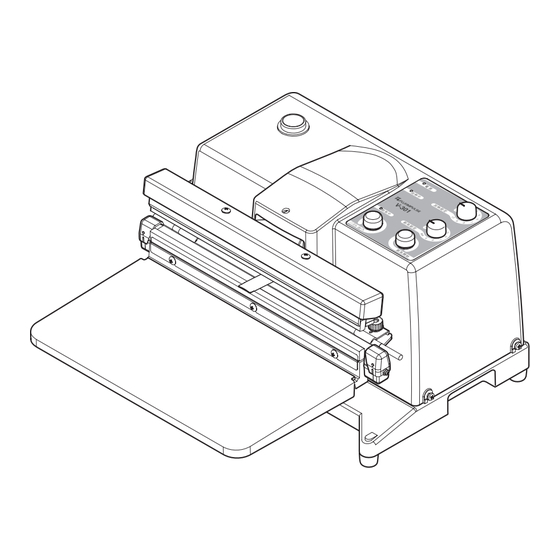
Page 12: Major Parts And Functions
Nozzle IN/OUT button Push to make the nozzle go NOZZLE IN / OUT NOZZLE IN / OUT VACUUM START VACUUM START forward or back, V-301-10D has same structure. Details are shown in the exploded view and parts list from page 31. -
Page 13: Proper Use Of The Sealer
V-301 series Operating Instructions Ver1.02E 8 Proper use of the sealer Use only as described in this manual. There is a risk of danger and malfunctions may result if the machine is used not in accordance with this manual. 8-1 Set up the machine Set the machine on a stable place which has a horizontal surface. -
Page 14: Adjust The Sealing Conditions
V-301 series Operating Instructions Ver1.02E 8-5 Adjust the sealing conditions Heating time and vacuum time can be adjusted by the knob on the control panel. Set the proper time by material, thickness and size of each pouch (film). �Adjust the heating time Turn the heating timer dial. -
Page 15: Set The Pouch
V-301 series Operating Instructions Ver1.02E 8-7 Set the pouch Hold the pouch with both hands at the seal position. Move your hands inward to allow enough of an opening for easy nozzle insertion. Insert nozzle. Move your hands outward, stretching the pouch to minimize wrinkles. -
Page 16: Press The Table Further Down
In V-301 series, after the heating lamp goes out, keeping – cooling process for 2 〜 3 seconds is necessary to produce good sealing performance. -
Page 17: Turn Off The Power Switch
V-301 series Operating Instructions Ver1.02E 8-13 Turn off the power switch Power switch Turn off the power switch once the sealing Push operation is complete. Pull out the power cord plug from the outlet if you do not intend to use the machine for an extend period of time. -
Page 18: When Air Flushing Is Desired
V-301 series Operating Instructions Ver1.02E 10 When air flushing is desired V-301 series sealer does not only remove the air, but can flush it as well. It is as simple as reversing the air hose lines on the vacuum pump. -
Page 19: Replacing He Routine Maintenance Parts
V-301 series Operating Instructions Ver1.02E 12 Replacing he routine maintenance parts Replace parts according the following directions in order to maintain your machine in optimum operating condition. Do not replace parts according to other methods not described in the operating instructions. -
Page 20: Slide The Teflon Sheet
V-301 series Operating Instructions Ver1.02E 12-1 Slide the teflon sheet [Essential tools] Scissors, Phillips screwdriver [Replace when] Teflon sheet is torn, burnt or sealing is dirty. Teflon sheet is sold by themselves or as a part of the replacement parts kit. - Page 21 V-301 series Operating Instructions Ver1.02E Teflon sheet ● Lower section (for V-301, V-301-10D) Heating element 1 Remove the teflon sheet. (Refer to " Slide the teflon sheet" in page 20.) Loosen the screw A on the right and left electrodes and remove the terminal cover.
-
Page 22: Change The Glass Tape, Sarcon Sheet
V-301 series Operating Instructions Ver1.02E 12-3 Change the glass tape, sarcon sheet about 2mm about 2mm [Essential tools] Scissors, Phillips screwdriver [Replace when] Heating element has burnt out, length of Sealing is dirty, etc. sealing section Sarcon sheet Electrode Glass tape and sarcon sheet are sold by themselves or as a part of the replacement parts kit. -
Page 23: Clean The Filter And Replace The Cartridge
V-301 series Operating Instructions Ver1.02E 12-5 Clean the filter and replace the cartridge [Essential tools] If filter case is tight, use monkey wrench or pliers [Replace when] Vacuum power is lessened, Vacuum operation cannot be done, Filter cartridge is clogged up heavily. -
Page 24: Replace The Nozzle
V-301 series Operating Instructions Ver1.02E 12-6 Replace the nozzle [Essential tools] Phillips screwdriver, Hexagonal wrench (3mm) [Replace when] Vacuum power is weaken or vacuum function does not work. Nozzle is clogged up. In the case of severe blockage, remove and clean the nozzle as shown below. -
Page 25: Clean Or Replace The Nozzle Coupler
V-301 series Operating Instructions Ver1.02E 12-7 Clean or replace the nozzle coupler [Essential tools] Philips screwdriver, Hexagonal wrench (3mm) [Replace when] Vacuum power is weaken or vacuum function doas not work. Cap bolt Nozzle coupler is clogged. Please clean or replace the nozzle copuler... -
Page 26: Adjust The Sealing Pressure
V-301 series Operating Instructions Ver1.02E 13 Adjust the sealing pressure The proper sealing pressure is different depending on the type of film used. When the first use or sealing condition is not good after changing the film, adjust the sealing pressure. -
Page 27: Electric Diagram
V-301 series Operating Instructions Ver1.02E 14 Electric diagram Source Black Grey Black Orange AC110V Motor Black Fuse Blue Grey AC200V AC220V Power Transformer Micro switch Vacuum pump Black Power switch Heating Yellow Black Black Black Triac V-301 Control Unit White... -
Page 28: Common Problems And Solutions
V-301 series Operating Instructions Ver1.02E 15 Common problems and solutions If you are experiencing problems with the machine, please refer to the chart below. Carefully follow the directions in the operating instructions when replacing parts. Please consult with your dealer or Fuji Impulse if the problem cannot be resolved after referring to the chart. - Page 29 V-301 series Operating Instructions Ver1.02E Vacuum difficulties Problems Check Solutions Clean nozzle and tube. (Ref. P24, Vacuum nozzle or tube clogged. Clean filter cartridge after Filter cartridge clogged. removing cartridge case. Or replace filter cartridge. Pull both sides of the pouch tight,...
- Page 30 V-301 series Operating Instructions Ver1.02E...
- Page 31 V-301 series Operating Instructions Ver1.02E Exploded view / Parts list When ordering spare parts, please consult the exploded view diagram / spare parts list on the following pages and provide both the part name and code number to your local dealer.
- Page 32 V-301 Exploded view A Type 68-a 65-a 65-b 68-b 62-a 62-b 65-c...
- Page 33 ● Please indicate the part name and number as listed below when placing your order. ● Please designate model name and voltage when there is no code number. ● # mark indicates common parts in V-301 series Parts No. Code No.
- Page 34 V-301-10D Exploded view A Type 68-a 68-a 65-a 65-b 68-b 62-a 62-b 65-c...
- Page 35 ● Please indicate the part name and number as listed below when placing your order. ● Please designate model name and voltage when there is no code number. ● # mark indicates common parts in V-301 series Parts No. Code No.
- Page 36 Y6054 OCT 2008 1st Edition V-301series Operating instructions 1.02E...
Need help?
Do you have a question about the V-301 and is the answer not in the manual?
Questions and answers