Table of Contents
Advertisement
Available languages
Available languages
EL-C5.2
EL-C6.2
Bitte vor Beginn der Arbeiten Einbauanleitung sorgfältig lesen!
rainbow audio GmbH Kreuzenstrasse 94 D-74076 Heilbronn
Einbauanleitung für
Komponentensysteme
Experience Line
2-Wege-Komponentensystem
2-Wege-Komponentensystem
Phone +49 7131 / 3958 180 - Fax +49 7131 / 3958 182
info@rainbow-audio.de
http://www.rainbow-audio.de
Art.-Nr. RAC231208
120 Watt
Art.-Nr. RAC231212
150 Watt
Advertisement
Chapters
Table of Contents

Summary of Contents for Rainbow EL-C5.2
- Page 1 2-Wege-Komponentensystem 120 Watt EL-C5.2 Art.-Nr. RAC231212 2-Wege-Komponentensystem 150 Watt EL-C6.2 Bitte vor Beginn der Arbeiten Einbauanleitung sorgfältig lesen! rainbow audio GmbH Kreuzenstrasse 94 D-74076 Heilbronn Phone +49 7131 / 3958 180 - Fax +49 7131 / 3958 182 info@rainbow-audio.de http://www.rainbow-audio.de...
- Page 2 Hörschaden: Anhaltende, übermäßige Lautstärken von über 85 dB können das Hörvermögen auf die Dauer beeinträchtigen. Rainbow® Verstärker sind imstande, auch Lautstärken über 85 dB zu produzieren. Lautstärke und Fahrerbewußtsein: Der Gebrauch von Musikanlagen kann das Hören von wichtigen Verkehrsgeräuschen behindern und dadurch während der Fahrt Gefahren auslösen.
-
Page 3: Table Of Contents
Bitte überprüfen Sie anhand der Aufstellungen (Seite 4) die Vollständigkeit des Komponentensystems unter Beachtung auf etwaige Fehlmenge und Beschädigung, welche Sie baldmöglichst Ihrem Fachhändler mitteilen sollten. Dieser wird Ihnen umgehend Ersatz leisten bzw. weiterhelfen. Mit freundlichem Gruß Ihr Rainbow-Team... -
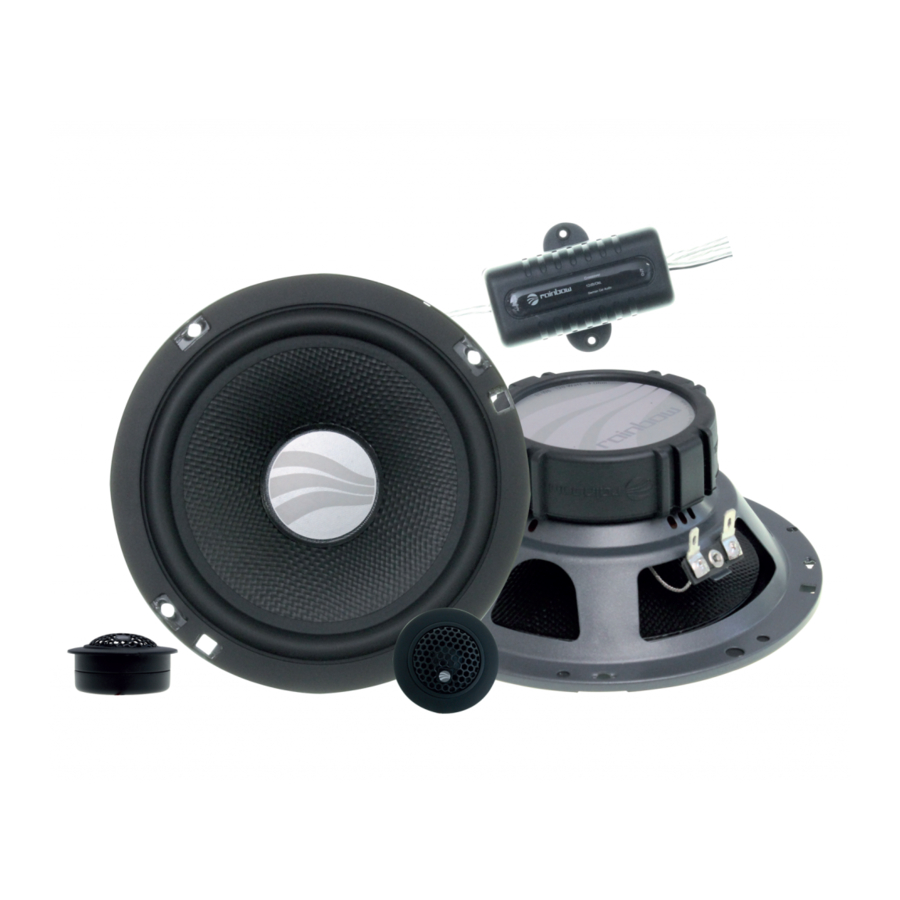
Page 4: Inhalt Und Teilebezeichnung (El-Cxx)
Gründen sind Lautsprecher beigelegten Blechgewindeschrauben zu befestigen. Bei anderen Befestigungsarten übernehmen wir keine Haftung. Inhalt und Teilebezeichnung EL-C5.2 / EL-C6.2 Befestigungsmaterial für Tieftöner: 130 / 165 mm ∅ 2 Stück Tieftöner 8 Stück Blechschrauben 3,9 x 32 DIN 7981 schwarz verzinkt 8 Stück... -
Page 5: Technische Daten (El-Cxx)
24 / 39 24 / 39 = mit Einbautopf Passende Einbau-Lautsprecherringe: RAC161066 Grill & Ring Satz 130mm für EL-C5.2 RAC161067 Grill & Ring Satz 165mm für EL-C6.2 Hinweis: Die High Power Lautsprecherausgänge der gängigen Autoradios werden mit hohen Watt-Leistungen beworben. -
Page 6: Positionierung Der Lautsprecher
Positionierung der Lautsprecher In Fahrzeugen bieten sich verschiedene Einbaupositionen für Rainbow Lautsprecher an. Bei der Auswahl des Einbauortes sollten die folgenden Hinweise beachtet werden: Tieftöner benötigen für die Wiedergabe ein großes Volumen. Die Türen mit großem Luftpolster zwischen Türverkleidung und Außenblech oder die Heckablage mit großvolumigem Kofferraum bieten den idealen Einbauort. - Page 7 Türeinbau: Um ein gutes Frontstaging zu erhalten, dürfen die Hochtöner nicht zu tief im Türraum platziert werden. Sie sollten etwa in Schulterhöhe und weit vorne, Richtung Armaturenbrett, installiert werden. Geeignete Einbaupositionen sind hierfür das Spiegeldreieck und die obere Türverkleidung. Das Aufsetzen der Hochtöner auf schräge Distanzringe (etwa 20°) kann klangliche Vorteile bringen, wenn dabei die Anordnung so erfolgt, dass der linke Hochtöner die rechte Türe bzw.
-
Page 8: Einbau Und Befestigung Der Tieftöner (El-Wxx)
Einbau und Befestigung der Tieftöner Achtung: Nicht in die Membrane fassen bzw. die Membrane eindrücken. Membrane nicht mit Schraubendreher oder anderen spitzen Gegenständen verletzen. • Nach Auswahl des Einbauortes Einbauring (C) am vorgesehenen Platz, z.B. mit doppelseitigem Klebeband, fixieren und die benötigten Bohrungen und den Ausschnitt für den Tieftöner (innerer Kreis des Einbaurings) anreißen. -
Page 9: Einbau Und Befestigung Der Hochtöner (El-Txx)
Einbau und Befestigung der Hochtöner Einbauart: Türeinbau vorne / hinten, Fondeinbau, Spiegeldreieck-, Armaturenbrett- und Heckablageneinbau Aufbaumontage: Bild 3 • Unterteil/Bodenplatte (U) am ausgewählten Einbauort aufstellen, Kabeldurchführung und Befestigungsbohrungen markieren. Bohrung Ø 3,5 mm für Befestigung und Ø 5 mm für Kabeldurchführung bohren. •... - Page 10 Flachbündige Montage: Bild 4 • Flachmontagering (L) am ausgewählten Einbauort aufsetzen und am unteren Durchmesser (X) anzeichnen • Hochtöner (J) auf Unterteil/Bodenplatte (U) einsetzen; Flachmontage-Ring (L) über Hochtöner stülpen und durch Drehen einrasten. • Kompletter Hochtöner in Ausschnitt einsetzen und mit Klammerring (M) von der Rückseite montieren.
- Page 11 Anschluss der Frequenzweiche an Autoradio oder den Verstärker Das Lautsprecherkabel, je Kanal (Links/Rechts) von der Kabelweiche (W) nach Bild 6 zum Radio- oder Verstärkerausgang verlegen und unter Beachtung der Polarität anschließen. Lautsprecherkabel vom Hochtöner zur Frequenzweiche (W) verlegen und Minus-Anschluss des Hochtöners (TW-) mit Kabel (TW-) der Frequenzweiche (W) verbinden.
-
Page 12: Wartung Und Pflege
Bild 6: Anschluss der Lautsprecher an Kabelweiche (W) Wartung und Pflege Die Komponenten sollten in regelmäßigen Abständen von Schmutz gesäubert werden, da die im Fahrzeug herrschenden Bedingungen die Komponenten sehr schnell verschmutzen lassen und es zu negativen Auswirkungen auf das Material kommen kann. Verwenden Sie hierzu ein weiches, leicht angefeuchtetes Tuch, danach mit einem sauberen, trockenem Tuch nachreiben. -
Page 13: Garantiebedingungen
Garantiebedingungen Rainbow audio GmbH übernimmt für die Produkte eine mindestens 2-jährige Garantie oder die gesetzlich vorgeschriebene Garantielaufzeit auf einwandfreie Funktion aller Teile. Die Garantie beginnt mit dem Erwerb des Produktes beim autorisierten Fachhandel und steht nur dem unmittelbaren Erstkäufer zu und ist nicht übertragbar. - Page 14 EL-C5.2 2-Way Component System 150 Watt Part-No. RAC231212 EL-C6.2 Please read installation manual carefully before beginning installation! rainbow audio GmbH Kreuzenstrasse 94 74076 Heilbronn Germany Phone +49 7131 / 3958 180 - Fax +49 7131 / 3958 182 info@rainbow-audio.de http://www.rainbow-audio.de...
-
Page 15: Important Safety Instructions
Use of sound components can impair your ability to hear necessary traffic sounds and may constitute a hazard while driving your automobile. Rainbow® accepts no liability for hearing loss, bodily injury or property damage as a result of use or misuse of this product. - Page 16 We congratulate you on your purchase of our superior product and thank you for placing your trust in Rainbow®. We have put together this installation manual with great consideration of different mechanical and acoustical auto features. Nevertheless, mistakes can happen. We would greatly appreciate your bringing any mistakes you come across to our attention.
-
Page 17: Contents
For the purpose of technical safety, the loudspeaker should only be attached with the included self- tapping screws. We accept no liability for use of alternative methods of attachment. Contents and Detail of Parts EL-C5.2 / EL-C6.2 Fastening for Woofer: woofer 130 / 165 mm ∅... -
Page 18: Technical Data
24 / 39 = with flush-mount Matching Loudspeaker Mounting Rings: RAC161066 Grille & Ring Set 130mm / 5.25” for EL-C5.2 RAC161067 Grille & Ring Set 165mm / 6.5” for EL-C6.2 Advice: The high power loudspeaker outputs of popular headunits will be advertised with high wattage. These power ratings are marketing figures normally. -
Page 19: Positioning The Loudspeaker
Positioning the Loudspeaker Rainbow loudspeakers may be installed in your vehicle in a variety of places. In determining the installation location the following information should be considered: Woofers require a large area for optimum sound reproduction. Car doors with a large air cushion between the door lining and external metal or the rear windshield deck of an auto with a large trunk are ideal locations. - Page 20 When possible, the woofers should be placed in the bottom area of the door lining. The distance between tweeters, midrange, and woofers should be kept as small as possible, to prevent the sound of the loudspeakers from being negatively impacted. (fig. 1). In order to achieve optimal woofer performance, i.e., kickbass, the total door space must be used.
-
Page 21: Installing And Attaching The Woofer
Installing and Attaching the Woofer Note: Do not attach via or puncture the membrane. Do not damage the membrane with a screwdriver or other sharp tool. • After selecting the installation location, attach the installation ring (C) at the designated location, e.g. with double-sided tape, and mark the necessary drill holes and the space for the woofer (inner circle of the installation ring). -
Page 22: Installing And Attaching The Tweeter
Installing and Attaching the Tweeter Installation Location: Door Installation (front/rear), rear installation, side view mirror area installation, dashboard installation, and rear windshield deck installation Surface installation: Fig. 3 • Place the ground plate (U) on the installation place. Scribe the holes for mounting 2 x Ø 3,5 mm and for the cable Ø... -
Page 23: Flush Mount Installation Figure
Flush mount installation: Fig. 4 • Place the flush mount cup (L) on the installation place. Scribe and cut-out mounting hole. • Place tweeter (J) on ground plate (U), pull cables through the appropriate holes and put flush mount ring (L) over the tweeter and fix it by twisting. •... -
Page 24: Connecting The Crossover
Connecting the Crossover to headunit or amplifier Run loudspeaker cable per each channel (left/right) from cable crossover (W) “Amp Input” to the head unit / amplifier output according to fig.6 making sure the polarity corresponds with that on the head unit / amplifier side. -
Page 25: Maintenance
Fig. 6: Diagram of Connections and Cable Preparation (W) Maintenance The components should be cleaned at regular intervals as the conditions in motor vehicles rapidly cause soiling and a deterioration of the material. Use a soft, moist cloth and wipe dry. Do not use any solvents or organic detergents. -
Page 26: Warranty
Version: RHSJ / 1.0 – 03/12 Article Nr.: RAC901148 This document is protected by copyright. Any duplication, including printing, in whole or part, and all reproductions of diagrams, also in a modified version, is permissible only with the written permission of rainbow audio GmbH, Germany.
Need help?
Do you have a question about the EL-C5.2 and is the answer not in the manual?
Questions and answers