Advertisement
Quick Links
Integrated Access
Control System
User Manual
D00RBELL
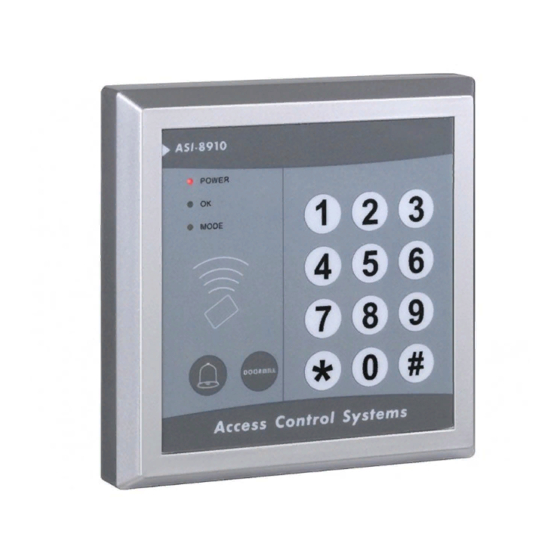
ASI-8910
Read the manual before usage and keep for
future reference.
http://www.ansoncorp.com
3. Ensure power cable is ready before put
the system on, screw bolt from bottom
Finish the procedures in 5.1 → Dial "2" → input
the 3-digit number of the card (for example,
033, 256 etc.) → read the card → dial "#" again
5.4.2 Adding multiple cards
Finish the procedures in 5.1 → Dial"2" → input
the 3-digit number of the first card → read the
second card (for example, read 10 cards at
one time) → dial "#" again (one 3-digit number
corresponds to one card. In case of adding
multiple cards, the 3-digit number for the se-
cond card will add 1 automatically, the number
ranges from 000-799 )
5.5 Deletion of card(after finish the procedures in
5.1Dial)
5.5.1 Delete all cards: Dial "3" → input 0000 →
dial "#"
5.5.2 Delete the cards read: Dial "3" → read the
card → dial "#"
5.5.3 Delete lost card: Dial "3" → input the num-
ber of the lost card → dial "#"
5.6 Door-open mode setup(after finish the proce-
dures in 5.1)
5.6.1 Open with card: Dial 400 → dial "#"
5.6.2 Open with card and password: Dial 401 →
dial "#"
1. Product Features
1.1 Independent and concise, configurable by the
panel without connecting to computer
1.2 Three modes of access: Card alone, Card plus
Password and Password alone.
1.3 Facilitated with a capacity of 800 cards with
one password.
1.4 Supportive for disassemble-preventative alarm.
1.5 Exit button input and door bell input.
1.6 All data can be kept for 10 years with power off.
1.7 Input with wave absorption function.
1.8 Supportive for electronic locks working in
power-on mode or power-off mode.
1.9 Product Size: L×W×H (mm): 117×117×21.
2. Electric Parameters
Working Voltage:DC9-15V
Static Current:≤70mA
Lock Current:≤3000mA
Reader Distance:5-15 cm
Type of Card:EM card or compatiable EM Card
Working Temperature:-10℃ to 50℃
Relative Humidity:10%-90%
4. Wiring Diagram
AC 220V 50Hz
AC220V
Controller Power
Note:
Disconnect all
powers before
wiring, the po-
wer can be swi-
tched on with
all components
③
③
②
②
①
①
are connected
+B
-B +12V GND +12 GND
correctly.
5.6.3 Open with card or password: Dial 402 →
dial "#"
Default is 402: open with card or password
5.7 Door-open time setup
Finish the procedures in 5.1 → Dial "5" → dial
a 2-digit number (00-99) → dial "#".
The default door-open time is 3 seconds.
5.8 anti-disassemble alarm setup
Finish the procedures in 5.1 → Dial 600 → dial
"#" close anti-disassemble alarm output, dial
601 → dial "#" permit anti-disassemble alarm.
Default setup forbid the anti-disassemble alarm.
5.9 Reset administrator password
In case the newly assigned administrator pass-
word is lost, the following procedures can be
carried out to recover the default password
from factory(i.e. 123456)
5.9.1 Switch off the power and uninstall the device
5.9.2 Switch on the power again and connect No.1
and No.4 finger On Jp2 which is located on the
back circuit board of the device(Please note
only connect No.1 and No.4, Not No.1, No.2,
No.3 and No.4). Jp2 locate at the bottom of the
circuit board and can be seen and operated
without opening the back cover.
3. Installation Procedures
1. Disassemble the back cover
Uncover the
back from
bottom
Back of Controller
GND +12V COM NO
NC
GND SW
BELL
Exit Button
EM Lock
V+
V-
NO
COM
NC
Special Note:
1. The interval of each operation is 15s while the in-
terval of each key-push is 3s.
2. Password consists of numbers from 0 to 9.
3. Each operation should be ended by "#".
6. Instruction for LED Lights
Red
Green Orange
Type of Alarm
POWER
OK
MODE
Normal Mode
On
Off
Configuration Mode
Off
Off
Valid Card/Password
Off
On
Invalid Card
On
Off
Invalid Password
On
Off
Press Exit Button
Off
On
Correct Input
Off
Off
Incorrect Input
On
Off
Disassemble Alarm
On
Off
7. Instruction for Buzzer
Type of Occasion
Mode of Buzzer
Normal Mode
No buzzing
Entering Configuration Mode
Long buzzing once
2. Put the back cover agianst wall and
screw tight the bolts
5. Configuration
The default administrator password is 123456,
defualt user password is 8888.
5.1 Entering configuration
Dial "*" and input administrator password then
dial "#" key. If the password is correct, the
buzzer will innitiate one long buzz and the
POWER light will be off while the MODE light
on. The buzzer will buzz twice shortly and the
system will exit Editing Mode if the password
is inccorrect.
5.2 Change administrator password
In the Editing Mode(after finish the procedures
in 5.1), Dial "0" → input a new 6-digit adminis-
→
trator password
Dial "#"
password Dial "#" again. If the passwords in-
put are inconsistent, the buzzer will innitiate
two short buzzing and exit the Editing Mode.
5.3 Change user password
Finish the procedures in 5.1 →
put a 4-digit new password
→
put the new password
5.4 Adding card information
5.4.1 Adding a single card
Valid Card/Password Input
Invalid Card Input
Invalid Password Input
Press Exit Button
Correct Input
Incorrect Input
Anti-disassemble Alarm
Card Overflow
Deleted or Invalid Card
Off
On
Off
Off
Off
Off
On
Off
Off
Sustained Effort for the Better
→
reinput the new
→
Dial "1"
in-
→
→
Dial "#"
rein-
Dial "#" again.
Long buzzing once
Short buzzing twice
Short buzzing twice
Long buzzing once
Long buzzing once
Short buzzing twice
Continuous buzzing
Short buzzing twice
Short buzzing twice
Buzzer
Anti-dis-
assemble
Button
Advertisement

Need help?
Do you have a question about the ASI-8910 and is the answer not in the manual?
Questions and answers