Quidel Sofia User Manual
Hide thumbs
Also See for Sofia:
- Quick start manual (6 pages) ,
- User manual (58 pages) ,
- Quick start manual (6 pages)
Table of Contents
Advertisement
Advertisement
Table of Contents

Related Manuals for Quidel Sofia


Summary of Contents for Quidel Sofia
- Page 1 User Manual Page 0 of 57...
-
Page 2: Table Of Contents
Set Default Mode and Print Options ..................22 Set Entry Requirement and Timeout ..................23 Set Calibration and QC ....................... 24 Set User Access Rights ....................... 24 General Sofia Settings ........................24 Set Location Name ........................24 Set Language and Sound ......................25 Set Date............................25 Set Time ............................. - Page 3 LIS Parameters and Settings ...................... 41 Send Results to LIS ......................... 42 Surveillance Mode ......................... 42 Sofia and Virena Router Connection Installation ..............43 Set Network Configuration ......................43 Surveillance Mode Set Up ......................43 Virena Router Connection Verification..................44 Performing Tests in Surveillance Mode ..................
- Page 4 Maintenance ..........................47 Battery Power ..........................47 Cleaning ............................. 48 Appendices ............................51 Appendix A Technical Specifications ..................... 51 Sofia ............................51 Barcode Scanner ........................51 Appendix B System Troubleshooting ..................... 52 Error Messages .......................... 53 Index ..............................55 Page 3 of 57...
-
Page 5: General Information
General Information Quidel Contact Information Contact Quidel Technical Support from 7:00 a.m. to 5:00 p.m. PST. Tel: 800.874.1517 (in the U.S.); 858.552.1100 (outside the U.S.); Fax: 858.552.7905 E-mail: technicalsupport@quidel.com or contact your local distributor Website: quidel.com Page 4 of 57... -
Page 6: Main Menu Structure - V.2.0 Or Higher
Main Menu Structure – v.2.0 or higher Page 5 of 57... -
Page 7: Supervisor Menu Structure - V.2.0 Or Higher
Supervisor Menu Structure – v.2.0 or higher Page 6 of 57... -
Page 8: Main Menu Structure - Previous To V.2.0
Main Menu Structure – previous to v.2.0 Page 7 of 57... -
Page 9: Supervisor Menu Structure - Previous To V.2.0
Supervisor Menu Structure – previous to v.2.0 Page 8 of 57... -
Page 10: Labels And Symbols
Labels and Symbols Label Description Manufacturer In vitro diagnostic medical device Prescription use only Consult instructions for use Authorized representative in the European Community Temperature limitation Directive 2002/06/EC on waste electrical and electronic equipment (WEEE) SD Card Serial Number Catalog Number Symbol Description Warning! -
Page 11: Brief Warnings, Precautions And Limitations
Sofia is designed to provide safe and reliable operation when used according to this User Manual. If Sofia is used in a manner not specified in the User Manual, the protection provided by the equipment may be impaired. All warnings and precautions should be followed in order to avoid unsafe actions that could potentially result in personal injury or damage to the device. - Page 12 Sofia. See page 4 for additional contact information. Clean Sofia per the Maintenance and Cleaning section of this User Manual prior to return or disposal. Note: Always dispose of Sofia and accessories in accordance with Federal, State and Local requirements.
-
Page 13: Introduction
Refer to assay-specific Package Insert for details on specific tests. Product Description Sofia uses a fluorescent tag that is illuminated by an Ultraviolet (UV) light source to generate specific results. In each test, an internal procedural control line is also scanned. -
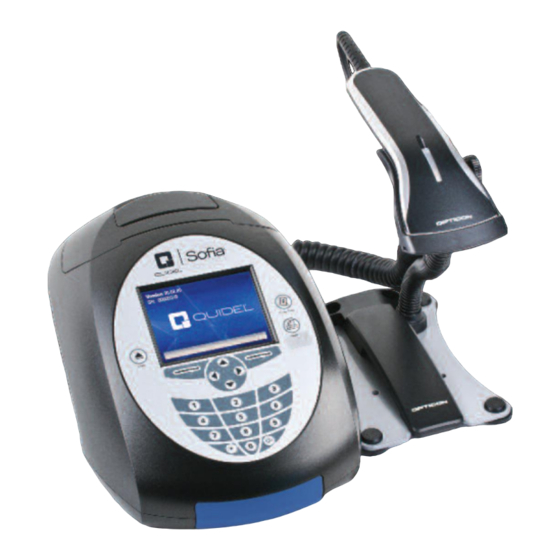
Page 14: System Components
The User dispenses the patient sample into the Cassette. The User then manually times the development period outside of Sofia. This can be done on the counter or bench top using a timer. Refer to the assay-specific Package Insert for the required development time. -
Page 15: Installation Pack
Sofia consumable test kits, including Test Cassettes and External Quality Control materials, are shipped separately. Consult your Quidel representative for a listing of approved Sofia assays. *Language Files (Yellow) may not be provided in the Installation Pack. If needed, contact Quidel Technical Support. User Types Users/Operators without Supervisor authorization have access to the following functions: ... -
Page 16: System Display And Keypad
System Display and Keypad System Display The Sofia contains a 3.5 inch diagonal color LCD display for interacting with the user interface. System Keypad The User Interface includes a numeric keypad and other function specific buttons (Table 1 and Figure 1). -
Page 17: System User Interface
Figure 1 System User Interface Screen Icon Description Indicates Sofia is in the WALK AWAY Mode. There is an SD Card inserted in the slot. Indicates Sofia is in the READ NOW Mode. Indicates the Supervisor is currently logged into Sofia. -
Page 18: Installation, Setup And Operation
Sofia drawer and access the connection ports on the back of the unit. Plug the DC power cord into the power port in the back of Sofia. Plug the country specific AC adapter power cord into the DC power cord and an available electrical outlet. -
Page 19: Loading Paper
Load paper into the integrated printer of Sofia (Figure 4). Lift black handle to remove paper cover. Place paper roll in Sofia with the paper tail coming from under the roll towards the operator. Holding the paper tail towards the operator, replace the paper cover and snap in place. -
Page 20: Power Up
Power Up Turn Sofia on using the power switch located on the rear panel (Figure 5). Hold the toggle switch down for 1-2 seconds until the screen illuminates. Figure 5 Sofia will display the Power On progress screen and complete a Power On Self-Test. The Barcode Scanner will chirp upon powering up. -
Page 21: Cassette Drawers
Figure 8 Cassette Drawers Sofia has three cassette drawers available for testing the different assays. Below are the three versions of cassette drawers and compatible cassette designs provided to Sofia users (Figure 9). For more information, please contact Quidel Technical Support at 800.874.1517 (in the U.S.). See page 4 for additional contact information. - Page 22 Navigating the Menu Settings Use the Up/Down arrows in the circle just below the screen to highlight the desired options on the menu (Figure 10). Use the keys to the right and left of the circle just below the screen for SELECT, BACK, OK, CANCEL and MAIN MENU options.
-
Page 23: System Settings
Sofia. Entry to the SETTINGS menu is accomplished by logging in as the Supervisor. Sofia comes from the manufacturer with a default Supervisor login ID which should be changed when Sofia is initially installed at the customer site. -
Page 24: Set Entry Requirement And Timeout
Using the Up/Down arrows, select Idle ID TIMEOUT. With the keypad, enter the number of minutes for the timeout from 1-20. Press OK to confirm when changes are completed. Note: If multiple users will be sharing frequent use for Sofia testing, a shorter idle time is recommended. -
Page 25: Set Calibration And Qc
Using the keypad, enter the number of days for the reminder interval from 2-30 days. Once employed, Sofia will provide an on-screen reminder to run calibration. IMPORTANT: Once the reminder has popped up, no tests can be run until calibration has been successfully completed. -
Page 26: Set Language And Sound
Down arrow to select SET SOUND. Set Sound Setting the sound of Sofia will allow the Supervisor to turn ON or OFF the beep sound when the keypad is pressed. Using the Left/Right arrows, select ON or OFF. Press OK to confirm and return to the General Settings Menu. -
Page 27: Set Time
Choose Load Test Types from SD Card to load new Sofia test type files. Insert the SD Card with the test type files (blue) to be installed and select OK. Sofia will load the test types that are on the SD Card if they are not already in Sofia. -
Page 28: Test Cloud Connection
Then press OK; Sofia is now connected to the Cloud. If Cloud Connection is not established, screen displays “The Analyzer cannot be connected to Cloud.” Review Sofia and Virena Router Connection Installation and Set Network Configuration sections to confirm all settings and connections. -
Page 29: Edit User
Press the Save & Next button when both fields are complete. Using the Left/Right/Up/Down arrows, select a letter at a time and press OK to construct the name (Figure 12). Figure 12 To delete a letter, press the BACKSPACE button on the keypad. -
Page 30: Review Data
Press CANCEL to return to the Supervisor Menu. Note: Maximum number of users is 400. Review Data Review Patient Results Patient Results include the records for previously run patient tests. The results can be searched to locate specific results, and Operators will only have access if the Supervisor has enabled the Access Patient Data function. -
Page 31: Review Calibration Results
Patient Test Results. Select the BACK button to return to the Review Data screen. Review Calibration Results Sofia Calibration Results include the records for previously run Calibration tests. A list of the calibrations performed will be displayed. Select the BACK button to return to the Review Data screen. -
Page 32: View Analyzer Info
Note: Both User History and the Message Log can be printed using the Print button. Load/Save Save Settings to SD Card To save the settings of one Sofia onto another Sofia you may clone the settings of the first and duplicate onto additional Sofia. Select Save Settings to SD Card from the Load/Save menu. -
Page 33: Load Settings From Sd Card
Test records may be exported to a desktop computer for back up or analysis. If a blank SD Card is inserted prior to Sofia use, then three “csv” files will be created, one each for patient, QC and calibration. Each time a patient, QC or calibration cassette is run, the result will be appended to the appropriate file on the SD card. -
Page 34: Load Firmware From Sd Card
Insert SD Card with the firmware to install. Choose Load Firmware from SD Card to load new Sofia firmware. Sofia reads the new firmware version on the SD Card that is being installed and displays a Load Analyzer Firmware confirmation screen. -
Page 35: Load Language File From Sd Card
If Cloud Connection is established, screen displays “The Analyzer can be connected to Cloud.” Then press OK to return to the Main Menu; Sofia is now connected to the Cloud. If Cloud Connection is not established, screen displays “The Analyzer cannot be connected to Cloud.”... -
Page 36: Perform Sofia Calibration Check
Perform Sofia Calibration Check Use the specific Calibration Cassette included with Sofia for the Calibration Check. Following the prompts, insert the Calibration Cassette into Sofia and gently close the drawer. Sofia will perform the Calibration Check automatically. The Calibration Cassette will automatically eject when calibration is complete. -
Page 37: Qc Results
Select OK to complete the QC process and return to the Main Menu. If the QC controls do not pass, repeat the external control testing process or contact the Supervisor or Quidel Technical Support at 800.874.1517 (in the U.S.) for assistance before testing patient specimens. See page 4 for additional contact information. -
Page 38: Change Development Mode
Depending on the assay, Sofia may automatically run the test in Forced WALK AWAY mode. In this case, no changes need to be made to the work mode. Change Development Mode Select the desired development mode by using the Up/Down arrows. Then select OK to confirm. -
Page 39: Enter The Order #, If Applicable
Use the arrows to highlight the Order # field on the Start Test Screen. Use the barcode scanner to scan an order number barcode from a patient test requisition or other source or manually enter the data by selecting the alpha entry α option and using the numeric key pad on Sofia. Test Procedure In the WALK AWAY development mode, proceed directly to the next steps as soon as the patient specimen has been processed and added into the Test Cassette. -
Page 40: Network Configuration
Refer to the assay-specific Package Insert for details on how to interpret results for specific tests. Note: Once results have been generated for an individual Test Cassette, Sofia will no longer accept that Cassette a second time. If the procedural control is “Invalid,” repeat the test with a new patient sample and a new Cassette. -
Page 41: Update Settings
Update Settings In order to download Test Type Files, Language Files or Firmware via the Cloud, Sofia must be set up to a specific IP Address and Port Number. Sofia’s default IP Address and Port Number (Figure 17) are set up to be compatible with the Virena Router when the Router is wired directly to Sofia. -
Page 42: Laboratory Information System (Lis)
Laboratory Information System (LIS) LIS Parameters and Settings Select Set LIS Parameters, use the numeric keypad to enter the LIS Address in the form. Use the Up/Down arrows to select Port Number, then use the numeric keypad to enter number. For the Auto Send and Queue Results options, use the Left/Right/Up/Down arrows to select Off or On option. -
Page 43: Send Results To Lis
If data was sent successfully, the screen will display Data were transmitted successfully. Note: If the auto send function for LIS or SURV is turned ON, and results are not transmitted successfully, then Sofia will keep retrying every 5 minutes of inactivity until a connection with the router or server is established. -
Page 44: Sofia And Virena Router Connection Installation
Wait 1 minute, then go to View Network Settings under Statistics and ensure that you have a valid IP address. Surveillance Mode Set Up Note: If Sofia does not show Surveillance Settings as an option, Sofia will require an upgrade to Firmware 1.3.1 or above. -
Page 45: Virena Router Connection Verification
Figure 20 Press OK to go to the Set Zip Code screen (Figure 21). Figure 21 Press OK to return to the Surveillance Settings screen. Virena Router Connection Verification Page 44 of 57... - Page 46 If connection is established, screen displays “The Analyzer can be connected to SURV.” Then press OK to return to the Main Menu; Sofia is now ready to be run in the Surveillance Mode. If connection is not established, screen displays “The Analyzer cannot be connected to SURV.”...
-
Page 47: Performing Tests In Surveillance Mode
Figure 22 Note: Study Code A-B allows for additional demographics data not currently defined in Sofia with a limit of two (2) numeric characters. Enter numeric value for Age (select appropriate units of Years, Months, or Weeks) by using the Right arrow. -
Page 48: Shutdown
Shutdown is complete when the screen goes dark. Maintenance Note: Sofia must be sent to Quidel if maintenance is required. The User should not attempt any maintenance except for replacing paper, changing batteries, and cleaning the external surfaces and Cassette drawer only. -
Page 49: Cleaning
Do not immerse or spray Sofia in liquid. Turn off and unplug Sofia before cleaning. Use a soft cloth with 70% alcohol or 0.6% bleach solution to clean exterior of Sofia. Wipe the external surfaces and Cassette drawer only. - Page 50 Gently pull drawer out until it stops, then lift up Sofia as shown (Figure 24). As shown in Figure 24, there is a “V” shaped slot on the underside of the drawer. Gently press this catch release with your thumb while slowly sliding the drawer out.
- Page 51 Figure 25 Gently slide the drawer until it is latched closed. If resistance is met or the drawer does not slide easily, check the alignment of the rails in the track. Go to main menu and perform Calibration. Page 50 of 57...
-
Page 52: Appendices
The Opticon barcode scanner (Model OPR-2001) is shipped in the correct configuration and is ready for use after connecting to the Sofia via the PS2 port. Additional information may be obtained at opticonUSA.com or by contacting Opticon technical support at 1.800.636.0090 x 2127. -
Page 53: Appendix B System Troubleshooting
Appendix B System Troubleshooting Symptom Cause Action Paper out error Sofia detects a printer error or Check the printer paper and that the printer is out of paper install a new roll if needed. SD Card error The system detects that the SD... -
Page 54: Error Messages
Error Messages Note: The chart below describes the error codes that may be displayed while using Sofia. If unable to resolve the problem after troubleshooting, please record the last six digits of the error code and contact Quidel Technical Support. The six digits will help Technical Support diagnose the problem. - Page 55 Please confirm correct ###.###.061.035 successfully exported. SD Card was used and inserted correctly. Low Battery Warning Batteries are low Connect Sofia to AC ###.###.061.051 power or replace batteries before running another test. Missing User ID Error The User ID is missing.
- Page 56 Supervisor or set a new cannot be changed. default Supervisor before changing User status to Operator. Wrong Value Measured Stray light or wrong Restart the Sofia, and if ###.###.071.021 calibration. issue continues, contact Technical Support. 20221 – Sofia Software Version 2.0 or higher...
-
Page 57: Index
Add User, 27 Limitations, 10 Analyzer Calibration, 12 Load Language File, 33, 34 Backspace, 15 Load Sofia Firmware, 32 BACKSPACE, 25, 28 Load/Save, 31 Barcode Scanner, 3, 14, 17, 19, 50, 51, 52 Locked WALK AWAY Mode, 13 Barcodes, 51... - Page 58 Shipping and Storage, 50 Update, 32 Shipping and Storage Humidity, 50 User ID Required, 23 Shutdown, 46 User Types, 14 Sofia Calibration, 12 View Analyzer Info, 31 Sofia Setup, 17 View Lot Status, 30 Sofia Statistics, 30 View Message Log, 31...
Need help?
Do you have a question about the Sofia and is the answer not in the manual?
Questions and answers