Table of Contents
Advertisement
Quick Links
To buy, sell, rent or trade-in this product please click on the link below:
https://www.avionteq.com/Flight-Data-Systems-HHMPI-FSD40-Data-Transfer-Unit.aspx
19 August 2014
30-0005 Issue D
www.avionteq.com
Operators manual
Handheld Multi-Purpose Interface (HHMPI)
Flight Data Systems Pty Ltd
31 McGregors Drive, Keilor Park,
Victoria 3042, Australia.
Ph. +61 3 8331 2900
Fax. +61 3 9336 1751
Email: support@flightdata.com.au
Copyright © Flight Data Systems 2014
This manual is property of Flight Data Systems. This manual contains information in
which Flight Data Systems has a protected interest. This manual is a controlled document
and as such is subject to amendment. It is in the interest of the user to register this man-
ual with Flight Data Systems to ensure receipt of any amendments. The use, duplication,
and/or disclosure, by persons receiving this manual may be subject to restrictions. No
part of this document and/or data contained herein may be reproduced and/or used in
any form without written permission from Flight Data Systems.
Advertisement
Table of Contents
Troubleshooting

Subscribe to Our Youtube Channel
Related Manuals for Flight Data Systems HHMPI


Summary of Contents for Flight Data Systems HHMPI
- Page 1 This manual is property of Flight Data Systems. This manual contains information in which Flight Data Systems has a protected interest. This manual is a controlled document and as such is subject to amendment. It is in the interest of the user to register this man- ual with Flight Data Systems to ensure receipt of any amendments.
-
Page 2: Table Of Contents
2.0 Introduction 2.1 HHMPI models........6 2.3 Accessories. - Page 3 11.3 FDR Configuration ......60 11.4 Upload OFP to the HHMPI ..... . 60...
- Page 4 HHMPI power-on sequence ........
- Page 5 HHMPI equipment list ........
-
Page 6: Introduction
Introduction 2.1 HHMPI models Table 2.0 HHMPI models and description of modifications applied HHMPI modifications Description Mod 1 External battery with PCMCIA card slot Mod 2 Firmware enhancement FA2100 CVR software (ADF) Mod 3 VADR software interface implemented (ADF) Mod 4... -
Page 7: Figure 2.0 Hhmpi Top View
Introduction Figure 2.0 HHMPI top view Figure 3.0 HHMPI bottom view Operators manual FDS 400-301... -
Page 8: Figure 4.0 Hhmpi Mod 1 Top View
Introduction Figure 4.0 HHMPI Mod 1 top view Figure 5.0 HHMPI Mod 1 bottom view Operators manual Handheld Multi-Purpose Interface (HHMPI) -
Page 9: Hhmpi Equipment
Cable USB, HHMPI to PC FDS400-301 HHMPI Mod 5 FDS400-301 HHMPI with internal battery Mod 5, 6 FDS400-301 HHMPI with external battery and PCMCIA card Mod 1, 5 FDS400-302 USB flash drive (2GB) FDS400-303 Compact flash card, HHMPI Option - all FDS400-304... -
Page 10: Accessories
Cable USB, HHMPI to PC FDS400-201 Interface cable, L-3 AR, F1000 FDS400-202 Interface cable, L-3 AR, FA2100 FDS400-203 Interface cable, HNY, SSFDR, (DC or Battery HHMPI only) FDS400-204 Interface cable, HNY, UFDR, SSDFDR FDS400-208 Interface cable, HNY, AR series FDS400-209 Interface cable, L-3 EDI, SRVIVR™... -
Page 11: Table 6.0 Specifications Hhmpi Mod 1 And 5 (Battery)
USB v2.0 to PC Ethernet RJ-45 to network Ethernet via recorder interface to recorder R2-422 via recorder interface to recorder Wireless 802.11g capability via optional USB key Table 6.0 Specifications HHMPI Mod 1 and 5 (battery) Parameter Weight HHMPI: 495 g HHMPI kit: 3.2 kg see... -
Page 12: Getting Started
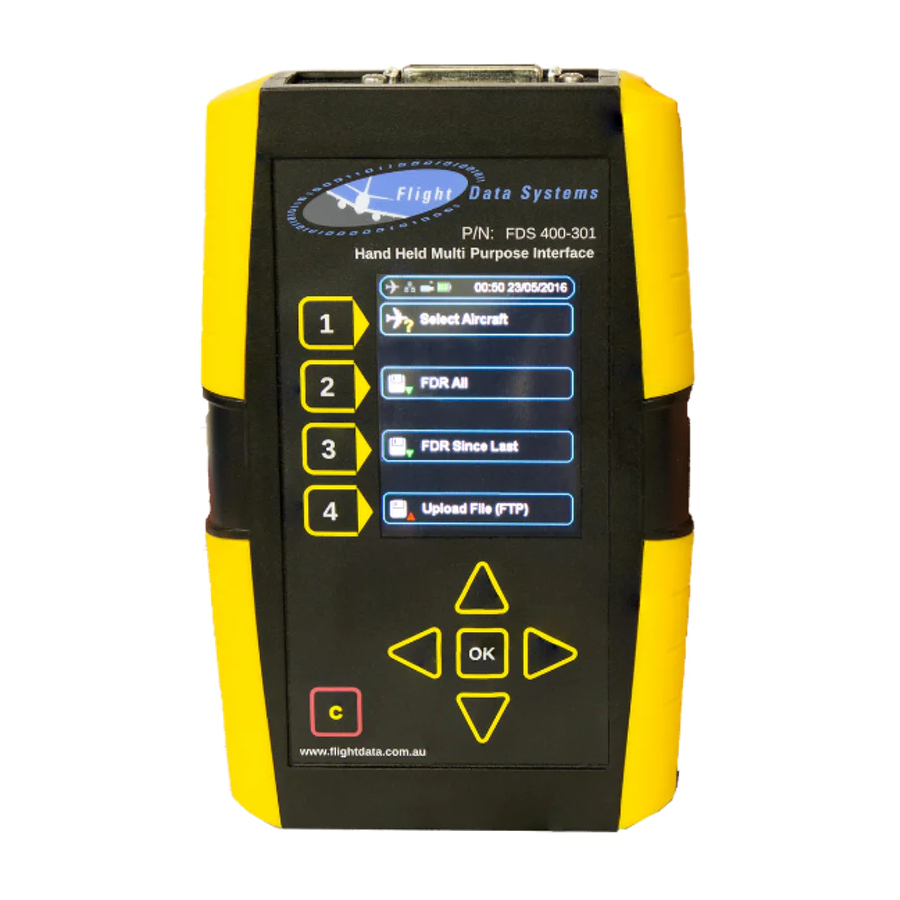
Wireless 802.11g capability via optional USB key 3.0 Getting started 3.1 Terminology used In this manual the hardware buttons on the HHMPI are referred to as the left, right, up, in this manual down, OK, or cancel buttons. See Figure 1.0, ”HHMPI front view”, on page 6 for the loca- tions of these buttons on the HHMPI. -
Page 13: Using The Hhmpi
Table 4.0, “Interface cables and software options,” on page 3.2.1 Connecting the HHMPI to an FDR To connect the HHMPI to a recorder use the interface cable for the specific recorder you want to download data from. Power is often supplied through the interface cable to the HMMPI from an aircraft powered recorder. -
Page 14: Powering And Charging The Hhmpi
Getting started Figure 7.0 Connecting the HHMPI to the FDR or CVR 3.2.2 Powering and charging the HHMPI The HHMPI can be powered by: An aircraft powered recorder through an interface cable. A PC or USB adapter power though a USB cable (P/N: FDS400-107). -
Page 15: Charging The Hhmpi With The Docking Cradle
3.2.3 Charging the HHMPI with the docking cradle Note Only applicable to HHMPI devices with Mod 7. HHMPI devices with Mod 7 can also be charged by a power adapter through the HHMPI docking cradle (P/N: FDS400-373). To charge the HHMPI with the docking cradle: Connect the power adapter to the docking cradle, the green light will illuminate. -
Page 16: Turning On The Hhmpi And Self-Test
The cradle provides direct current (DC) charging which extends battery life by avoid- ing trickle charging. The transfer of files from the HHMPI to the PC is stable and easy to operate when docked. Auto-sync and transfer files from the unit to a nominated FTP server via Ethernet con- ... -
Page 17: Shortcuts
Tip To return to the Main menu from any other menu, press left repeatedly. 3.5 HHMPI The HHMPI can be configured via a web interface, or directly on the unit. Using the web configuration interface is the easiest way to set up the HHMPI, see Section 5.4.1, ”Changing the HHMPI... -
Page 18: Network Settings
3.5.6 Security Settings ▼▲ Main Menu > Device Configuration > Security Settings Set access to the menus and settings of the HHMPI by using password access by select- ing the following: Restrict Configuration - Restrict modification of any HHMPI settings. -
Page 19: Operation
Dates and time stamps are stripped to remove slashes and colons. 4.2 Aircraft lists Stored in the HHMPI as a comma separated variable file, the Aircraft List contains a list of all aircraft in the fleet. Using an Aircraft List makes it easier to assign tail numbers to operational downloads, it also makes the file names more readable. -
Page 20: Creating An Aircraft List On A Pc
▼▲ Main Menu > Device Configuration > Settings Profile > Load Aircraft To transfer the Aircraft List to the HHMPI, insert the USB flash drive containing the file named aircraft.csv into the USB port on top of the HHMPI. From the Main Menu, press down until you reach the Device Configuration com- mand, and then press right. -
Page 21: Creating The Aircraft List On The Hhmpi
Section 4.2.2, ”Cre- ating an Aircraft List on a PC” on page To create, or add to, the Aircraft List on the HHMPI, from the Add Aircraft menu: Press down until you reach the Set Model command, and then press right. -
Page 22: Saving The Aircraft List To The Usb Flash Drive On The Hhmpi
By selecting this option all the aircraft models and tail numbers in the Aircraft List will be removed from the HHMPI. Press OK to confirm or cancel to cancel this operation. 4.2.9 Prompt for Tail No. Main Menu > Device Configuration > Aircraft Settings > Prompt for Tail ▼▲... -
Page 23: Downloading Flight Data
FDR is indicated by a blue air- craft icon found in the status bar of the display. Plug the USB flash drive into the USB port on the top of the HHMPI. An alert, USB Drive Inserted, should appear monetarily. -
Page 24: Decompressing Cvr Data At The Aircraft
download the last 20 minutes recorded. If an external storage device, like a USB flash drive, is plugged into the HHMPI, you may now select to store the data onto this device. To start downloading the data, press right. -
Page 25: Decompressing Cvr Away From The Aircraft
OK. Note To decompress CVR data away from the aircraft, the de-multi- plexing feature needs to be enabled on the HHMPI. Contact Flight Data Systems for more information about this feature. Decompres- sion of CVR data away from the aircraft also only applies to Honey- well CVRs. -
Page 26: Using The Cvr Rack Adapter
HHMPI. Ensure the blue plane appears in the HHMPI and begin a CVR download at the aircraft. 4.4 Viewing live flight The HHMPI can be used to monitor live ARINC 717 data from the aircraft. The Live Data data View can display data from the FDR in five formats:... -
Page 27: Figure 16.0 Viewing Live Data
Figure 7.0, ”Connecting the HHMPI to the FDR or CVR”, on page Turn on the HHMPI and the FDR. Once turned on, the start-up process begins and the power-on self-test is carried out. If connected to the HHMPI, the interface cable is detected automatically, and correct connection to the FDR is indicated by a blue air- craft icon found in the status bar of the display. -
Page 28: Live Data View Options
Simultaneous words can be displayed if required by using shortcut buttons 1 to 4. See Figure 18.0, ”Multiple live data view”, on page Parameters for each displayed Live Data Word-Offset can be modified. See Section 4.4.3, ”Changing the display format” on page Operators manual Handheld Multi-Purpose Interface (HHMPI) -
Page 29: Viewing Live Flight Data In Engineering Units
Definition file with an aircraft. The Aircraft Definition file is exported from STARS with the units extension .sdf. You will need to transfer this file to the HHMPI either through a direct USB Operators manual FDS 400-301... -
Page 30: Assigning An Aircraft Definition File To An Aircraft
Operation connection, where the HHMPI will be picked up as an external storage device, or via one of the removable memory options such as an SD memory card, or USB flash drive. Note To view live data in engineering units, the engineering units feature needs to be enabled on the HHMPI. -
Page 31: Figure 20.0 Selected Tail Number On The Shortcut Screen
Follow the procedure in Section 4.4, ”Viewing live flight data” on page 26 and wait until the HHMPI synchronizes with the FDR, while synchronizing, UNKNOWN is dis- played on the screen. Press a shortcut button to select a parameter / word cell. -
Page 32: File Transfer Operations
Section Figure 23.0, ”Four parameters populated with Engineering Units” on page Figure 23.0 Four parameters populated with Engineering Units 4.6 File transfer 4.6.1 File transfer between HHMPI storage locations operations ▼▲ Main Menu > Storage Operations > Select Files | Select All Files... -
Page 33: Other Storage Operations
▼▲ 4.6.3 File transfer PC to HHMPI When connected to a PC the internal memory of the HHMPI will appear as a write-pro- tected external hard drive, therefore files may only be copied from the HHMPI to the PC. To erase files from the HHMPI internal memory, see Section 4.6.1, ”File transfer between... -
Page 34: Configuring An Ftp Connection
Figure 24.0 DHCP or manual IP configuration 5.0 Configuring an FTP connection Before you can upload files from the HHMPI to a server, you need to configure the FTP server settings. You can do this from the HHMPI or through the web interface. Using the web interface is the easiest way to configure the FTP server settings. -
Page 35: Configuring An Existing Ftp Server From The Hhmpi
FTP server name you want to configure, and then press right. Then do one of the following: from the HHMPI To save an IP Address, press right on the FTP IP Address command. To enter the IP Address, press up or down on each number, and then press OK to confirm your selection. - Page 36 Configuring an FTP connection To save an FTP Type, press right on the FTP Type command, and then press down until you reach the FTP type you want, and then press right. The HHMPI supports three FTP types: FTP (port 21), unsecured transmission on port 21 ...
-
Page 37: Testing An Ftp Server From The Hhmpi
Then press down until you reach the View Wired Address command, and then press right. If the HHMPI is assigned an IP address it will now be displayed, if no link is detected No Link Detected will be displayed. -
Page 38: Figure 28.0 Viewing The Wired Ip Address
Open a web-browser such as Mozilla Firefox or Google Chrome and type the wired IP address into the browser’s address bar. Login to the HHMPI web interface using the default username and password: Username: admin Password: admin Figure 29.0, ”Web interface login”, on page... -
Page 39: Changing The Hhmpi Configuration Via The Web Inter
40. The Device Configuration screen allows you to configure everything you can on the HHMPI, including network settings and wireless settings. Save any changes you make, and then click Apply to write the changes to the HHMPI flash memory. Operators manual... -
Page 40: Backing Up The Hhmpi Configuration
Configuring an FTP connection Figure 31.0 Device configuration screen 5.4.2 Backing up the HHMPI configuration To back up the HHMPI settings, aircraft list and SSL certificate (if installed) through the web interface, in any web-browser: Log on to the HHMPI web interface per Section 5.4, ”Setting up an FTP connection... -
Page 41: Restoring Backup Files Via The Web Interface
From the Access Restrictions collapsible menu, set the new passcode and then click Save. The next time you turn on the HHMPI the new passcode will take effect when attempting to access the main menu. 5.4.5 Logging out of the web interface To log out of the web interface press the Logout button below. -
Page 42: Wirelessly Uploading Files From The Hhmpi To A Server
This wireless network information is usu- ally available from your IT department. 6.1.2 Turning on wireless network support To wirelessly upload files from the HHMPI to a server, when in range of a wireless net- work: ▼▲... -
Page 43: Connecting To A Wireless Network
Wirelessly uploading files from the HHMPI to a server Figure 35.0 Connecting to a wireless network 6.1.3 Connecting to a wireless network To connect to a wireless network, it is likely that you will need to configure some security settings like the encryption type and key. To turn on encryption, from the Wireless Set-... -
Page 44: Troubleshooting
6.1.4 Uploading files via FTP with a wireless network connection When the HHMPI is connected to a wireless network, files saved on the HHMPI, or on one of its external storage devices, can be uploaded wirelessly to a server via FTP. -
Page 45: Table 7.0 Troubleshooting Common Issues With The Hhmpi
HHMPI, and the part numbers of recorders you are trying to interface with (if applicable). If it is not possible to report the error on the HHMPI, send an email to support@flight- data.com.au. In your email, include the following information: Company name and contact details. -
Page 46: 7.0 Troubleshooting
Ensure that the USB wireless network adapter is plugged into wireless network. the USB port on the top of the HHMPI, and ensure correct con- nection to the recorder. Connection is indicated by a white antennae icon found in the status bar of the display. See Section 3.5.4, ”Network Settings”... -
Page 47: 7.0 Troubleshooting
Ensure that the USB wireless network adapter is plugged into the USB port on the top of the HHMPI, and ensure correct con- nection to the recorder. Connection is indicated by a white antennae icon found in the status bar of the display. See Section 3.5.4, ”Network Settings”... -
Page 48: Fa2100, Fa2200 And Fa2300 Interface Supplement
CVR All - Retrieves all cockpit voice recordings from the recorder. If CVR de-multiplex- ing is enabled on the HHMPI, recordings can also be decompressed so they can be played on a PC or other device. CVR Time - Retrieves the last specified duration of cockpit voice recordings. -
Page 49: Fdr Status
8.9 Dump Debug Trace This function dumps the running debug stream from an L3 FA2100 recorder to a file on the HHMPI. This file is a text file readable in any text editor. 8.10 Memory Marker Set a new FDR memory marker. The next marker will be chosen in the range 1-15, when all the markers are set, the marker count returns to 1. -
Page 50: Audio Operations
To listen to audio, plug headphones into the audio jack on the bot- tom of the HHMPI, see Figure 3.0, ”HHMPI bottom view”, on page Press the up and down buttons to select which channel you want to listen to. Shortcut button 2 increases the volume and shortcut button 3 decreases the volume. -
Page 51: Srvivr Interface Supplement
SRVIVR™ Interface Supplement Table 9.0 Additional menu items for FA2100 CVFDR Main Menu Menu Level 1 Menu Level 2 Recorder Operations FDR Status FDR Stream Detected Frame Lock Recorded Minutes Latched Fault CVR Status Latched Fault Recording FDR Fault Output Forced On/Off CVR Fault Output Clear Latched Fault... -
Page 52: Recorder Operations
Table 11.0, “Additional menu items for SRVIVR™ CVFDR,” on page 54 Figure 40.0, ”SRVIVR™ Recorder Operations - Information”, on page Initiating system self test, see Figure 41.0, ”SRVIVR™ Recorder Operations - Self Test”, on page Operators manual Handheld Multi-Purpose Interface (HHMPI) -
Page 53: Audio Operations
Figure 41.0 SRVIVR™ Recorder Operations - Self Test 9.3 Audio Operations The SRVIVR™™ audio can be monitored in real time. To listen to audio, plug headphones into the audio jack on the bottom of the HHMPI, see Figure 3.0, ”HHMPI bottom view”, on page Press the up and down buttons to select which channel you want to listen to. -
Page 54: Menu Tree
Discrete Inputs Discrete Outputs CVR Status Word Processor Status Power Supply Status CPM Status Audio Status ARINC Status External Status Self Test Processor Status Power Supply Status CPM Status Audio Status ARINC Status External Status Operators manual Handheld Multi-Purpose Interface (HHMPI) -
Page 55: Fa5000/Fa5001 Interface Supplement
FA5000/FA5001 Interface Supplement Table 11.0 Additional menu items for SRVIVR™ CVFDR Main Menu Menu Level 1 Menu Level 2 Audio Operations CVR Live Audio Select Monitor Channel: HQV1, HQV2, HQV3, SQN, SQC, HQC. Audio volume Data Rate Live Data View (Section 4.4, View Live FDR Data ”Viewing live flight data”... -
Page 56: Recorder Operations
Download of CVFDR fault logs. See Figure 44.0, ”FA5000/FA5001 Recorder Operations - Dump Log”, on page Download EDS file. Get the ARINC 717 Engineering Documentation Standard (EDS) conversion file (FRCS, FRED, etc.) from the recorder. Operators manual Handheld Multi-Purpose Interface (HHMPI) -
Page 57: Fdr Configuration
To listen to audio, plug headphones into the audio jack on the bot- tom of the HHMPI, see Figure 3.0, ”HHMPI bottom view”, on page Press the up and down buttons to select which channel you want to listen to. Shortcut button 2 increases the volume and shortcut button 3 decreases the volume. -
Page 58: Live Data View
Download Operations FDR All (Section 4.3, ”Downloading FDR Since Last flight data” on page FDR Time FDR Mark CVR All CVR Since Last CVR Time CVR Mark DLR All DLR Since Last DLR Mark Operators manual Handheld Multi-Purpose Interface (HHMPI) - Page 59 FA5000/FA5001 Interface Supplement Table 12.0 Additional menu items for FA5000/FA5001 CVFDR Main Menu Menu Level 1 Menu Level 2 Recorder Operations FDR Status FDR Fault FDR Input Data Lock ARINC 717 Data Received Current FDR Rate Latest FDR Marker CVR Status CVR Fault Datalink Data Received GMT Data Received...
-
Page 60: Smiths Vadr Interface Supplement
HHMPI Power up the HHMPI and connect to the VADR using a VADR aircraft interface cable. Insert a USB flash drive into the USB port on top of the HHMPI containing the OFP files. From the Main menu, press down until you reach the FDR Configuration command, and then press right. -
Page 61: Figure 47.0 Uploading Ofp To The Vadr From The Hhmpi
Once complete return to the FDR Configuration and confirm the files are loaded in the information section. See Figure 47.0, ”Uploading OFP to the VADR from the HHMPI”, on page Figure 47.0 Uploading OFP to the VADR from the HHMPI...
Need help?
Do you have a question about the HHMPI and is the answer not in the manual?
Questions and answers