Table of Contents
Advertisement
Quick Links
Advertisement
Table of Contents

Summary of Contents for Aquaguard AGWAV20
- Page 1 OWNER’S MANUAL MODELS AGWAV20 20,000 Gallon System AGWAV40 40,000 Gallon System...
-
Page 2: Aquaguard Series Residential Warranty
SGS (as described in Paragraph 9, below). In the first two years of the five-year prorated warranty period, SGS will repair or replace any “AQUAGUARD” parts in the Unit that are confirmed to have been defective at no cost to the Customer. In years three, four and five of the warranty period, SGS will repair or replace any “AQUA GUARD”... -
Page 3: Table Of Contents
Table of Contents AquaGuard Series Residential Warranty Table of Contents Safety Instructions and Precautions System Sizing How the AquaGuard Chlorinator Works Water Preperations and Tips on Water Chemistry Salt: When and How to Add It Salt Convertion Table Chlorinator Installation... -
Page 4: Safety Instructions And Precautions
Safety Instructions & Precautions Congratula�ons on your purchase of a Saltwater Chlorinator . You have made a wise decision and will benefit from your chlorinator for many years to come. Please take a moment to read through the en�re manual before installing your new unit. Your chlorinator must be installed and operated as specified. - Page 5 Safety Instructions & Precautions continued SAVE THESE INSTRUCTIONS ELECTRICAL HAZARD All systems are shipped from the factory wired for 220 Volts. • To reduce risk of electrical shock make sure all power to pool equipment area is off prior to any •...
-
Page 6: System Sizing
System Sizing Produces up to .78 pounds of Free Chlorine per day to maintain residen�al AGWV20 pools up to 20,000 gallons*. AGWV40 Produces up to 1.35 pounds of Free Chlorine per day to maintain residen�al pools up to 40,000 gallons*. * Correct sizing of a chlorine generator is subject to the specifica�ons of each body of water, and should be carefully evaluated for best results. -
Page 7: How The Aquaguard Chlorinator Works
How the Chlorinator Works Common salt (sodium chloride) is made up of two elements, sodium and chloride. When the system is installed, a measured quan�ty of salt is dissolved in the pool water to create a mild saline solu�on. As part of the daily filtra�on cycle, the pool water is passed through the electroly�c cell to produce chlorine, which is instantly dissolved into the water. - Page 8 Water Preperation & Tips on Water Chemistry continued How to adjust pH A pH range of 7.2 – 7.6 is ideal for maximum comfort and minimum chlorine demand. Always adjust total alkalinity before adjus�ng pH. Low pH (acidic water) leads to s�nging eyes and corrosion of open metal fi�ngs.
-
Page 9: Salt: When And How To Add It
Salt: When & How to Add It AT START UP -- Determine the salinity level of the water before adding any salt with a salinity test meter, salt test strips or through a water tes�ng facility. You should be aware that previous use of sodium hypochlorite (liquid chlorine) creates residual salt within the pool. -
Page 10: Salt Convertion Table
Salt Convertion Table Salt Concentra�on Before Addi�on (PPM) -
Page 11: Chlorinator Installation
Chlorinator Installation Chlorinator must be installed by a qualified pool professional or cer�fied electrician. If you have any ques�ons or need assistance in finding a qualified installer, please contact our tech support hotline at 1-866-972-SALT (7258) or (480) 385-3052, Monday through Friday, from 7:00 AM to 3:00 PM Arizona �me, or via E-Mail at: services@sgschlorinators.com. -
Page 12: Installation Preperation
Installation Preperation The system cell MUST be installed horizontally, with the ports down, as the last piece of pool equipment in line, on the return to the pool, a�er the heater. (See illustra�on 1 on next page) The design of the cell forms a natural gas trap. Even though the system has an internal flow sensor, this installa�on provides a secondary safety feature to prevent gas build-up within the system. -
Page 13: Installation Procedures
Installation Procedures Electroly�c Cell 1. Locate pool return line a�er the heater or filter as shown in illustra�on # 1 above. This is the preferred loca�on for the cell housing, but must be located above the highest point of plumbing. 2. -
Page 14: Start-Up Procedures
Installation Procedures continued Connec�ng the cell cord to the Control Center Align the three pins of the cell cord plug with the socket on the Control Center bo�om (Part A in illustra�on 2 shown above) and insert the connector un�l it clicks in place. There are clips located on either side of the plug on the Control Center -- make sure they are locked into the cell half of the plug. -
Page 15: System Operation
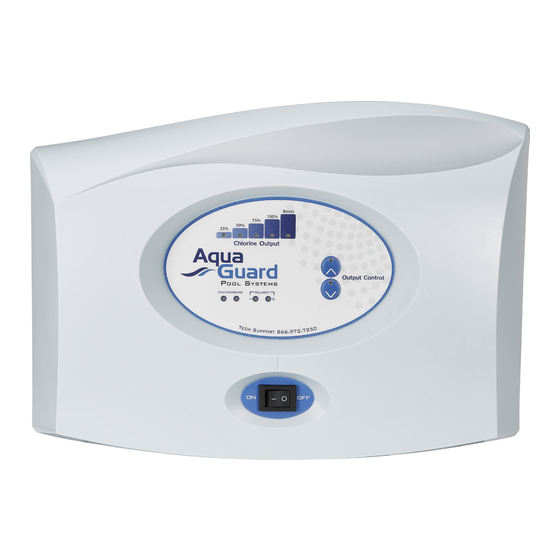
System Operation The chlorinator is designed to make sani�zing your pool very easy with minimal maintenance. The system will reduce the need to add chlorine and decrease spikes in your chlorine readings, giving you the ability to relax and enjoy crystal clear pool water. The system begins to operate at its full poten�al immediately. - Page 16 System Operation continued Basic Opera�on Engage Power switch (#6 on Illustra�on 5 shown above) by pressing to “On” posi�on. As the system boots up, the lights will flash for about ten seconds. The System Status light (#3) will then remain solid; the Sani�zer Output lights (# 1) will display the selected chlorine output level.
-
Page 17: System Maintenance
System Maintenance Cell Maintenance -- How and When to Clean Your Cell Although the is a low maintenance reversing polarity system, occasional manual cleaning of the low maintenance Electroly�c cell will be required to remove scale and calcium build up. How o�en this cleaning is needed depends on the chemistry of the pool water, including the hardness of the water and how you balance your pool water chemistry, among other things. - Page 18 System Maintenance continued Weekly Service Chlorine Test: Test pool water chlorine level with a reliable test kit. Maintain ideal range by adjus�ng Sani�zer Output level (see Basic Opera�on on page 1 8 ) . Note: Chlorine residual above 5.0 PPM may cause corrosion of pool metals and possible damage to associated pool equipment.
-
Page 19: Troubleshooting
Troubleshooting Situa�on Possible Cause Correc�ve Ac�on Low or no chlorine residual Low stabilizer (Cyanuric acid level in pool Add stabilizer to maintain 20-30 In pool water) PPM per pool professional’s recommenda�ons. Insufficient run �me Increase daily run �me. Recommend 1 hour of run �me per 10 degrees ambient temp. - Page 20 Troubleshooting continued Unable to increase Chlorine Cell is plugged with debris, cold water, Check cell and clean, check salt Produc�on low salt level level, check water temperature. Problem with power to Control Center Check to make sure On/OFF Switch is on. Make sure pump is on.
- Page 21 Notes...
- Page 22 Notes...
- Page 23 Notes...
Need help?
Do you have a question about the AGWAV20 and is the answer not in the manual?
Questions and answers