Table of Contents
Advertisement
Advertisement
Table of Contents

Summary of Contents for LX Navigation Colibri X
- Page 2 Colibri X user’s manual Page 1 of 34 Colibri X User’s manual (version 1.0) Refers to Colibri X FW version 1.0 For a new world experience. Tkalska ulica 10 SI 3000 Celje Tel.: 00 386 3 490 46 70 Fax.: 00 386 3 490 46 71 info@lxnavigation.si...
-
Page 3: Table Of Contents
Transfer ............................24 Logbook ............................26 Graphics ........................... 27 Info ............................29 PART THREE – FLYING WITH COLIBRI X ......................30 PART FOUR – CONNECTIVITY ..........................32 4.1 SD card ............................... 32 4.2 Bluetooth and WiFi ..........................32 4.3 Micro USB ............................32... -
Page 4: Part One - Introduction
PART ONE – INTRODUCTION 1.1 Author’s note You are one of the first, who have received a Colibri X. We would like to congratulate you on being a part of this club and wish you many safe flights. This document is a working title of the Colibri X manual. With each new version, new features will be unlocked and explained in a manual published on our webpage (http://www.lxnavigation.com/support/manuals/). - Page 5 Everything is connected using a CAN bus (single cable for power and data). All connections are plug and play, which means no specialist is required to install the system. With the Colibri X we introduce something completely new that is a technology ahead of any other device in its class on the market.
-
Page 6: Overview
Airspace, airports and turnpoint information is shown graphically. The Colibri X is designed to sit comfortably in your hand or be mounted with one of our mounts into a space in your cockpit. - Page 7 Version: Document Name: Colibri X user’s manual Page 6 of 34 Functions: Variometer World maps 4 independent navigational pages – TP (turnpoint), APT (airport), TSK (task) and NRST (nearest landable turnpoint or airfield) Final glide calculator based on GPS data (for TP, APT, TSK and NRST)
-
Page 8: Technical Specification
Version: Document Name: Colibri X user’s manual Page 7 of 34 1.4 Technical specification Hardware 3.5” 640 x 480 capacitive touchscreen transflective display LX One Chip 16 GB of internal solid state memory Built-in GPS receiver and antenna Built-in battery with charger (5V via USB) -
Page 9: Basic Use & Gestures
1.5 Basic use & gestures Gestures The Colibri X user interface consists of two input tools. First is the physical button on the left side of the unit, which has the following functions: Short press (>1 second), when turned off, turns the unit on. - Page 10 Version: Document Name: Colibri X user’s manual Page 9 of 34 Numeric input Press and hold anywhere on the roll bar and starting turning right (clockwise) for higher values or left (counter clockwise) for lower values. Alphanumeric input The keyboard is a standard QWERTY type keyboard with two layouts. The first one is an alphabetic keyboard and the second one is punctonumeric, consisting of punctuation marks and numbers.
- Page 11 SD card folder. Copy and paste the file for update (x.xx.lxu) to the root of your micro SD card. Carefully and gently insert the micro SD card in the Colibri X and power up the device. Go to Setup > Transfer > Software update and select the desired file. A password input dialog will appear.
-
Page 12: Part Two - Interface
Version: Document Name: Colibri X user’s manual Page 11 of 34 PART TWO – INTERFACE 2 Main pages overview main pages represent a row of pages in the graphical user interface, which allow the user to access different information screens and flight parameters. - Page 13 Another page, which can be accessed from any main page, is the Drop- down page. On the main vario page access drop down menu by pressing and pulling down the header with LX navigation logo. On this page you can quickly access and set with a sliding action the following parameters: ...
-
Page 14: Vario Page
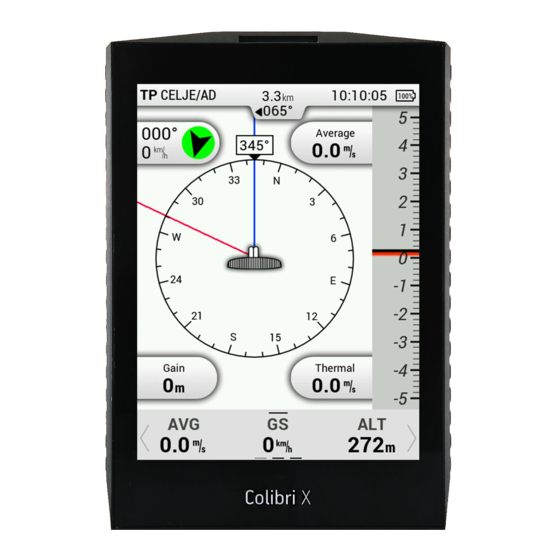
Version: Document Name: Colibri X user’s manual Page 13 of 34 2.1 Vario page The vario page is the first page displayed, upon power on. It consists of a header, wind icon, thermal assistant, vario with 3 fixed indicators and a navbox line, with different lines of 3 navbox indicators. -
Page 15: Tp Page
Version: Document Name: Colibri X user’s manual Page 14 of 34 2.2 TP page In order to use this page to its maximum extent, the user should first import turnpoint, and airfield files. For more information on this subject, please refer to Setup/Transfer/Load TP. -
Page 16: Apt Page
Version: Document Name: Colibri X user’s manual Page 15 of 34 2.3 APT page In order to use this page to its maximum extent, the user should first import turnpoint and airfield files. For more information on this subject, please refer to Setup/Transfer/Load TP. -
Page 17: Tsk Page
Version: Document Name: Colibri X user’s manual Page 16 of 34 2.4 TSK page In order to use this page to its maximum extent, the user should first import turnpoint, and airfield files. For more information on this subject, please refer to Setup/Transfer/Load TP. - Page 18 Version: Document Name: Colibri X user’s manual Page 17 of 34 Note! When importing tasks (from a microSD card, via Bluetooth, or othewise), zone information is not imported. Be sure to check that the zones are correct. When clicking on a turnpoint, a list of options will show, depicted on the right picture.
-
Page 19: Nrst Page
Version: Document Name: Colibri X user’s manual Page 18 of 34 2.5 NRST page In order to use this page to its maximum extent, the user should first import turnpoint, and airfield files. For more information on this subject, please refer to Setup/Transfer/Load TP. -
Page 20: Gps Page
Version: Document Name: Colibri X user’s manual Page 19 of 34 2.6 GPS page GPS page shows us the current GPS status, date, latitude, longitude and a map of satellites above us. 2.7 Flight statistics page Appears only when in flight mode. -
Page 21: Setup Page
Version: Document Name: Colibri X user’s manual Page 20 of 34 2.8 Setup page By swiping left on main vario page you get to the setup page. Under setup, the pilot can set all parameters of the unit. The menus are following: 1. -
Page 22: Gliders
Version: Document Name: Colibri X user’s manual Page 21 of 34 Gliders In the glider`s menu you can select, edit, add new or delete a glider. To make your custom glider go to Add new. First, select the glider. You will find a list of gliders already defined. If you cannot find your glider on this list, please select the option user-defined, found at the top of the list. -
Page 23: Vario
Version: Document Name: Colibri X user’s manual Page 22 of 34 Vario In this menu pilot can set vario settings: - Zero frequency is a frequency generated at 0 m/s - Positive frequency is the frequency at maximum climb shown on the... -
Page 24: Logger
Warnings Warnings are used to inform the pilot that some flight-related data is outside set margins. When a warning state is detected by Colibri X, the pilot will get a red warning message box with a description of what is outside margins. -
Page 25: Passwords
To access some options, a password is required. Available passwords are: - 46486: sets Colibri X to factory settings. - 99999: clears all flights from flight recorder – logbook is emptied. - 28346: audio player (will play any .wav file 8-bit 16kHz mono from the root of external SD card). - Page 26 SD card folder. Copy and paste the file for update (x.xx.lxu) to the root of your micro SD card. Carefully and gently insert the micro SD card in the Colibri X and power up the device. Go to Setup > Transfer > Software update and select the desired file. A password input dialog will appear.
-
Page 27: Logbook
Version: Document Name: Colibri X user’s manual Page 26 of 34 Logbook The pilot can copy take-off/landing time to personal logbook and transfer flight to external SD card for OLC upload. Last 50 flights are listed. Any older flights will be erased from logbook list. -
Page 28: Graphics
Version: Document Name: Colibri X user’s manual Page 27 of 34 Graphics The Graphic setup is where you can set custom colours for Airspace, Map and Task, as well as set font sizes for map objects. Airspace In the Airspace menu you following submenus to edit:... - Page 29 Version: Document Name: Colibri X user’s manual Page 28 of 34 We offer 12 different Map pallets, which can be seen below. LX Navigation 1 LX Navigation 2 LX Navigation 3 LX Navigation 4 Imhof 1 Imhof 2 Imhof 3...
-
Page 30: Info
Version: Document Name: Colibri X user’s manual Page 29 of 34 Info By choosing info page, you can view following Colibri X information: Serial number, FW version, HW version, IGC serial and production date of the device. -
Page 31: Part Three - Flying With Colibri X
PART THREE – FLYING WITH COLIBRI X To get the best out of the Colibri X, it is important that some preparation is done prior to the flight – trying to configure the instrument or set up a task while flying the glider may spoil your whole day! Pre-flight preparation will ensure that the flight will be both successful and enjoyable. - Page 32 Downloading flights Make sure the micro SD card is properly inserted in Colibri X. In the setup page, select logbook and search for a flight that you wish to download. Select the flight. On the bottom of the page, you will find "Copy to SD card"...
-
Page 33: Part Four - Connectivity
4.2 Bluetooth and WiFi The Colibri X has internal Bluetooth and WiFi modules. You can switch them on and off at the bottom of the drop-down page each marked with its own icon. Turn both off to save the battery. -
Page 34: Tips, Tricks & Troubleshooting
Store the Colibri X in a dry environment, with a temperature below 25°C. When you store the Colibri X for a long period, it is recommended that the battery charge be kept to at least 50%. Regularly check the battery status (every one to two weeks) and charge if needed. - Page 35 Version: Document Name: Colibri X user’s manual Page 34 of 34 Do not try to open the Colibri X. The battery can only be replaced by authorized dealer or manufacturer.
Need help?
Do you have a question about the Colibri X and is the answer not in the manual?
Questions and answers