Table of Contents
Advertisement
Advertisement
Table of Contents

Related Manuals for RSR TB285SW

Summary of Contents for RSR TB285SW
-
Page 1: User Manual
TB285SW USER MANUAL... -
Page 2: Table Of Contents
Contents Important Safety Instructions .....................3 Safety .......................................3 Warning ....................................4 What’s in the Box ........................6 Placement and Mounting .....................7 Placement ....................................7 Stand Mounting (if using option-A) ..........................7 Horizontal Mounting .................................7 Installing the Rubber Feet (if using option-B) ......................8 Wall Mounting (if using option-C) ..........................8 Identifying the Parts ......................9 Main Unit ....................................9 Remote Control ................................ -
Page 3: Important Safety Instructions
Important Safety Instructions or pinched particularly at plugs, convenience CAUTION receptacles, and the point where they exit from the apparatus. RISK OF ELECTRIC SHOCK DO NOT OPEN 11 Only use attachments/accessories specified by the manufacturer. CAUTION: TO REDUCE THE RISK OF ELECTRIC Use only with the car t, stand, SHOCK, DO NOT REMOVE COVER (OR BACK). -
Page 4: Warning
The mains plug/appliance coupler is used as DO NOT INGEST BATTERY,CHEMICAL the disconnect device, the disconnect device BURN HAZARD must remain readily operable. The remote control supplied with this Danger of explosion if battery is incorrectly product contains a coin/button cell battery. replaced. - Page 5 FCC INFORMATION (for US customers) Warning: Changes or modifications to this unit not expressly approved by the party responsible for compliance could void the user’s authority to operate the equipment.” NOTE: • This equipment has been tested and found to comply with the limits for a Class B digital device, pursuant to Par t 15 of the FCC Rules.
-
Page 6: What's In The Box
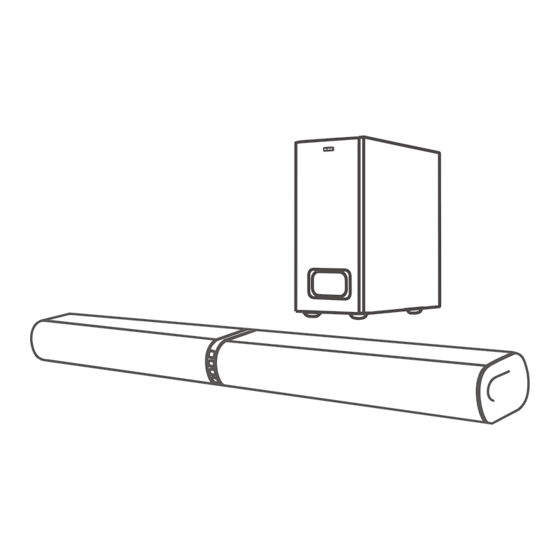
What’s in the Box Sound Bar (Left / Right) Remote Control Wired Subwoofer Stand (Left / Right) AC Power cord Wall Bracket Rubber Feet 3.5mm to 3.5mm Audio Cable HDMI Cable Optical Cable User Manual Quick Start Guide Wall Mount Guide •... -
Page 7: Placement And Mounting
Placement and Mounting As the unit can be used either a single sound bar or a 2-piece Tube speakers. Placement • You are suggested putting the unit with below options: Main Unit (Left) Main Unit (Right) Stand Mounting (if using option-A) Stand (Left) Stand (Right) Horizontal Mounting... -
Page 8: Installing The Rubber Feet (If Using Option-B)
Installing the Rubber Feet (if using option-B) You can extend the height of the unit. Note: Ensure the surface is clean prior to sticking the rubber foot to the bottom of the unit. 1. Turn the unit upside down. 2. Remove the backing paper from the rubber foot. 3. -
Page 9: Identifying The Parts
Identifying the Parts Main Unit 1 Speakers 2 Remote Control Sensor 3 Wall bracket screws 4 SOURCE button Select the play function. In AUX mode, the lights up Green. button Switch the unit between on and Standby mode. In Standby mode, the lights up Red. 6 VOL+ button Increase the volume level. -
Page 10: Remote Control
Remote Control Switch the unit between ON and STANDBY mode. 2 VOL+/VOL- Increase/decrease the volume level. 3 Function buttons Select the play function. 4 PAIR Ac tivate the pairing func tion in Bluetooth mode or disconnect the existing paired Bluetooth device. 5 MUTE Mute or resume the sound. -
Page 11: Connections
Connections Use the HDMI (ARC) Socket ARC (Audio Return Channel): With the ARC (Audio Return Channel) function, it allows you to send audio input from your ARC-compliant TV to ARC-compliant audio devices (e.g. soundbar) without the need to connect an audio cable. HDMI (ARC) To enjoy the ARC function, make sure main unit the HDMI (ARC) socket is connected by an HDMI cable (included) to the HDMI (ARC) socket of your ARC-compliant TV. -
Page 12: Use The Aux Socket
Use the AUX Socket A. Use a 3.5mm to 3.5mm audio cable (included) to connect the TV’s headphone socket to the AUX socket on the unit. B. Use a RCA to 3.5mm audio cable (not included) to connect the TV’s audio output sockets to the AUX socket on the unit. -
Page 13: Basic Operation
Basic Operation Standby/ON When you first connect the main unit to the mains socket, the main unit will be in Standby mode. Press the button on the unit or on the remote control to switch the unit ON. Press the button again on the remote control or on the unit to switch the unit back to STANDBY mode. -
Page 14: Aux/Optical/Hdmi Arc Operation
1 During ON mode, press the SOURCE button repeatedly on the unit or the BT button on the remote control to select Bluetooth mode. The Blue indicator will flash slowly. 2 Activate your Bluetooth device and select the search mode. “RSR TB285SW” will appear on your Bluetooth device list. -
Page 15: Listen To Music From Bluetooth Device
Tips: Enter "0000" for the password if necessary. If no other Bluetooth device pairs with this player within two minutes, the player will recover its previous connection. The player will also be disconnected when your device is moved beyond the operational range. If you want to reconnect your device to this player, place it within the operational range. -
Page 16: Specifications
• This is a 15 mins power off function, one of the ERPII standard requirement for saving power When the unit's external input signal level is too low, the unit will be turned off automatically in 15 minutes. Please increase the volume level of your external device. Specifications Soundbar Power Supply ...............................
Need help?
Do you have a question about the TB285SW and is the answer not in the manual?
Questions and answers