Advertisement
Quick Installation Guide
Air:Link 2000
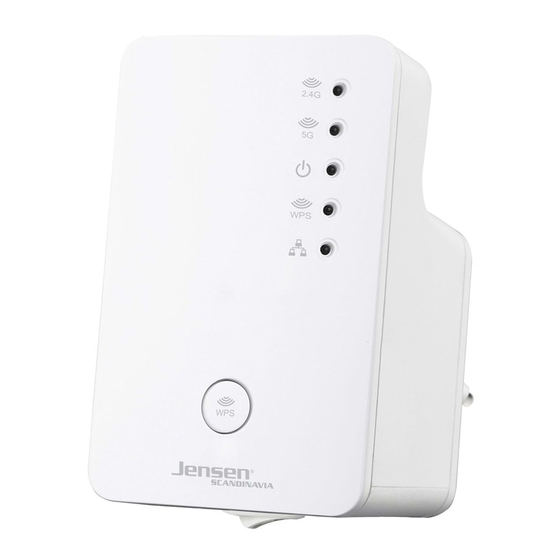
LED / Button function
1
2.4GHz LED
2
5GHz LED
1
2
3
Power LED
3
4
WPS LED
4
5
Ethernet LED
5
6
WPS/Reset button
WPS - Press and hold for 2
seconds to initiate a WPS
pairing process.
6
Reset - Press and hold for 10
seconds to reset AL2000
back to factory default.
LED
Color
LED status
Description
Excellent signal
Signal strength
On
Signal strength: 60 - 100%
1
Slow
Good signal
Flashing
Signal strength: 40 - 60%
Amber
Poor signal
Quick
2
Signal strength: below 40%
Flashing
No signal detected or in
Off
LED off mode.
WPS connection established
Off
(LED remains on for 5 min.
after connection is made.
6
Green
Slow
WPS in progress (waiting for
Flashing
another WPS device connection.
No WPS in progress or in
Off
LED off mode
AirLink2000
A
E
Sette opp AL2000
A
Sett AL2000 i en ledig stikkontakt i maksimalt 3m fra din trådløse ruter og
skru den på med av/på bryteren.
B
Søk etter tilgjengelig trådløse nettverk med din datamaskin, smarttelefon,
nettbrett osv. og koble til nettverket AirLink2000
C
Åpne nettleseren på enheten du bruker (Internet Explorer, Chrome osv.).
Dersom startmenyen for AL2000 ikke vises automatisk, skriv inn adressen
http://airlink.setup og trykk Enter.
Trykk Next når du får opp velkomstskjermen
D
Velg ditt trådløse nettverk fra listen. Om du har både 2.4Ghz og 5Ghz nettverk
kan du velge begge samtidig. Om du ønsker å endre navnet på nettverket må
du krysse av for «I want to have a new name for the repeated network»
Trykk Next.
E
Skriv inn ditt passord til eksisterende trådløst nettverk og trykk Next.
F
Skriv inn ønsket navn på det nye trådløse nettverket og trykk Next.
G
AL2000 er nå ferdig satt opp og er klar til bruk.
Du kan nå flytte AL2000 til området der du ønsker utvidet dekning.
H
For best mulig ytelse anbefaler vi at du velger en plassering der signal
lampene på AL2000 viser godt signal. Se info på venstre side.
Free 12 months support
Norway -
22 32 30 76
Sweden - 08 38 30 00
Denmark - 70 70 21 22
Finland -
09 455 21 22
Declaration of Conformity with Regard to EU Directive 1999/5/EC (R&TTE Directive):
Hereby, Jensen Scandinavia AS, declares that this wireless router is in compliance with
the essential requirements and other relevant provisions of Directive 1999/5/EC.
The declaration of confirmity may be consulted at www.jensenscandinavia.com/rtte/
B
F
A
Plug the AL2000 into a power outlet close to the existing wireless router and
turn it on with the on/off switch.
B
Use your Wi-Fi device (e.g. computer, smartphone, tablet) to search and
connect to the Wi-Fi network AirLink2000
C
Open a web browser (Internet Explorer, Chrome etc.) on your device.
If the AL2000 setup page is not displayed automatically, please go to
http://airlink.setup. Click Next when you see the welcome screen.
D
Please select your WiFi network from the list. If you have both 2.4GHz and
5GHz networks at home you may select both.
If you would like to use a new network name for the repeated network
please choose «I want to have a new name for the repeated network»
Click Next.
E
Enter the encryption key for your existing Wi-Fi network and click Next.
F
If you have selected to create a new name for the repeated WiFi network,
you will be asked to enter a new name. Once it's filled in, click next
AL2000 is now functional and ready for use.
G
You can now relocate the AL2000 to another location.
H
For the best coverage, select a location where the LED displays a strong signal.
See more information on left side of the Quick Installation Guide.
Switzerland
- 43 544 00 11
Belgium
- 2 880 77 30
Netherlands
- 20 262 26 25
Luxembourg
- 20 20 42 20
This equipment may be operated in all EU and EFTA countries: AT, BE, BG, CY, CZ, DK, EE, FI,
FR, DE, GR, HU, IS, IE, IT, LV,LI, LT, LU, MT, NL, NO, PL, PT, RO, SK, SI, ES, SE, CH, TR, GB
PRODUCT USAGE RESTRICTIONS: This product is intended for indoor use only.
C
G
H
Setup AL2000
A
or send an email to
support@jensenscandinavia.com
D
Advertisement
Table of Contents

Related Manuals for Jensen AirLink 2000


Summary of Contents for Jensen AirLink 2000
- Page 1 This equipment may be operated in all EU and EFTA countries: AT, BE, BG, CY, CZ, DK, EE, FI, Hereby, Jensen Scandinavia AS, declares that this wireless router is in compliance with FR, DE, GR, HU, IS, IE, IT, LV,LI, LT, LU, MT, NL, NO, PL, PT, RO, SK, SI, ES, SE, CH, TR, GB the essential requirements and other relevant provisions of Directive 1999/5/EC.
- Page 2 This equipment may be operated in all EU and EFTA countries: AT, BE, BG, CY, CZ, DK, EE, FI, Hereby, Jensen Scandinavia AS, declares that this wireless router is in compliance with FR, DE, GR, HU, IS, IE, IT, LV,LI, LT, LU, MT, NL, NO, PL, PT, RO, SK, SI, ES, SE, CH, TR, GB the essential requirements and other relevant provisions of Directive 1999/5/EC.
Need help?
Do you have a question about the AirLink 2000 and is the answer not in the manual?
Questions and answers