
Related Manuals for DELLA 048-GM-48333

Summary of Contents for DELLA 048-GM-48333
- Page 1 INSTRUCTION MANUAL BEER COOLER Model: 048-GM-48333 Please read the instruction manual carefully before installing and operating, and keep it for future reference.
-
Page 3: Important Safety Instruction
INTRODUCTION This is a household beer cooler, equipped with a CO2 cartridge pressure system to keep the beer fresh. It brings the beer to the best temperature for cold storage (32 to 39℉) within 19-21 hours. The beer cooler will keep the 5L Keg cool for an almost indefinite period. - Page 4 beer cooler is at least 5 inches / 10cm away on either side so as to allow correct ventilation on the appliance. Never put the beer cooler under the sunlight. Never cover the beer cooler when it is operating by some other object.
- Page 5 maintenance shall not be made by children without supervision. Children should be supervised to ensure that they do not play with the appliance. Warning: Do not store explosive substances such as aerosol cans with a flammable propellant in this appliance. This appliance is intended to be used in household and similar applications such as –...
- Page 6 BEER KEG SEALANT All 5 Liter beer keg with the below various appearance sealants can apply to the beer cooler, however, you should follow the information as below *The sealants with code No. 20 and 21 can be pierced simply by the cooler piercing pin.
- Page 7 provided in the beer cooler, attach it to the beer keg, and pierce it by cooler piercing pin. (Show as Figure 3). Figure 1 (Important: Before replacing the sealants or piercing the cooler kit, you must always follow the instructions marked on the keg to eliminate the excess gas and ensure that the keg has rested long enough to avoid foam coming out through the cooler piercing pin /tap faucet.
-
Page 8: Specifications
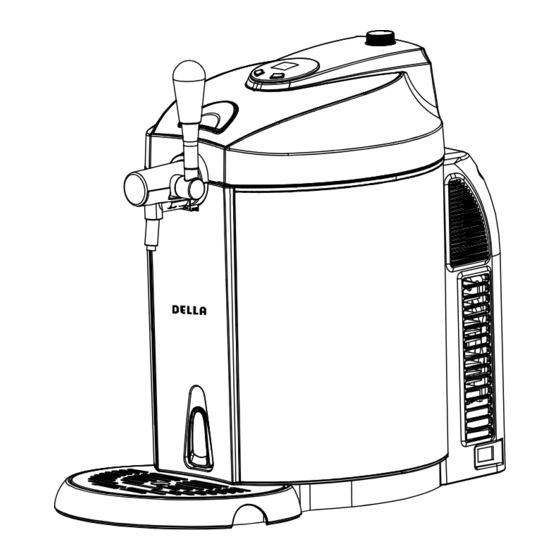
SPECIFICATIONS Item Descriptions Specification Voltage AC 120V/60Hz Available capacity 5 liter beer keg Rated operating power Cooling performance ℉ 36 to 54 adjustable ≤38dB(A); (ambient Noise level noise ≤25dB(A)) Dimensions W272*D480*H470 Net weight 0 .5Kg ± CO2 pressure out unit √... - Page 9 PARTS & FEATURE Figure 4 Figure 5 1. Top cover 8. CO2 pressure relief valve/ knob 9. LED display Drain switch/ Digital 2. CO2 cartridge sheath control button Drip tray 3. Tap handle 10. Door lock button 4. Tap 11. Rear cover 12.
-
Page 10: Installation
INSTALLATION & OPERATION A. INSTALLATION 1. Take out the beer cooler from its package. Place the beer cooler on a steady and horizontal surface, and make sure the beer cooler is at least 5 inches/10 cm away from other appliances or wall on each side so as to allow correct ventilation on the appliances to get better performance. -
Page 11: Operation
display the best performance) Note: Make sure the drain switch is at “Off” position, and no extra objects in the cooling cavity. The max water level line Figure 8 Figure 9 B. OPERATION Universal 5L beer keg 1. Before piercing the plug on the top of the keg, you must always follow the instructions marked on the keg to eliminate the excess gas and ensure that the keg has rested long enough to avoid foam coming out through the tap faucet. - Page 12 Beer dispensing unit Keg seal Beer keg 3. Open the beer cooler with 60-80N strength and place the well-assembled keg into the cooling cavity; Connect the CO2 connector tube and beer outlet tube with the keg lifter tube connector. NOTES: make sure all connection of tap mechanism is well connected, and without damage.
- Page 13 Beer connector Close 图十七 Open CO2 connector 4. Loosen the CO2 bottle sheath (Show as figure 15), insert a 16gram CO2 cartridge in the sheath (Figure 16), and screw the sheath tightly until you will hear a “Click”(Figure 17), which indicates that the cartridge seal has been pierced and the CO2 gas can flow into the keg freely.
- Page 14 CO2 bottle sheath Figure 15 Figure16 Figure 17 Figure 18 5. Close the top cover of the beer cooler; When pouring out the beer, the turn the knob on the top cover to “+” position to release the CO2, and turn it to “-“position when pause or stop pouring beer to close the CO2.
- Page 15 Connector Switch is on “off ” status Figure 19 7. It will take 19-21 hours to cool the beer to 37-43 ℉ 72-75℉ambient temperature. And it can keep the temperature as set. We suggest that you initially cool your beer keg for in your refrigerator before placing it into the beer cooler, especially when the ambient temperature is high.
- Page 16 9. to pour the beer out by pulling down the tap mechanism, and you can adjust the pressure regulator knob to control the beer flow rate and beer bubble; Note: Clean the glass before pouring beer out; if the beer or beer cup/glass is in high temperature or the beer is not cool enough, there are many bubbles when pouring beer out;...
- Page 17 1. The Heineken connector that comes with your beer cooler can work with all Heineken 5 liter kegs. However you must use a flat head screwdriver to remove the green base from the keg in order to install the new connector, provided with the beer cooler. 2.
- Page 18 Beer connector Figure 24 Figure 25 3. Close the top cover; operate it as above step 6-12, as the universal 5 liter keg, but step 9 is exception. D. TO CHAGE A NEW BEER KEG (5 liter universal keg) When the beer in the keg runs out, before changing a new beer keg. 1.
- Page 19 When you take out the beer connector and CO2 connector, please press the white button down Figure 26 Figure 27 E. TO CHAGE A NEW CO2 CARTRIDGE (No need for Heineken keg) Please change the CO2 cartridge if can’t pour beer out when the CO2 pressure knob is at “on”...
- Page 20 4. Turn the CO2 pressure knob to “+“ position to turn on the CO2 supply, and it is ready to pour beer out. Reminder: each 16g CO2 cartridge can pressure more than 5L beer out; Warning: 1. Please use the qualified CO2 cartridge. The below CO2 cartridge information for your reference.
- Page 21 one time recommended) Move the drain switch to horizontal line, will start to drain water Drip tray Water flow into drip tray from this end Figure 28(Sketch map of drain construction) 1. Open the drain switch to drain out the water from the cavity into the drip tray.
- Page 22 c. the drip tray can load 450ml water; CLEANING BEER TAP MECHANISAM Beer cooler need conformity with hygienically demand, it need clean before the first use or for long time use, clean the whole machine with dry cloth. Otherwise two cleaning way is recommended as following: 1.
- Page 23 dishwasher; Never use the chemical cleaning detergent to clean the parts, warm or purified water is recommended. TO CHANGE SPARE PARTS ACCESSORIES INCLUDED WITH YOUR BEER COOLER Spare Items Name Qty. Installment Picture parts Conncetor Regulator 5pcs seal valve Regulator 1pcs connector valve...
- Page 24 Heineken Heineken 1set adaptor Regulator valve 3pcs cartridge assembly Cleaning 1pcs bottle Cartridge pierced probe and seal washer Cartridge pierced probe and seal washer maybe damaged when wrong usage or other reasons, please replace a new one. 1. Firstly, pick out the seal washer with a tiny metal stick (Show as figure 31), and take out Cartridge pierced probe.
- Page 25 instead of new cartridge, or will cause hazard. B. TO CHANGE BEER TUBE (show as figure 33) Please replace the beer tube if beer tube is damaged and cause beer leakage. 1. Loose out the tube from the connection 1, draw out the tube. Pull down the lock setting, and draw the tube out.
-
Page 26: Maintenance
Replace the new seal circle of beer tube if the connector has leakage 1. Turn out the beer tube as indication of bellowing figure 2. Take out the seal circle of beer tube 3. Replace a new seal circle on same position 4. -
Page 27: Troubleshooting
that you can correct yourself. Troubleshooting Trouble Cause Troubleshooting The tap does not 1. The pouring tube is in poor 1. Well connect the pouring work / can’t pour connection or CO2 supplying is tube and CO2 supplying beer out cut off 2. - Page 28 This marking indicates that this product should not be disposed with other household wastes throughout the EU. To prevent possible harm to the environment or human health from uncontrolled waste disposal, recycle it responsibly to promote the sustainable reuse of material resources. To return your used device, please use the return and collection systems or contact the retailer where the product was purchased.
Need help?
Do you have a question about the 048-GM-48333 and is the answer not in the manual?
Questions and answers