Table of Contents
Advertisement
Quick Links
Operator's Manual
Fault Finder and
Fault Finder / Remote
WaRRanty InstRuctIOns
LIMITED WARRANTY - A Fault Finder or
Fault Finder / Remote Warranty is provided
to the original purchaser for a period of one
(1) year from the date of purchase, when
used in accordance with the operating
instructions. You must retain your receipt
for proof of purchase. This warranty covers
defects in materials and workmanship to the
Fault Finder or Fault Finder / Remote.
TERMS THAT APPLY TO THE WARRANTY
Improper installation, misuse, neglect and
tampering of any kind are NOT covered
under the Limited Warranty. Fault Finder
or Fault Finder / Remote, returned under
the Warranty will be inspected and if the
problem is determined to be the result of
neglect or abuse, then no warranty will be
applied. No warranty other than the above
is expressed or implied. Implied warranties
of merchantability and fitness for a particular
application are hereby disclaimed unless
the law specifically precludes this disclaimer.
The manufacturer and seller have no liability
for damages, incidental or consequential,
resulting from or caused by any failure,
malfunction or defect of any product.
TO MAKE A WARRANTY CLAIM -
1. Fault Finder or Fault Finder / Remote,
returned for warranty work must be
accompanied by a copy of the original
sales receipt/invoice and a note showing
the customer name, phone number, return
address (where the unit will be returned
to) and a brief description of the problem.
2. Pack product carefully in oversized carton
with crushed newspaper (or other appropriate
packing materials) for cushioning.
3. The product should be shipped PREPAID and
insured against shipping loss or damage.
4. Send warranties to:
Kencove Farm Fence
344 Kendall Rd
Blairsville, PA 15717
1-800-536-2683
- 1 -
If the "lightning bolt" is flashing
and voltage reading is "HI", then
the voltage being measured
by the Fault Finder is above its
range of measurement.
IMaGe 2
MeasuRInG Fence cuRRent
1. Turn on the Fault Finder.
2. Press the Fault Finder (
)
power button to toggle between
the volt and amp function until
the "A" symbol is displayed on
the right hand side of the display.
3. Firmly hold the Fault Finder with
your bare hand (do not wear
gloves). Pressing your thumb
firmly on top of the Fault Finder,
- 5 -
IntROductIOn
Depending on the model
purchased, there are 3 major
functions that the Fault Finder or
Fault Finder / Remote can perform.
1. VOLTMETER - Displays the
electric fence voltage in kilovolts
( kV ). 1kV = 1000 volts.
Benefit: Measuring fence voltage
helps determine the effectiveness
of the electric fence system.
2. CuRRENT METER - Displays
the current in (amps) that is
flowing through the fence wire.
Benefit: Measuring the current
through the hot fence wire will
help locate faults (shorts) in
the fence system. Fence shorts
reduce fence energizer [shock]
effectiveness.
3. REMOTE CONTROL - Allows
the user to turn the Energizer
on-or-off from any location on
the fence. (This unique function
is only available in the Fault
Finder with "Remote" and
only works with remote-ready
electric fence Energizers).
Benefit: Conveniently save
time by turning the energizer
on-or-off from any location on the
fence (through the hot wire).
*Fault FIndeR specIFIcatIOns
• Voltage range - .3 to 18 kV
• Current range - 2 to 150 amps
• Battery - 9 Volt Alkaline
*Specifications are subject to change
without notice.
- 2 -
position your fingers to make
contact with the metal ground
plate (battery cover) on the back.
Since the Fault Finder does not
require any additional wires for
grounding, the Fault Finder relies
on your body for the ground.
Therefore, making good contact
with the metal ground plate is
important (See image 2).
4. Place the Fault Finder's fence
hook onto the fence wire (See
image 3). Each time the
energizer pulses, a "lightning
bolt" will appear on the top of the
display to indicate a fence pulse
has been measured. The fence
current will be displayed, in amps
(A), at the center of the display.
Above the current reading an
arrow pointing to either the
left or the right will also be
displayed. These arrows indicate
the direction of the current flow
and will help to locate the faults
(shorts) in the fence.
NOTE: If the "lightning bolt" is
flashing and voltage reading
is "Lo", then the voltage being
measured by the Fault Finder is
below the range of measurement.
If the "lightning bolt" is flashing
and voltage reading is "HI", then
the voltage being measured
by the Fault Finder is above its
range of measurement.
The current reading should not
be taken if the fault finder is in
close proximity to the energizer
as it will give inaccurate reading.
- 6 -
paRts and theIR FunctIOn
IMaGe 1
Fault
low
Fence
Fault
direction
Battery
pulse
direction
Voltage
current
energizer
energizer
Off Button
On Button
(With Remote
(With Remote
power Button
Version Only)
Version Only)
and kV / a
Fence
Belt
Battery
hook
clip
cover
IMPORTANT: The Fault Finder or
Fault Finder / Remote does not
have a lighted display and was
not designed to work in low light
conditions. It is not recommend to
install or repair electric fencing in
low light conditions.
pOWeRInG the Fault FIndeR
On-OR-OFF
ON - Press and release the Fault
Finder (
) power button.
- 3 -
tuRnInG the eneRGIzeR
On-OR-OFF
(Fault FIndeR / ReMOte Only)
Please check with the manufacturer
as to which Energizer is compatible
with the Fault Finder / Remote.
1. Turn on the Fault Finder / Remote.
2. Firmly hold the Fault Finder with
your bare hand (do not wear
gloves). Pressing your thumb
firmly on top of the Fault Finder,
position your fingers to make
contact with the metal ground
plate (battery cover) on the back.
Since the Fault Finder does not
require any additional wires for
grounding, the Fault Finder relies
on your body for the ground.
Therefore, making good contact
with the metal ground plate is
important (See image 2).
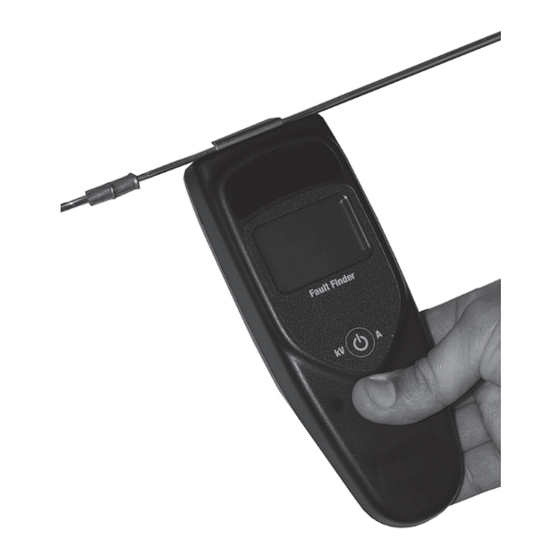
3. Place the Fault Finder's fence
hook onto the fence wire (See
image 3). Fence hook to fence
wire contact is needed to
transmit the on/off signals.
OFF – press and release the (
OFF button and the display will
show "OFF" indicating that a
signal was sent to the Energizer.
After the signal is sent, the Fault
Finder / Remote will return to
measuring current or voltage.
ON – press and release the (
ON button and the display will
show "ON" indicating that a signal
was sent to the Energizer. After
the signal is sent, the Fault Finder
/ Remote will return to measuring
current or voltage.
- 7 -
OFF - When turned on, the Fault
Finder will automatically turn off in
1 minute if not in use. To turn the
Fault Finder off manually, press and
hold the (
) power button for a
few seconds.
MeasuRInG Fence VOltaGe
1. Turn the Fault Finder on.
2. Press the (
) power button to
toggle between the volt and amp
function until the kV symbol is
displayed on the right hand side
of the display.
3. Firmly hold the Fault Finder with
your bare hand (do not wear
gloves). Pressing your thumb
firmly on top of the Fault Finder,
position your fingers to make
contact with the metal ground
plate (battery cover) on the back.
Since the Fault Finder does not
require any additional wires for
grounding, the Fault Finder relies
on your body for the ground.
Therefore, making good contact
with the metal ground plate is
important (See image 2).
4. Place the Fault Finder's fence
hook onto the fence wire (See
image 3). Each time the energizer
pulses, a "lightning bolt" will
appear at the top of the display to
indicate a fence pulse has been
measured. The fence voltage will
then be displayed, in kilovolts (kV),
at the center of the display.
NoTE: If the "lightning bolt" is
flashing and voltage reading
is "Lo", then the voltage being
measured by the Fault Finder is
below the range of measurement.
- 4 -
IMpORtant tIps When usInG
the ReMOte FeatuRe:
Before removing the Remote
from the fence, always check the
voltage on the fence to ensure
the Energizer received the on-
or-off signal. The easiest way to
determine if the Energizer is on,
is to check the display for the
"lightning bolt" indicator.
If the Energizer did not turn on-or-
off, ensure that the wire being used
to send the signal is not open and is
connected to the Energizer's hot wire.
If the hot fence wire being used is
rusted or corroded and the Remote
will not work, move to a different
fence location where the fence wire
is not rusted or corroded.
A low battery will reduce the
Remote's ability to effectively transit
the on-off signal to the energizer.
Replace the battery if the battery
indicator is shown on the display.
IMaGe 3
)
)
- 8 -
Advertisement
Table of Contents

Related Manuals for Kencove Fault Finder

Summary of Contents for Kencove Fault Finder
- Page 1 TO MAKE A WARRANTY CLAIM - is only available in the Fault with the metal ground plate is 1. Fault Finder or Fault Finder / Remote, Finder with “Remote” and important (See image 2). returned for warranty work must be...
- Page 2 VOltaGe ReadInGs fence you are measuring all the fence does not necessarily mean 1. Turn on the Fault Finder / Remote. leaks (faults) in the fence. The that there is a critical fault on your To understand how the Fault Finder farther you go from the Energizer 2.
Need help?
Do you have a question about the Fault Finder and is the answer not in the manual?
Questions and answers