Table of Contents
Advertisement
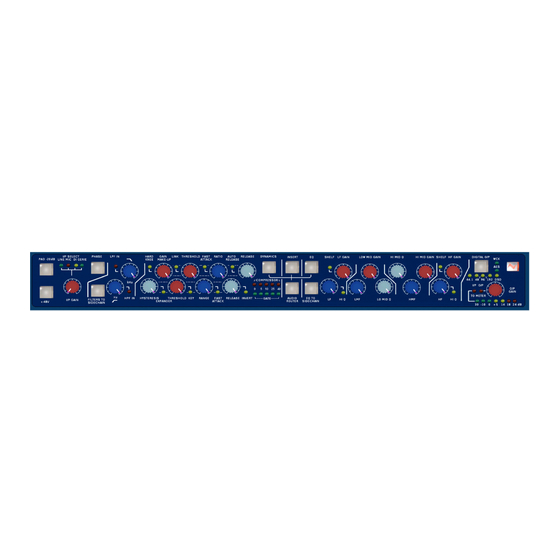
Neve 8801
Channel Strip
User Manual
527 - 358
Issue 7.3
The 8801 is a combined Mic / Line / Instrument Preamp,
with Dynamics processing, EQ and Insert point.
The Audio Router function provides a user configurable signal path,
allowing any order of Dynamics, EQ, and Insert within the channel path.
In addition, the EQ and/or Filters can be placed in the Dynamics sidechain.
Advertisement
Table of Contents

Summary of Contents for Neve 8801
- Page 1 User Manual 527 - 358 Issue 7.3 The 8801 is a combined Mic / Line / Instrument Preamp, with Dynamics processing, EQ and Insert point. The Audio Router function provides a user configurable signal path, allowing any order of Dynamics, EQ, and Insert within the channel path.
-
Page 2: Health & Safety Notice
Support: www.ams-neve.info/crm/fault_report.html © 2007-2010 AMS Neve Ltd own the copyright of all information and drawings contained in this manual which are not to be copied or reproduced by any means or disclosed in part or whole to any third party without written permission. -
Page 3: Table Of Contents
88 Series Outboard / 8801 Issue 7.3 Table of Contents Health & Safety Notice.......................2 1 - Introduction.........................5 Package Contents........................5 System Requirements.........................5 Brief Description & Characteristics....................6 2 - Front Panel Controls.....................7 On/Off Switch..........................7 Input Section..........................7 Line Input.........................7 Mic Input...........................7 PAD..........................7 Phantom Power........................7 DI Input..........................7... - Page 4 88 Series Outboard / 8801 Issue 7.3 Key input........................15 Dynamics Sidechain Link......................16 Insert..........................16 Line Output........................16 Headphone........................16 Rear Panel Power section......................17 Warning symbols......................17 USB..........................17 Technical Earth Switch......................17 Fuse..........................18 Power DIN socket......................18 4 - Optional Digital board....................19 Analogue to Digital Converter - AES/EBU (AES 3) & DSD...............19 Sampling Frequency Selection....................19...
-
Page 5: Introduction
Dynamics, EQ, and Insert within the channel path. In addition, the EQ and or filters can be placed in the Dynamics sidechain. The configuration of the unit can be stored and recalled via the Neve Recall software on a PC or Mac. -
Page 6: Brief Description & Characteristics
Dynamics sidechain. • Dynamics processing based on 88R circuitry. • Compression/Limiting with auto release. • Gate/Expander/Ducker. • Dynamics Sidechain linkable to other 8801 units. • Key input. • Compressor and Gate gain reduction meters. • Balanced switchable Insert. • 4 band EQ based on the 88R console, switchable between channel path and Dynamics sidechain. -
Page 7: Front Panel Controls
Issue 7.3 2 - Front Panel Controls On/Off Switch The Neve Logo Switch on the right hand side of the front panel switches the unit on and off. Input Section On power up, the default input selection will be Line. -
Page 8: Phase Button
88 Series Outboard / 8801 Issue 7.3 Phase Button All inputs can be phase reversed using the Phase button. The Phase button will illuminate to indicate a phase inversion between input and output. Filters Section High Pass Filter The high pass filter has a 12dB per octave (20dB per decade) slope and a frequency range from 30Hz to 300Hz. -
Page 9: Limiter/Compressor
Link can be selected by pressing on the Threshold knob. When enabled, the compressor section of the unit can be controlled by the sidechain of other linked 8801 units. For example, this allows a stereo input across two modules to be compressed by the same amount, maintaining the stereo image. -
Page 10: Gain Reduction
88 Series Outboard / 8801 Issue 7.3 Gain Reduction The red meter indicates the gain reduction in dB applied by the compressor. Expander/Gate The Expander/Gate has knobs for: • Hysteresis variable from 0dB to 25dB, & pressing Hysteresis knob selects Expander mode •... -
Page 11: Eq Section
88 Series Outboard / 8801 Issue 7.3 EQ Section EQ Button The EQ button activates the EQ section. When illuminated, EQ is in circuit. When not illuminated EQ is bypassed. EQ TO SIDECHAIN Button The EQ To Sidechain button places the EQ in the sidechain. -
Page 12: Insert
88 Series Outboard / 8801 Issue 7.3 Insert The Insert button switches the insert into the channel path. The Insert send and return can be found on the rear panel. The send is on a male XLR and the return is on a Female XLR. -
Page 13: Audio Routing Screen
As soon as a new item is inserted in the Channel Path or the Dynamics Sidechain, the unit is updated accordingly. Similarly, if the order of processing is changed on the 8801, these changes will be immediately reflected on this screen. -
Page 14: Bargraph Led Meter
The default meter setting is Input. Overload There are many gain stages in the 8801 channel strip, and it is possible for any one of these stages to overload. Overloading is indicated by one of the following buttons illuminating red:... -
Page 15: Rear Panel
88 Series Outboard / 8801 Issue 7.3 3 - Rear Panel Rear Panel Audio Connections Line Input The line input combo socket accepts input signals from either male XLR or male ¼” Jack connectors. Input signals can be balanced or unbalanced. -
Page 16: Dynamics Sidechain Link
1-2 and 3-4. Pins 1 and 3 as well as pins 2 and 4 are in parallel. Multiple 8801 units can be linked allowing all linked units to be compressed by the same amount. Multiple units can be linked together by forming a daisy chain of the Dynamics Links. -
Page 17: Rear Panel Power Section
Disconnect the mains lead to isolate this unit. Please refer to the manual before operating this unit. The Type B USB socket is used to connect the 8801 unit to a PC or Mac for Recall store and recall of the unit settings. -
Page 18: Fuse
88 Series Outboard / 8801 Issue 7.3 Fuse The removable fuse holder houses a 1.6 AT fuse. Power DIN socket The 8 pin DIN socket should only be used to connect the power supply provided with the 8801 unit. For technical reasons the orientation of the socket is the opposite way up, and the “top”... -
Page 19: Optional Digital Board
88 Series Outboard / 8801 Issue 7.3 4 - Optional Digital board The 8801 has an expansion slot allowing access for digital connectivity. The digital option available is an Analogue to Digital converter featuring AES/ EBU and DSD outputs Analogue to Digital Converter - AES/EBU (AES 3) & DSD The optional AES/EBU &... -
Page 20: Dsd
SDIF2 DSD data requires an external sync clock which is passed to the Digital to Analogue converter of the receiver. Preferably use the 8801 Wordclock O/P clock which is available on the back of the 8801 ADC option. SDIF3 DSD data have embedded clocks and don't require any external sync clock. -
Page 21: Firmware Upgrades
88 Series Outboard / 8801 Issue 7.3 5 - Firmware Upgrades In order to get the most from your Neve unit, the latest firmware should be installed. Upgrading your software is a simple process with on screens prompts to guide you. -
Page 22: File Downloading
88 Series Outboard / 8801 Issue 7.3 File Downloading Once the file is selected the transfer will begin, and the Recall screen will display that the download is under way. This process may take up to two minutes. Upon completion, the message Firmware Update Successful will be displayed. -
Page 23: Recall Software Installation
Issue 7.3 6 - Recall Software Installation Neve Recall software allows settings from the 8801 to be stored on a PC or Mac and recalled for later use. Recall can be used for all the units in the 88 range including 8801, 8803, 8804 and 8816. - Page 24 88 Series Outboard / 8801 Issue 7.3 The installation programme will select a default location for files to be copied and created to. Click Next, or click Browse and then select another location. Click Next to start the installation. The install will start and file progress will be shown.
-
Page 25: Installation For Mac
Once the install has successfully completed, click Close. The software will now be ready to use, and will be accessible from Start Menu / Programs / Neve Recall / Neve Recall, or from the Recall icon on the Desktop. Installation for Mac Insert the CD containing the software into the Mac, and the install programme will launch automatically. -
Page 26: Other Information
88 Series Outboard / 8801 Issue 7.3 7 - Other Information Rack Mounting and Cooling The rack unit should be installed in a 19 inch cabinet with access to the front and rear. No specific air conditioning is required for the rack provided that there is free flow of air through the rack from front to back and side to side, and that the ambient air is maintained below 25 degrees centigrade.
Need help?
Do you have a question about the 8801 and is the answer not in the manual?
Questions and answers