Table of Contents
Advertisement
V
e
r
s
i
o
n
7
.
1
S
e
t
u
p
&
U
s
e
r
G
u
i
d
e
V
e
r
s
i
o
n
7
.
1
S
e
t
u
p
&
U
s
e
r
G
u
i
d
e
PRODUCTS:
TERRABLOCK HUB SERVER
TERRABLOCK 24D/HA
TERRABLOCK 24D
TERRABLOCK 24EX 32/16/12/8
TERRABLOCK 8D
TERRABLOCK 8XS
TX16 EXPANSION CHASSIS
ACCESSORIES:
QLOGIC SANBOX, ATTO FIBRE CHANNEL SWITCHES
EDGE-CORE, HP ProCurve, NETGEAR ETHERNET SWITCHES
ATTO FIBRE HOST BUS ADAPTERS
SOFTWARE:
FACILIS SHARED FILE SYSTEM
FACILIS TERRABLOCK MANAGER
FACILIS FILE MIGRATION TOOL
FACILIS PROJECT MANAGER / VIEWER
Advertisement
Table of Contents

Subscribe to Our Youtube Channel
Related Manuals for Facilis TERRABLOCK


Summary of Contents for Facilis TERRABLOCK
- Page 1 TERRABLOCK 8XS TX16 EXPANSION CHASSIS ACCESSORIES: QLOGIC SANBOX, ATTO FIBRE CHANNEL SWITCHES EDGE-CORE, HP ProCurve, NETGEAR ETHERNET SWITCHES ATTO FIBRE HOST BUS ADAPTERS SOFTWARE: FACILIS SHARED FILE SYSTEM FACILIS TERRABLOCK MANAGER FACILIS FILE MIGRATION TOOL FACILIS PROJECT MANAGER / VIEWER...
- Page 2 TO THE EXTENT ALLOWED BY LOCAL LAW, EXCEPT FOR THE OBLIGATIONS SPECIFICALLY SET FORTH IN THIS WARRANTY STATEMENT, IN NO EVENT SHALL FACILIS TECHNOLOGY OR ITS THIRD PARTY SUPPLIERS BE LIABLE FOR DIRECT, INDIRECT, SPECIAL, INCIDENTAL, OR CONSEQUENTIAL DAMAGES, WHETHER BASED ON CONTRACT, TORT, OR ANY OTHER LEGAL THEORY AND WHETHER ADVISED OF THE POSSIBILITY OF SUCH DAMAGES.
-
Page 3: Table Of Contents
Before You Begin Rack Mounting the 24D/24EX Enclosure Installing the Drives Mouse/Keyboard Monitor Power Cords Client Hardware Installation Cabling the TerraBlock Server Fibre Channel Cabling Cabling the Fibre Switch Ethernet Cabling Cabling the Ethernet Switch Turning on the TerraBlock Server... - Page 4 Chapter 3 – Setup and Administration System Setup Management Tools Troubleshooting/Service Tools Tools Volume TerraBlock Manager TerraBlock Manager User Mode Menus Volumes Tab Volumes Tab – Button Functions Mount Un-mount Update Read-Only Add Users Mount Properties Show & Hide Permissions...
- Page 5 Volume Workflows – Single-user Write Volume Workflows – Multi-user Write Chapter 6 – Facilis File Migration Tool Setup and Usage Chapter 7 – Facilis Project Manager / Viewer Facilis Project Manager Overview Facilis Project Manager Usage Facilis Project Viewer Chapter 8 – Using the CommandApp...
- Page 6 Appendix A – Additional Setup Tools Tools Volume Configuration OSX Icon Installation Additional Client Software TerraBlock Manager Keyboard Shortcuts Appendix B – Working with External Tandem Volumes Working with External Tandem Volumes Appendix C – Server Hardware Specifications Dimensions and Weight...
-
Page 7: Using This Guide
Using This Guide Who Should Use This Guide This guide is intended for any user or administrator of the Facilis TerraBlock system. What This Guide Contains This guide covers the information you will need to: Install the enclosure and drives ... -
Page 8: Overview
TerraBlock 8D contains a single field replaceable power supply. An uninterruptable power supply (UPS) is also highly recommended. All TerraBlock Servers ship with field replaceable internal fans. Never leave the TerraBlock cover off for more than 2 minutes as the hard drives may overheat... -
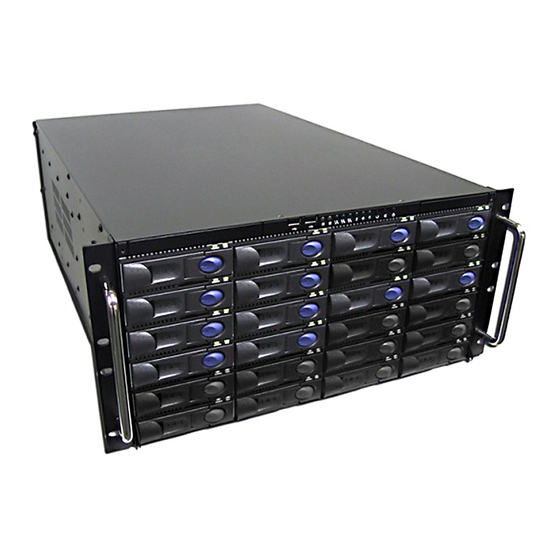
Page 9: Terrablock Enclosure Front Panel
TerraBlock Enclosure Front Panel The front panel of the TerraBlock system is used to start up and shut down the unit and to monitor hard drive activity through LED indicators. The drive carriers are inserted in the front of the unit during initial installation, or in the event of drive replacement. -
Page 10: Enclosure Front Panel Cover
The 8D unit is shown below Enclosure Front Panel Cover The 24D/EX and 8D TerraBlock enclosures have a front cover that can be kept in place to prevent access to the physical hard drives. If access to the drives is necessary, the cover can be opened by unscrewing the two thumb screws at the top left and right. -
Page 11: Power Supplies
The 8D rear panel is very similar to this diagram when rack mounted, but a single power supply. Power Supplies – One power supply in the TerraBlock 24D and 24EX, chassis is replaceable while the unit is running. The unit will run as long as at least 2 power supplies are active. -
Page 12: Chapter 2 - Hardware Installation
If you are missing any of the components listed below, do not attempt installation until contacting Facilis Technology customer service at +1 978-562-7022. After unpacking the TerraBlock kit, check the contents of the kit against the following list to be sure you have received all the components. The kit contains: ... -
Page 13: Installing The Drives
Installing the Drives The TerraBlock SATA drives ship boxed separately from the enclosure. If the SATA drives have been left at or below 45F (7C) for several hours (on a delivery truck or loading dock), allow the drives to return to room temperature before inserting and powering on the unit. -
Page 14: Monitor
A keyboard and mouse (not supplied) should be installed prior to powering on the TerraBlock Server. If possible, use a USB keyboard and mouse, as these will remain enabled after boot and can also be connected after the server is on. -
Page 15: Cabling The Terrablock Server
Cabling the TerraBlock Server The following explains how to cable the TerraBlock system to clients directly or any switches in your configuration. Keep the location of the edit rooms in mind when installing the TerraBlock. (See Appendix D or call Facilis customer support for additional information on cabling options and specifications). -
Page 16: Ethernet Cabling
Ethernet Cabling There are two methods of connecting the TerraBlock Server to an Ethernet switch via 1Gbit Ethernet diagrammed below. Alternatively, you can install a 10Gbit Ethernet card to connect either directly to a client with the model card or to connect to the Ethernet switch with the 10Gbit uplink option (servers shipped after 8/1/2010). -
Page 17: Turning On The Terrablock Server
Not shown here: Established link LED’s When a link has been established with the TerraBlock Server or a client system, an LED light will illuminate on the switch where the port number is listed. Additional configuration on the TerraBlock Server and clients will be required. -
Page 18: Chapter 3 - Setup And Administration
The TerraBlock system has software management tools pre-installed on the server. The following covers these tools that are installed prior to shipping. The most commonly used is the TerraBlock Manager. It allows for user and volume management. The default user that launches the TerraBlock Manager on the server will have the ability to add, change and remove volumes;... - Page 19 The name of the program is SMManager.exe QLOGIC Switch Management When a Fibre Channel switch is included with a TerraBlock order, managing the QLOGIC switch may be necessary. This can be performed from the TerraBlock Server.
-
Page 20: Tools Volume
Tools Volume The Tools volume allows communication between the TerraBlock Server and the TerraBlock Manager software on the clients. The Tools volume is a 1GB Read Only volume in each TerraBlock system and cannot be removed or deleted. It is mounted by default on every fibre connected client workstation. -
Page 21: Terrablock Manager
TerraBlock Manager The TerraBlock Manager is used to create and change volumes and users, assign volumes to users, mount, un-mount and update volumes. The TerraBlock Manager can be launched from the blue shortcut icon after the server is powered on. These examples show the Mac OSX client TerraBlock Manager. -
Page 22: Terrablock Manager User Mode Menus
Un-mount all volumes on exit (Windows, Mac OSX, Linux) – When this setting is enabled, all volumes will be un-mounted upon close of the TerraBlock Manager application. Because of this, it is necessary to have the TerraBlock Manager open in the background while the workstation requires use of the TerraBlock volumes. -
Page 23: Volumes Tab
Export to .csv Users may export the contents of the TerraBlock Manager’s current window display to a .csv file by using the ‘Export to .CSV’ command under the File Menu rather than the User Mode menu. This .csv file can be then imported into any application that supports comma-separated value files. - Page 24 When using Auto-format, the volume size will match the partition size in the client OS. If formatting volumes manually, the volume must be formatted the same size set in the TerraBlock Manager, and not partitioned into smaller sections at the client station. The size of a volume can be increased after creation.
- Page 25 RAID50 parity. The data and DynaRAID RAID5 parity data is striped across multiple Facilis devices. The Facilis device can be an additional TerraBlock Server or a Facilis TX16 Expansion Chassis. If an individual physical drive failure occurs, the necessary RAID5 data is decompressed and used in place of the missing primary data.
- Page 26 Server – Multiple servers can be employed to increase capacity and bandwidth in a Facilis network. The names of the servers will be displayed in this column for ease of volume location. If a volume is spanned across multiple Facilis devices, (RAID50, RAID51, ATTO Power Center) “Tandem”...
-
Page 27: Volumes Tab - Button Functions
Volumes Tab - Button Functions Mount When the Mount button is clicked, the TerraBlock Manager will attempt to mount any volume highlighted according to that volume’s settings in the Mount Properties and according to the Mount Type; Multi-user or Single-user Write (see Change Volume for more information on changing Mount Type). -
Page 28: Update Read-Only
Client machines may mount up to 30 volumes per Terrablock server. Update Read-Only This button is used to refresh the data or contents for workstations that have a Single-user Write volume mounted with Read Only Access. This action will refresh the files and directories on the Read-Only volumes, and present the latest version of the data. -
Page 29: Create Volume
Volumes over 8TB in size are supported but not recommended. If volumes will be designated as Multi-user Write on a 64bit Windows 7/10 TerraBlock, there is no hard limitation on volume size, however Facilis recommends against creating extremely large volumes as it may impact the volume recovery time. - Page 30 Auto Format option is available (see Auto Format Volume, below). When selecting Multi-user Write, the Auto Format option is not available. Multi-user Write volumes are created and automatically formatted as NTFS on the TerraBlock Server. They are then automatically set to Multi-user volumes after the server format is complete.
-
Page 31: Delete Volume
When ‘Auto Format’ is chosen, the volume will be created and mounted with Single-user Write access. After a drive rescan the TerraBlock Manager will initiate formatting the volume as NTFS or HFS+ using the same name given in the TerraBlock Manager ‘Create Volume’... - Page 32 Write Access on the client where the change is applied. After changing the volume size in the TerraBlock Manager ‘Change Volume’ window select the OK button to submit changes. Depending on the OS, different rules will be applicable.
- Page 33 Change Size (MUW) – To change the size of a Multi-user Write volume, open the TerraBlock Manager on a client system or the TerraBlock Server itself. From the Change Volume window enter a new size for the Multi-user Write volume and click OK.
-
Page 34: User Access Permissions
TerraBlock Server itself. The TerraBlock Server then becomes the “Single-user Write” owner of the volume. Every volume designated as Multi-user Write will have a “W” in the TerraBlock Manager Sys (System) column, and “Multi- user Write” in the Mount Type column. -
Page 35: Refresh
Using the Refresh button at regular intervals will ensure that accurate data is displayed. Users Tab On TerraBlock client systems, the ‘Users’ tab on the TerraBlock Manager will only be visible if the TerraBlock User has “Admin” access. These are the columns in the TerraBlock Manager Users Tab: Name –... -
Page 36: Add Volumes
To quickly add the correct user name of a client system without using the “Create User” button and dialog, simply launch the TerraBlock Manager on the client. If communication is successful, the user will be automatically created based on the name of the OS local user account. -
Page 37: Refresh
Refresh The Refresh button is used to update the display of the TerraBlock Manager. Upon completing a task in the User Tab, if the display does not refresh automatically, click the Refresh button. If the TerraBlock Manager display still had not updated, quit and re-launch the TerraBlock Manager. - Page 38 Model – This lists the model of the physical drives in the TerraBlock Server. Serial# – This lists the serial number of the physical drives in the TerraBlock Server. This can be useful to verify the correct drive is being replaced during a drive replacement.
-
Page 39: Terrablock Manager On The Server
TerraBlock Manager on the Server Additional Function Buttons When launching the TerraBlock Manager on the TerraBlock Server itself, there are several additional features that the Server administrator may use. These additional features are available only when running TerraBlock Manager from the Server and will not appear on a TerraBlock client, regardless of the user’s permissions. -
Page 40: Add Attached Volumes
(SUW only) or un-mount Volumes when needed. If a user has never launched the TerraBlock Manager on the local workstation, the username will show up as “Unknown (xx)”, with no hostname. When remotely mounting or un-mounting for this user, the Administrator must know the WWN number of the Fibre Channel card. -
Page 41: System Tab: Locate
TerraBlock Server that the TerraBlock Manager is currently running on. Pressing the Locate button causes the selected physical drive’s disk activity light to blink, making it easier to locate the physical drive in the TerraBlock Server Enclosure. -
Page 42: Admin Settings Tab
Enable E-mail Notification of TerraBlock errors The server is able to report any Disk, SMDrive (TerraBlock Server’s service) or SAS errors to an e-mail address specified in the Admin Settings tab of the TerraBlock Manager. Enter the e-mail information and select ‘Test E-mail’ to verify your e-mail... - Page 43 Client. In a multi-server environment, users will be prompted for their username and password once the setting has been enabled on any one of the TerraBlock servers. Disable automatic user creation This option is used in conjunction with the ‘Enable username and password login’...
-
Page 44: Ldap Tab
Directory server. Once this option is enabled, an additional tab will be displayed in the TerraBlock Manager on the server itself, as well as any client with Admin privileges. Users from the LDAP or Active Directory server can then be synced or pulled to the TerraBlock server to become a TerraBlock user. -
Page 45: Ldap Tab - Button Functions
The Group column displays the existing group name that located on the LDAP/AD server. Permission This column lists the permissions of an existing TerraBlock user to be applied to an LDAP/AD user when “Sync” is performed. Name This lists the display name of the user provided by the LDAP/AD server. This most commonly will match the Common Name. -
Page 46: Configure Ldap
‘Connected Successfully’ dialog will be displayed. Refresh The Refresh button is used to manually update the display of the TerraBlock Manager. If the user interface (UI) does not update automatically the information displayed in the TerraBlock Manager may become outdated. Use the Refresh button to force a TerraBlock Manager UI update. -
Page 47: Terrablock Client Setup
If Sync all is selected while both TerraBlock and LDAP users are shown, existing TerraBlock users that do not exist on the LDAP server will be deleted. TerraBlock users will then match only what the LDAP server has provided. It is recommend to use this at initial setup when there are no existing TerraBlock users. -
Page 48: Linux Clients
After the Fibre Channel card has been installed and configured properly, attach the fibre cable to the ATTO fibre card. In a single TerraBlock Server environment, there must be only one fibre cable connected to the Linux Client. -
Page 49: Linux Clients
If GUI is preferred, please consult the documentation for your specific distribution. To create a Single-user Write volume for use with Linux Clients, in the TerraBlock Manager ‘Volumes’ tab, select the ‘Create Volume’ button. In the ‘Create Volume’... - Page 50 TerraBlock Manager ‘Volumes’ tab, select the volume in TerraBlock Manager and mount with write access. After the Single-user Write volume has been mounted by the TerraBlock Manager, the volume is now available to the Linux client as an un-partitioned and unformatted device.
- Page 51 Note: ~ denotes the letter, b through z (a is the system drive), in the order the devices were recognized by the Linux OS Record the label of the device you mounted with the TerraBlock Manager (example: sdh) and go to step 3.
- Page 52 The –L switch in the mkfs.xfs command sets the volume label in the Linux OS. Be sure the volume name inserted into the xfs formatting command is EXACTLY the same as the name listed in TerraBlock Manager. Be aware that volume names are case sensitive.
-
Page 53: Linux Clients
The easiest way to do this is through the volume label. If you formatted the volume using mkfs.xfs –L, the volume label should be the name of the TerraBlock volume. In order to view the fstab file use the following command: cat /etc/fstab. The fstab file can also be viewed using a graphical text tool, such as Gedit. - Page 54 Un-mounting Single-user Write Volumes Un-mounting a Single-user Write volume is a two step process. 1. In the TerraBlock Manager, select the Single-user Write volume and press the ‘Unmount’ button. This will remove the device from the Linux client. 2. In the Terminal, as ROOT, un-mount the volume from the Linux filesystem by running the ‘umount’...
- Page 55 Unlike Multi-user Write volume mount points, Single-user Write volume mount points are not automatically removed when the Single- user Write volume is un-mounted. The SUW volume mount point will remain in the file system. If desired, the SUW mount point directory can be deleted once the SUW volume has been un-mounted.
-
Page 56: Ethernet Shared File System Setup
This is achieved with either a single Ethernet connection from the TerraBlock NIC card to an Ethernet switch, four teamed Ethernet links from the TerraBlock to an Ethernet switch, or, with servers shipped after 8/1/2010, a 10Gbit uplink to a 10Gbit enabled switch. -
Page 57: Enabling The Ethernet Option On The Server
TerraBlock Server’s hostname. Enabling the Ethernet Option on the Server Once the TerraBlock Server is cabled to the Ethernet switch and the IP address is set, the Ethernet option can be enabled (the Ethernet option should be enable for all new TerraBlock servers). -
Page 58: Enabling The Ethernet Option On The Clients
Ping the TerraBlock Server by IP address and/or Host Name. To Ping the TerraBlock Server from a Windows client system go to the Start Menu of the client and choose Run. Type “cmd” and hit enter. At the > prompt type “ping <server IP address>”. -
Page 59: Teamed Ethernet Connection
Interface Card (NIC). You must install the Ethernet NIC into an available slot in the TerraBlock Server. The driver for that card is also included with the kit on a USB thumb drive. At this time Facilis only supports the use of X7 (or newer) based TerraBlock 24EX and 24D units for the 4X teamed Ethernet option. -
Page 60: Teaming The Nic Connections
Cancel. 2. The Intel driver package should be found in the following path on the TerraBlock Server: C:\Program Files\Facilis\TerraBlock\Drivers\Windows\Intel (Drivers can also be found on the provided USB key or downloaded at www.facilis.com). - Page 61 4. Double click on the first Network Adapter listed (see above). You will be presented with the Network Connection Properties Window. Click on the Teaming tab in that window. 5. In the Teaming tab select the “Team this adapter with other adapters” option and click the New Team button (see above).
- Page 62 7. In the next New Team Wizard window select Adaptive Load Balancing and click 'Next'. If you are using a switch other than that supplied by Facilis and it supports the IEEE 802.3ad Dynamic Link Aggregation option you may want to consider using that option. However, you will have to configure your switch appropriately for this option.
-
Page 63: 10Gbit Ethernet Connection
Windows 10 x64 operating system. The card installation requires an available PCIe slot in the TerraBlock Server. If all the PCIe slots are occupied with Fibre Channel cards you will have to remove one card and consider adding a Fibre Channel switch to accommodate those clients connected to the card(s) you remove. - Page 64 (see pg. 59 “Single Ethernet Connection”). When installing a dual channel Myricom 10GBit Ethernet card in the TerraBlock server it is recommended to have an independent subnet or network for each channel. For example, when configuring an IP address, channel 1 can be set to 10.0.0.1 and channel 2 to 20.0.0.1.
-
Page 65: Creating And Managing Users
In the Users Tab, users may show up with the name “Unknown (xx)” - you may disregard these users. The most efficient method of creating users on the TerraBlock manager if not using User and Password Authentication is to allow client stations to send their user information to the server. -
Page 66: Logging In To The Terrablock System
TerraBlock Manager from any client workstation. New User Login If the user does not currently exist on the TerraBlock server, the user logging in will be asked to create a new user. Selecting “Yes” will allow the server to automatically create the new user. -
Page 67: Changing Passwords
The user logging in will be asked to create and verify their password. Existing User Login If a user is logging in for the first time using an existing TerraBlock user (a user that existed prior to version 5.6) the user will be asked to create and verify their password. -
Page 68: Ldap/Active Directory User Feature
Once connection to an LDAP or Active Directory (AD) server has been established, the User Groups will be listed in the TerraBlock Manager. A specific user or multiple users can then be selected and synced or pulled from the LDAP/AD server and will become a new TerraBlock user. - Page 69 Any new LDAP/AD user will be missing from the TerraBlock. The same User(s) may be located on both servers. Changes may have to be applied to the TerraBlock user if volumes and or permissions have changed for the user (see above). A single click of the user in the User list will generate a “pop up”...
-
Page 70: Creating Volumes
Facilis Shared File System (Multi-user Write), it is recommended that all volumes be formatted as NTFS. While HFS+ is supported for use with the Facilis Shared File System, it is strongly recommended that Multi-user Write volumes are formatted with an NTFS filesystem. -
Page 71: Dynaraid
TerraBlock Server. Logical Volumes When creating a volume the Terrablock server creates the volume in logical pieces. A logical volume may be no more than 1000GB. Thus larger volumes are constructed with more logical pieces. Each logical volume has a second RAID or Mirror piece unless the volume is unprotected. -
Page 72: Raid Descriptions
If a volume is created with RAID50 protection and one of the individual Facilis devices becomes unavailable, the RAID50 volume will be unavailable to users until the individual Facilis device (TerraBlock Server or TX16 Expansion Chassis) is restored to operation. - Page 73 Multi-user Write volumes. If the RAID50 volume has not yet been set to Multi- user Write, this can be done using the ‘Change Volume’ feature in the TerraBlock Manager. Changing RAID50 volumes to Multi-user Write can only be done from the TerraBlock Manager running on the TerraBlock Server.
-
Page 74: Creating Tandem Volumes
Creating Tandem Volumes In the ‘Create Volume’ dialog, the Tandem button allows selection of multiple drive groups. Drive groups may be on the same TerraBlock Server, (if working with a TerraBlock 24D (24 drives)), different servers (in a multi-server workgroup) or TX16 Expansion Chassis’. - Page 75 TerraBlock servers with an attached TX16 Expansion Chassis. RAID50 RAID50 is supported on Windows 7 and Windows 10 TerraBlock Servers. When creating a RAID50 volume, the volume must be created on the Windows TerraBlock Server or a Windows 7/10 client. Creating the RAID50 Volume:...
- Page 76 Multi-user Write volume. The TerraBlock Server will then create, format and mount the RAID50 volume. The volume will be mounted on the TerraBlock Server as a Single-user Write volume, but set to Multi- user.
-
Page 77: Formatting Options
When formatting volumes directly on a Windows 7 64bit, or Windows 10 64bit, TerraBlock Server, volumes may be created up to 8 terabytes (8000 GB) in size. Any HFS+ (MAC OS EXTENDED) volume larger than 2 TB created and formatted on a Mac OSX client is not supported with Windows 32 bit operating systems (TerraBlock Server or client). -
Page 78: Creating Volumes Larger Than 8Tb
Partition Map” as the partition scheme. Creating Volumes larger than 8TB With TerraBlock version 6.0 and greater, Auto Format is now supported for creating volumes over 8TB in size. This applies to Single-user and Multi-user Write volumes. Volumes greater than 8TB in size are only supported using a Windows 7/10 64bit based TerraBlock Server. -
Page 79: Tandem Volumes
Once the process is complete, the volume will be mountable from all client workstations (Mac, Windows and Linux). Volumes larger than 8TB in size require a TerraBlock Server running Windows 7 or 10. -
Page 80: Chapter 4 - Working With The Shared File System
Chapter 4 – Working with Shared File System To use the Shared File System, there first must be a properly formatted volume on the TerraBlock Server. All the following steps are described in Chapter 3 – Setup and Administration. ... - Page 81 Once the volume has successfully switched from Single-user to Multi-user Write, the volume will display in the TerraBlock Manager with a ‘W’ in the Sys column, and ‘Facilis’ will appear in the Volume Access Permissions pane as Mounted Writable in orange (Single-user Write).
-
Page 82: Mounting Multi-User Write Volumes
‘W’ in the Sys column, the user is free to mount the volume with Write or Read-Only access. If desired, on Windows clients prior to mounting the volume, use the volume ‘Mount Properties’ setting in TerraBlock Manager to set up a mount location (drive letter or C:\Volumes). For Windows, Mac and Linux clients, Persistent Mount, a mount attribute that will persist (Read/Write), can also be set. -
Page 83: Chapter 5 -Volume Permissions And Workflows
Directory. If logging in with Active Directory, the LDAP user feature can be used to sync and create new TerraBlock users. The login name sent to the TerraBlock server after login at a client workstation will be the basis for permissions when displaying and mounting new volumes. If the Administrator wishes the permissions to remain the same on a per client basis, the same user should be used when logging in with the TerraBlock Manager. - Page 84 When moving from a Single-user Write access model to Multi-user Write, the security in effect through volume-level locking will no longer apply. When using Single-user volumes, even if multiple users had write permissions, only one user could add or delete data at a time. If a volume was consistently used for write on a single workstation, all other workstations were blocked from affecting that data.
-
Page 85: Chapter 6 - Facilis File Migration Tool
Setup and Usage Using the Facilis File Migration Tool On the left pane of the Facilis File Migration Tool, you can select directories and files to be copied. In the right pane, choose the destination volume or directory. Facilis File Migration Tool UI... - Page 86 Set the copy speed by entering the desired number of mega-bytes per second (MB/s). Setting the MB/s is useful if you want to keep the traffic and/or load on the TerraBlock server low. Any errors during copy will be recorded to the Log tab. The Save Log button will save the error log as a text file that can be sent to Facilis Support for review.
-
Page 87: Chapter 7 - Facilis Project Manager / Viewer
Upon launching the Facilis Project Manager, the user will be presented with the Facilis Project Manager Window. The Facilis Project Manager window is split into two panes, the Volume Name Pane and the Project List Pane. The Volume Name Pane will list any volumes that were mounted at the time the application was launched. -
Page 88: Facilis Project Manager Usage
Facilis Project Manager Usage: Enabling Sharing In order to share a Final Cut Pro and Adobe Premiere Pro project on a Facilis volume, the volume must first have sharing enabled. 1. Select the Facilis Volume you wish to use for Final Cut Pro or Adobe Premiere Pro project sharing in the Volume Name Pane 2. - Page 89 6. The project will now be ‘unlocked’ and available for any user to take ownership of the project. It is recommended that site administrators install the Facilis Project Manager on a single Final Cut Pro or Adobe Premiere Pro client designated for Admin...
-
Page 90: Facilis Project Viewer
Facilis Project Viewer The Facilis Project Viewer is intended for use by non-admin users on Final Cut Pro or Adobe Premiere Pro client machines. Its sole purpose is to allow non-admin users to see which Final Cut Pro or Adobe Premiere Pro projects are currently being shared and the current ownership status of the projects. -
Page 91: Chapter 8 - Using The Commandapp
2. The Application will ask if you want to enter an address for a TB server. a. If you are connecting via fibre enter “n” b. If you are connecting via Ethernet enter the IP address of the Terrablock server 3. - Page 92 Example output: r – Remount MultiWrite volumes: Remounts Multi User Write volumes after a system reboot. The volumes will mount and return to the command prompt. m – Mount volume: Begins the mount volume dialogue. 1. Enter the volume name to mount then hit enter. 2.
-
Page 93: Running The Commandapp From A Command Line
Running the CommandApp from a Command Line The Facilis CommandApp can be run from the CLI on Windows, Mac, and Linux. This gives users the ability to script and automate TerraBlock Manager commands. The CommandApp must remain in the manager folder in order to run. - Page 94 Multi User Write volumes via Ethernet from the server at IP address 192.168.1.1. The CommandApp connects to the server using user CommandAppUser with no password. cd /Applications/Mac\ Manager ./CommandApp.exe -i 192.168.1.1 -u CommandAppUser -p "" –r For help creating automated scripts with the CommandApp contact Facilis support.
-
Page 95: Tools Volume Configuration
The Tools volume (named “Tools” by default in the system software), is the first 1GB volume on the first group of drives in the TerraBlock system. Tools (or Tools1, Tools2, etc.) is presented as a Read-Only volume to every client that connects over Fibre Channel. -
Page 96: Osx Icon Installation
The TerraBlock System comes with custom volume icons to distinguish Facilis TerraBlock Single-user and Multi-user Write volumes from others on the Mac desktop. The Facilis TerraBlock Icon Installer can be used for Fibre Channel connected Mac clients using the ATTO 4G, 8G, 16G and ATTO ThunderLink Fibre Channel devices. -
Page 97: Additional Client Software
Additional Client Software TerraBlock clients can benefit from additional software to aid in the setup of Windows clients. This software is available from the Downloads area of the Facilis web site. TerraBlock Manager Keyboard Shortcuts Command + ‘Letter’ for Mac OSX Alt + ‘Letter’... -
Page 98: Working With External Tandem Volumes
New in version 7 you have the ability to add a Hub server for bandwidth aggregation. This allows you to maximize bandwidth in multi server environments by attaching multiple servers over fibre channel to a head unit or Hub Server. See the Facilis Hub Server Guide or contact support@facilis.com... -
Page 99: Dimensions And Weight
Appendix C – Server Hardware Specifications Warning: Be sure to remove all power before servicing the unit. See label affixed on the TerraBlock unit for power ratings. Power Supplies Power supplies are hot-swappable while the server is in operation. Please read the following procedure for swapping a power supply unit. - Page 100 Connectivity Fibre Channel Cable - Multimode 50 or 62.5/125 Full Duplex Fibre Channel Terminations - LC (square small form factor) Fibre Channel Tolerance - .5 DB/jump, Max 6DB/run P2P Ethernet Cable - Cat5e rated for Gbit Multimode 50/125 Ethernet Connector - RJ45 for Gbit LC for 10 Gb Fibre Channel Cable Specifications and Length...
Need help?
Do you have a question about the TERRABLOCK and is the answer not in the manual?
Questions and answers