Table of Contents
Advertisement
Quick Links
USER MANUAL
Thank you for purchasing the SureLife Pulse Oximeter. This manual contains the instructions necessary
Thank you for purchasing the SureLife Pulse Oximeter. This manual contains the instructions necessary
to operate the product safely and in accordance with its function and intended use. Observance of this
to operate the product safely and in accordance with its function and intended use. Observance of this
manual is a prerequisite for proper product performance and correct operation and ensures patient and
manual is a prerequisite for proper product performance and correct operation and ensures patient and
operator safety. Read this manual carefully before using the fingertip pulse oximeter. This product is a
operator safety. Read this manual carefully before using the fingertip pulse oximeter. This product is a
reusable medical device. The lifespan of the product is 2 years. This device is a prescription use device.
reusable medical device. The lifespan of the product is 2 years. This device is a prescription use device.
1 - SAFETY
1 - SAFETY
1.1 Contraindications
1.1 Contraindications
Do NOT use oximeter in a magnetic resonance (MR) environment.
Do NOT use oximeter in a magnetic resonance (MR) environment.
1.2 Warnings
1.2 Warnings
Keep the oximeter away from young children. Small parts such as the battery door, battery, and lanyard
Keep the oximeter away from young children. Small parts such as the battery door, battery, and lanyard
may be choking hazards.
may be choking hazards.
1.3 Cautions
1.3 Cautions
• Do not use the oximeter in the presense of flammable anesthetics.
• Do not use the oximeter in the presense of flammable anesthetics.
• The oximeter needs to be used according to information provided in this user manual.
• The oximeter needs to be used according to information provided in this user manual.
• The equipment is NOT intended for neonate and infant.
• The equipment is NOT intended for neonate and infant.
• Do not use a damaged oximeter as it may affect measurement performance.
• Do not use a damaged oximeter as it may affect measurement performance.
• Do not place the oximeter on the same hand/arm when using a blood pressure monitor or cuff.
• Do not place the oximeter on the same hand/arm when using a blood pressure monitor or cuff.
• Do not use the oximeter for more than 30 minutes without relocating the device to another finger.
• Do not use the oximeter for more than 30 minutes without relocating the device to another finger.
• Do not place the oximeter on edema or fragile tissues.
• Do not place the oximeter on edema or fragile tissues.
• Do not use the oximeter as the only basis for making medical decisions, it is intended only to be used
• Do not use the oximeter as the only basis for making medical decisions, it is intended only to be used
as additional information that you can give to your licensed health care professional.
as additional information that you can give to your licensed health care professional.
• Do not use the oximeter in high frequency environments such as near electro-surgical equipment.
• Do not use the oximeter in high frequency environments such as near electro-surgical equipment.
• Do not place the oximeter in liquid.
• Do not place the oximeter in liquid.
• Follow local disposal and recycling laws for the oximeter and its components, including the batteries.
• Follow local disposal and recycling laws for the oximeter and its components, including the batteries.
• Do not stare at the light (infrared is invisible) emitted from the oximeter as it is harmful to the eyes.
• Do not stare at the light (infrared is invisible) emitted from the oximeter as it is harmful to the eyes.
• The oximeter is designed to measure the percentage of arterial oxygen saturation of functional
• The oximeter is designed to measure the percentage of arterial oxygen saturation of functional
hemoglobin. Any of the following conditions may reduce the performance of the oximeter:
hemoglobin. Any of the following conditions may reduce the performance of the oximeter:
- Flickering or very bright light
- Flickering or very bright light
- Body weight less than 10lbs
- Body weight less than 10lbs
- Venous pulsations
- Venous pulsations
- Cardiogreen and other intra-vascular dyes
- Cardiogreen and other intra-vascular dyes
- Methemoglobin
- Methemoglobin
- Artificial nails or fingernail polish
- Artificial nails or fingernail polish
2 - THE BASICS
2 - THE BASICS
The pulse oxygen saturation is the percentage of HbO
The pulse oxygen saturation is the percentage of HbO
concentration in the blood. It is an important bio-parameter for respiration. A number of diseases relating
concentration in the blood. It is an important bio-parameter for respiration. A number of diseases relating
to the respiratory system may cause the decrease of SpO
to the respiratory system may cause the decrease of SpO
such as the malfunction of the human body's self-adjustment, damages during surgery, and the injuries
such as the malfunction of the human body's self-adjustment, damages during surgery, and the injuries
caused by some medical checkups would also lead to the difficulty of oxygen supply in human body.
caused by some medical checkups would also lead to the difficulty of oxygen supply in human body.
The corresponding symptoms would appear as a consequence, such as vertigo, impotence, vomit etc.
The corresponding symptoms would appear as a consequence, such as vertigo, impotence, vomit etc.
Some symptoms may be serious enough to cause significant harm. Therefore, prompt information
Some symptoms may be serious enough to cause significant harm. Therefore, prompt information
concerning the patients SpO
concerning the patients SpO
can help doctors discover potential problems, and is of great importance
can help doctors discover potential problems, and is of great importance
2
2
in the clinical and medical field.
in the clinical and medical field.
2.1 Principle
2.1 Principle
The Principle of the oximeter is as follows: an experience formula of data process is established making
The Principle of the oximeter is as follows: an experience formula of data process is established making
use of the Lambert Beer law according to Spectrum Absorption Characteristic of Reductive hemoglobin
use of the Lambert Beer law according to Spectrum Absorption Characteristic of Reductive hemoglobin
(Hb) and oxyhemoglobin (HbO
(Hb) and oxyhemoglobin (HbO
) in glow & near-infrared zones. The operation principle of the device
) in glow & near-infrared zones. The operation principle of the device
2
2
is: Photoelectric Oxyhemoglobin Inspection Technology is adopted in accordance with Capacity Pulse
is: Photoelectric Oxyhemoglobin Inspection Technology is adopted in accordance with Capacity Pulse
Scanning Recording Technology, so that two beams of different wavelengths of light can be focused
Scanning Recording Technology, so that two beams of different wavelengths of light can be focused
onto the human nail tip through a perspective clamp finger-type sensor. The signal is obtained and
onto the human nail tip through a perspective clamp finger-type sensor. The signal is obtained and
measured by a photosensitive element. The information acquired will be shown on screen through
measured by a photosensitive element. The information acquired will be shown on screen through
treatment in electronic circuits and microprocessor.
treatment in electronic circuits and microprocessor.
Figure 1. Oximeter Schematic Diagram
3 - INTRODUCTION
3 - INTRODUCTION
3.1 Intended Use
3.1 Intended Use
The Pulse Oximeter is a portable, convenient, non-invasive device, used to monitor arterial hemoglobin
The Pulse Oximeter is a portable, convenient, non-invasive device, used to monitor arterial hemoglobin
oxygen saturation (SpO
oxygen saturation (SpO
) and pulse rate. The personal application are adult patients (weight: >30lbs) and
) and pulse rate. The personal application are adult patients (weight: >30lbs) and
2
2
pediatric patients (weight: 20-30lbs). We recommend using the index finger, middle finger, or ring finger
pediatric patients (weight: 20-30lbs). We recommend using the index finger, middle finger, or ring finger
as suitable positions for the monitor. It is intended for spot-checking or attended-care monitoring in
as suitable positions for the monitor. It is intended for spot-checking or attended-care monitoring in
home health care and medical facilities.
home health care and medical facilities.
WARNING:
WARNING:
• This pulse oximeter is intended to be used only by clinical professionals or under their guidance.
• This pulse oximeter is intended to be used only by clinical professionals or under their guidance.
It must only be used by persons who have received adequate training in its use. Anyone unauthorized
It must only be used by persons who have received adequate training in its use. Anyone unauthorized
or untrained must not perform any operation on it.
or untrained must not perform any operation on it.
CAUTIONS:
CAUTIONS:
• This pulse oximeter is intended for use in
• This pulse oximeter is intended for use in
• The pulse oximeter is NOT designed for a newborn or infant. For adults and children, a finger thickness
• The pulse oximeter is NOT designed for a newborn or infant. For adults and children, a finger thickness
between 8 - 25.4mm is recommended.
between 8 - 25.4mm is recommended.
NOTES:
NOTES:
• The probe is the opening in the middle of the equipment in which the finger is inserted.
• The probe is the opening in the middle of the equipment in which the finger is inserted.
• The probe is the Applied Part of the equipment.
• The probe is the Applied Part of the equipment.
3.2 Features
3.2 Features
• The pulse oximeter is small in size, lightweight, and easy to carry.
• The pulse oximeter is small in size, lightweight, and easy to carry.
• Low in power consumption,(600 spot-checks on two AAA batteries.)
• Low in power consumption,(600 spot-checks on two AAA batteries.)
• Easy, one-button operation.
• Easy, one-button operation.
• There are two modes: sleep and measure.
• There are two modes: sleep and measure.
• Automatic sleep mode after 8 seconds with no signal.
• Automatic sleep mode after 8 seconds with no signal.
NOTES:
NOTES:
• Press the power button to activate oximeter (measure mode) from sleep mode.
• Press the power button to activate oximeter (measure mode) from sleep mode.
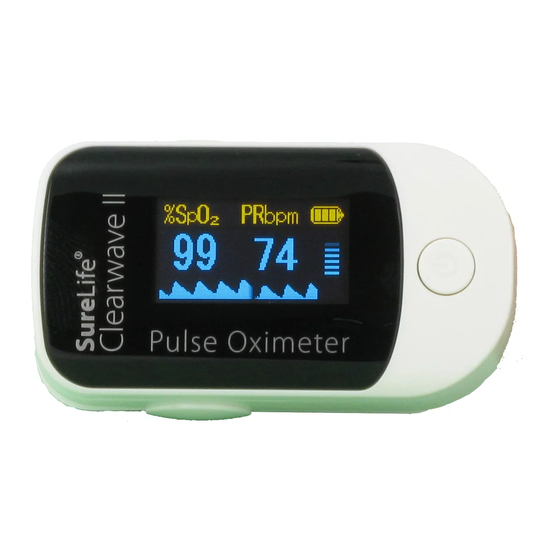
3.3 Front View
3.3 Front View
Power Indication
%SpO
2
99
SpO
Value
Pulse Bar Graph
2
PR bpm
70
Pulse Rate Value
Power Button
Figure 2. Front View of Clearwave
- Moisture in the oximeter
- Moisture in the oximeter
- Weak pulse quality (low perfusion)
- Weak pulse quality (low perfusion)
- Low hemoglobin
- Low hemoglobin
- Carboxyhemoglobin
- Carboxyhemoglobin
- Dysfunctional hemoglobin
- Dysfunctional hemoglobin
in the total Hb in the blood, so-called the O
in the total Hb in the blood, so-called the O
2
2
in the blood, furthermore, some other causes
in the blood, furthermore, some other causes
2
2
Light Emitting Diode
Finger
Photo Detector
Probe Body
hospitals, clinical institutions, or healthcare communities.
hospitals, clinical institutions, or healthcare communities.
Pulse Rate Value
SpO
Value
2
%SpO
PRbpm
2
99
70
Pulse Oximeter
Pulse Waveform
Figure 2. Front View of Clearwave II
3.4 Functions
Function
Display
SpO
parameter measurement
2
Pulse rate parameter measurement
Bar graph display
Battery display
Automatically enters sleep mode
Pulse waveform display
Four direction display
3.5 Symbols
Symbol
Definition
The Pulse Oxygen
% SpO
2
Saturation (%)
PR
Pulse Rate (BPM)
he Product is
T
Protected Against
IPX2
Harmful Effects of
Dripping Water per
IBC 60529
Rx Only
Federal Law Restricts This Device to Sale by or on the Order of a Licensed Healthcare Practitioner.
4 - BATTERY INSTALLATION
1. Put the two AAA batteries into battery compartment in correct polarities.
2. Push the battery cover horizontally along the arrow shown in figure 3.
WARNINGS:
• Battery polarities should be correctly installed,
otherwise, damage may be caused to the equipment.
• Please remove the batteries if the oximeter will be stored
for more than 30 days.
• Please remove the batteries if you want turn off the oximeter.
Otherwise it is always in sleep mode.
• Battery may leak or explode if used or disposed off improperly.
5 - OPERATING GUIDE
5.1 Application Method
1. Remove the battery cover, and insert the two AAA batteries following polarity markings indicated
inside of the battery compartment, then reposition the cover.
2. Hold the oximeter with the display facing toward you, slide your finger into the opening probe of the
device as shown below (Figure 4), until the fingertip touches the built-in stop guide. For best results,
make sure the finger is centered within the finger guide.
3. Press the button to activate the oximeter from sleep mode. The measurement interface will appear
in 3 seconds.
4. The measurement result will appear on the screen within 10 seconds.
5. The oximeter will turn to sleep mode automatically within 8 seconds after the finger is removed.
Press the bottom Insert the finger Press the operating button to activate
2
2
5.2 Notes for Operation
• The index finger, middle finger, and ring finger are suitable positions for the monitor.
• Excessive or rapid movement may affect measurement.
• Improper sensor placement may affect the measurement accuracy.
• The oximeter can be reused after cleaning and disinfection.
• The measurement is most accurate when the oximeter and the heart are at the same level.
• (Only for Clearwave II) The plethysmogram can be used as signal quality indicator.
The displayed parameters might be unreliable with the disorderly plethysmogram.
• (Only for Clearwave) The bar graph can be used as signal quality indicator.
The displayed parameters might be unreliable with un-periodic bar change.
• The displayed parameters will show invalid indicator as '---' if signal quality is very low.
• The displayed parameters will show invalid indicator as '---' if oximeter fault occurs.
• The oximeter will shut down after 5 minutes if continuous testing.
6 - SPECIFICATIONS
6.1 Classification
Type of protection against electric shock............................ II (Internally powered equipment)
Degree of protection against electric shock....................... Type BF-Applied part (non-defibrillation proof )
Operating mode............................................................................ Spot checking
Degree of protection against hazards of explosion......... Ordinary equipment: Not protected
Equipment type............................................................................ Fingertip oximeter
6.2 Measurement Specifications
SpO
declared accuracy
2
Range(σ*)............................................................................ 70% ~ 99% ± 2 digits
Resolution........................................................................... 1%
Update Period.................................................................... 1s
Averaging Time................................................................. 8s
PR declared accuracy
Range(σ*)............................................................................ 25 ~ 250 : ± 3 digits
Resolution........................................................................... 1bpm
Update Period.................................................................... 1s
Averaging Time................................................................. 8s
6.3 Power Requirements
Specification of alkaline batteries............................................ Two AAA
Operating current.......................................................................... Less than 30mA
Run time............................................................................................ 600 spot checks on two full power batteries
6.4 Environmental Specifications
Temperature
Operating............................................................................ +41° to + 104°F / 5° to +40°C
Storage/Transportation................................................. -40° to + 140°F / -40° to +60°C
Humidity
Operating............................................................................ 10 ~ 95%, non-condensing
Storage/Transportation................................................. 10 ~ 95%, non-condensing
Atmosphere Pressure
Operating............................................................................ 70 ~ 106kpa
Storage/Transportation................................................. 50 ~ 107.4kpa
6.5 Physical Specifications
Width x Height x Depth............................................................... 62x35x31 mm
Power Indication
Weight................................................................................................ 60 lb (g) (including the batteries)
Pulse Bar Graph
6.6 Display
Clearwave
Power Button
Display
LED
Dual_color OLED, 0.96", 128x64 pixel
Heartbeat Mark
Type
SpO
%, Pulse rate,
SpO
Display
2
Battery indicator,
Bar graph, Pulse waveform,
Content
Bar graph
Heartbeat mark
Clearwave
LED
Y
Y
Y
Y
Y
—
—
Symbol
Definition
Symbol
Definition
Battery Positive
Serial Number
Electrode
The Device has no
Battery Cathode
Alarm System
Electrode
Caution, Consult
Date of
Accompanying
Manufacturer
Documents
the oximeter to open the probe
Figure 4. Operation Guide
0% ~ 69%: unspecified
at ambient temperature 25°F(°C).
6.7 LED Wavelengths
Clearwave II
Wavelength
RED
660 ± 2nm
%, Pulse rate, Battery indicator,
2
IR
906 ± 10nm
Clearwave II
OLED
Y
Y
Y
Y
Y
Y
Y
Symbol
Definition
BF Type Applied Part
Manufacturer
This Item is Compliant
with Medical Device
Directive 93/42/EEC
- -
+
+
Figure 3. SureLife Oximeter
Battery Installation
-
Probe LED Specifications
Radiant Power
1.8 mW
2.0 mW
Advertisement
Table of Contents

Related Manuals for MHC Medical Products SureLife Clearwave II


Summary of Contents for MHC Medical Products SureLife Clearwave II
- Page 1 USER MANUAL 3.4 Functions Function Clearwave Clearwave II Display OLED parameter measurement Pulse rate parameter measurement Bar graph display Battery display Automatically enters sleep mode Pulse waveform display — Thank you for purchasing the SureLife Pulse Oximeter. This manual contains the instructions necessary Thank you for purchasing the SureLife Pulse Oximeter.
-
Page 2: Troubleshooting
Check the luminescent and photoelectric window. sheltered by some object. Excessive movement. Stop moving finger, hand and body. SureLife® is a trademark of MHC Medical Products, LLC. The finger is not placed inside deep enough. Place the finger properly and try again. The SpO...
Need help?
Do you have a question about the SureLife Clearwave II and is the answer not in the manual?
Questions and answers