Table of Contents
Advertisement
TOW-BEHIND DR
SAFETY & OPERATING INSTRUCTIONS
Models: Mow Pro-44
Mow Pro-60
Serial No.
Order No.
Read and understand this manual and all instructions before operating the TOW BEHIND DR FINISH MOWER.
®
FIELD and FINISH MOWER
DR Power Equipment
Toll-free phone: 1-800-DR-OWNER (376-9637)
Fax: 1-802-877-1213
Website: www.DRpower.com
Advertisement
Table of Contents

Subscribe to Our Youtube Channel
Related Manuals for DR Power Mow Pro-44


Summary of Contents for DR Power Mow Pro-44
- Page 1 ® TOW-BEHIND DR FIELD and FINISH MOWER SAFETY & OPERATING INSTRUCTIONS Models: Mow Pro-44 Mow Pro-60 DR Power Equipment Toll-free phone: 1-800-DR-OWNER (376-9637) Serial No. Fax: 1-802-877-1213 Order No. Website: www.DRpower.com Read and understand this manual and all instructions before operating the TOW BEHIND DR FINISH MOWER.
- Page 2 ® TOW BEHIND DR FIELD and FINISH MOWER...
-
Page 3: Table Of Contents
Additional Information and Potential Changes Serial Number Label DR Power Equipment reserves the right to discontinue, change, and improve its products at any time without notice or obligation to the purchaser. The Figure 1 descriptions and specifications contained in this manual were in effect at printing. - Page 4 ® TOW BEHIND DR FIELD and FINISH MOWER...
-
Page 5: Chapter 1: General Safety Rules
Chapter 1: General Safety Rules Read this Safety & Operating Instructions manual before you use the TOW BEHIND DR FINISH MOWER. Become familiar with the operation and service recommendations to ensure the best performance from your machine. If you have any questions or need assistance, please contact us at www.DRpower.com or call toll-free 1-800-DR-OWNER (376-9637) and one of our Technical Support Representatives will be happy to help you. - Page 6 Protecting Yourself and Those around You This is a high-powered machine with moving parts operating at high speeds. Always take the following precautions when operating this machine: Always wear protective goggles or safety glasses with side shields. We recommend wearing sturdy shoes with non-slip tread, long pants, and gloves while using this machine. Be sure the gloves fit properly and do not have loose cuffs or drawstrings.
-
Page 7: Slope Operation
Slope Operation Use of machinery on slopes is a major factor in outdoor power equipment accidents. All slopes require caution. If you feel uneasy on a slope, do not mow it. Always take the following precautions when using this machine on slopes: ... -
Page 8: Chapter 2: Setting Up The Tow-Behind Dr Field And Finish Mower
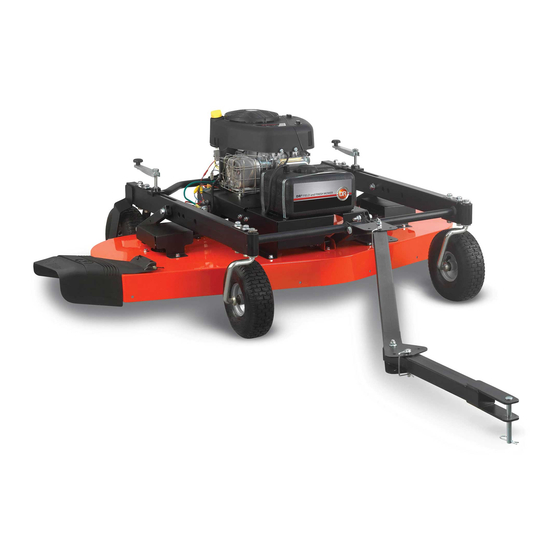
Figure 2 before beginning these procedures. If you have any questions at all, please feel free to contact us at www.DRpower.com. TOW-BEHIND DR FIELD and FINISH MOWER Controls and Features (Mow Pro-44 Model) Note: The model shown in Figure 1 may look slightly different from your machine. - Page 9 TOW-BEHIND DR FIELD and FINISH MOWER Controls and Features (Mow Pro-60 Model) Note: The model shown in Figure 1 may look slightly different from your machine. Fuel Filter Fuel Filter Briggs and Stratton 14.5 HP Oil Fill Engine Cap/Dipstick Oil Drain Hose Fuel Shutoff Filter Valve...
-
Page 10: Specifications
Specifications 13.3 TQ Mow Pro-44 Model 14.5 HP Mow Pro-60 Model Engine See your Engine Manual for oil capacity and other See your Engine Manual for oil capacity and other Engine specifications. Engine specifications. Manual Start Electric Start Starting System Fuel Tank 3.5 L (.92 gal), Gasoline, Unleaded... - Page 11 The Mow Pro-44 Model is shipped mostly assembled. Go to “Installing the Discharge Guard” section if you have a Mow Pro-44 Model. Bushing Tools and Supplies Needed: Bolt and Wire Cutters Locknut Sway Brace Two 3/4" Wrenches ...
- Page 12 Note: The Bushings in the Deck Brackets should still be in place as instructed in Bushing earlier steps. Bushing Shoulder 8. Install the Bushing into the Bracket at the front of the Frame with the long portion of the Bushing fully into the Frame Bracket (Figure 11). The Bushing shoulder should be tight against the Bracket.
- Page 13 Installing the Discharge Guard 1. Install the Discharge Guard with five 3/8-16 X .75" Bolts using a 9/16" Wrench (Figure 17). Note: If it is difficult to install the Bolt at the front (Mow Pro-60 Model) the Anti- Bolts scalping Wheel can removed using a 9/16" Wrench and Adjustable Wrench to make it easier.
- Page 14 1. Place the machine on a level surface and remove the Oil Fill Cap/Dipstick Oil Lower Limit (Figure 20a: Mow Pro-44) (20b: Mow Pro-60). 2. Initially add 32 oz. of SAE 30 High Detergent oil (recommended by the Engine Manufacturer) into the Oil Fill and wait one minute for the oil to settle.
- Page 15 Connecting the TOW-BEHIND DR FIELD and FINISH MOWER to your Tow Vehicle The Pin type Hitch that comes standard on the TOW-BEHIND DR FIELD and FINISH MOWER Tow Bar is quick and easy to attach to Tow Vehicles with a hole in the Hitch Plate. A ball Hitch Kit is also available if you would prefer attachment to a 2" Ball on the Tow vehicle.
-
Page 16: Chapter 3: Operating The Tow-Behind Dr Field And Finish Mower
Chapter 3: Operating the TOW-BEHIND DR FIELD and FINISH MOWER This chapter covers the procedures for starting and stopping your new TOW-BEHIND DR FIELD and FINISH MOWER and discusses basic operation features. You may find it helpful to review the TOW-BEHIND DR FIELD and FINISH MOWER Controls and Features in Chapter 2 before reading this chapter. - Page 17 Note: The Blade Switch Safety Cover must be pushed down or the Engine will not start. Starting (Mow Pro-44 Model) 1. Ensure the Blade Switch Safety Cover is down (Figure 26). 2. When starting a cold Engine, push the Throttle Control Lever up to the Choke position (Figure 15).
-
Page 18: Adjusting The Mower Deck Height
Engaging the Blades Blade Switch Safety Cover 1. Engage the Blades by pulling up on the Blade Switch Safety Cover and Blade Switch pushing forward on the Blade Control Switch (Figure 28). Stopping the Blades 1. Push down on the Blade Control Safety Cover (Figure 26). Adjusting the Mower Deck Height ... -
Page 19: Offset Mowing
Offset Mowing The Tow Bar allows you to offset the cutting path of the TOW-BEHIND DR FIELD and FINISH MOWER up to 68" (Mow Pro-44 Model) and 76" (Mow Pro-60 Model) from the center of the Tow Vehicle. The various offset positions are listed in the “Specifications”... -
Page 20: Cutting Wet And Heavy Growth
Changing the Tow Bar Offset Direction Clevis The Tow Bar can be installed for offsetting to the right or left depending on Push Bar which side of the tow vehicle you choose to mow. The following steps describe Offset installing the Offset Bracket to allow offsetting to the left side of the Tow Bracket Vehicle. -
Page 21: Chapter 4: Maintaining The Tow-Behind Dr Field And Finish Mower
Chapter 4: Maintaining the TOW-BEHIND DR FIELD and FINISH MOWER This chapter covers regular maintenance procedures that will ensure the best performance and long life of your TOW-BEHIND DR FIELD and FINISH MOWER. For Engine maintenance, please refer to the Engine Owner’s Manual that came with your machine. When performing any adjustment or maintenance, you must first disengage the Blade, shut off the engine, wait five minutes to allow parts to cool and disconnect the spark plug wire, keeping it away from the spark plug. - Page 22 Rail. It is very important to also lube at the base of the threads where they go through the Deck. Figure 39 4. Lower the Deck to distribute the lubrication. Removing and Replacing the Engine Oil (Mow Pro-44) Note: Refer to the Engine Owner’s manual for more detailed instructions for Engine Oil Fill Cap/Dipstick maintenance.
- Page 23 Removing and Replacing the Engine Oil and Filter (Mow Pro-60) Oil Fill Cap Bracket Note: Refer to the Engine Owner’s manual for more detailed instructions for Engine Oil Drain Cap/Dipstick maintenance. Drain the oil when the Engine is warm. Warm oil drains quickly and completely.
- Page 24 3. Remove the two bolts from each of the two Belt Covers (Mow Pro-60 model only) using a 9/16" Wrench and remove the Covers. Belt 4. Remove the six Bolts (Mow Pro-44 Model) or four bolts (Mow Pro-60 Cover Model) securing the Front Belt Cover using a 9/16" Wrench and remove the Cover (Figure 45).
- Page 25 8. The Belt for the Mow Pro-44 can now be rolled off the pulleys and removed. 9. Mow Pro-60 model only: Release tension on the Belt by placing a 9/16" Wrench Wrench on the nut against the Tensioner Pulley and roll the Belt off the Blade Pulley (Figure 49).
- Page 26 Replacing the Carbon Canister (Mow Pro-44 Model) Tank Hose Tools needed: 5/16" Wrench Purge Hose Wire Cutters Pliers 1. Pull the two hoses from the top of the Carbon Canister (Figure 53). Bolt 2. Remove the bolt that secures the Canister Bracket using a 5/16" Wrench.
-
Page 27: Charging The Battery
Battery Care (Electric Start Model Only) Proper care can extend the life of a Battery. Follow these recommendations to ensure your Battery’s best performance and long life: Do not allow the Battery charge to get too low. If the machine is not used, charge the Battery every 4 – 6 weeks. Operate the Engine for at least 45 minutes to maintain proper Battery charge. -
Page 28: Chapter 5: Troubleshooting
If the Spark Plug is oily, leave it out, hold a rag over the Plug hole and crank the Engine over a couple of times using the Electric Starter (Mow Pro-60) or Starter Cord (Mow Pro-44) to blow out any oil in the Cylinder, then wipe off the Plug and reinsert it. - Page 29 When performing any adjustment or maintenance, you must first shut off the engine, wait five minutes to allow parts to cool and disconnect the spark plug wire, keeping it away from the spark plug. Troubleshooting Table (Continued) YMPTOM OSSIBLE AUSE Engine smokes.
-
Page 30: Chapter 6: Parts Lists And Schematic Diagrams
Chapter 6: Parts Lists and Schematic Diagrams Parts List – Frame and Tow Bar Note: Part numbers listed are available through DR Power Equipment. Ref# Part# Description Ref# Part# Description 35495 Bracket, Offset 34511 Bolt, Hex, Flange, 1/2-13 X 3", Gr5, ZP... - Page 31 Schematic – Frame and Tow Bar CONTACT US AT www.DRpower.com...
- Page 32 Parts List – Deck and Deck Lift (Mow Pro-44) Note: Part numbers listed are available through DR Power Equipment. Ref# Part# Description Ref# Part# Description 37369 Deck, Finish Mowing, 44" Wide, With 15127 Pulley, Flat Idler, 4" Labels 36281 Belt, A76...
- Page 33 Schematic – Deck and Deck Lift (Mow Pro-44) CONTACT US AT www.DRpower.com...
- Page 34 Parts List – Deck and Deck Lift (Mow Pro-60) Note: Part numbers listed are available through DR Power Equipment. Ref# Part# Description Ref# Part# Description 37368 Deck, Finish Mowing, 60" Wide, With 37166 Spacer, 3/8" ID, 1-3/8" OD, 3/4" Thk...
- Page 35 Schematic – Deck and Deck Lift (Mow Pro-60) CONTACT US AT www.DRpower.com...
- Page 36 Parts List – Drive, Gas and Control (Mow Pro-44) Note: Part numbers listed are available through DR Power Equipment. Ref# Part# Description Ref# Part# Description 37371 Rail Support, Left, 44, With Labels 13758 Label, Check Oil, 2.75" x .63" 37122...
- Page 37 Schematic – Drive, Gas and Control (Mow Pro-44) CONTACT US AT www.DRpower.com...
- Page 38 Parts List – Drive, Gas and Control (Mow Pro-60) Note: Part numbers listed are available through DR Power Equipment. Ref# Part# Description Ref# Part# Description 39111 Rail Support, Left, 3/8" Straps, 60, With 31283 Nut, Lock, 1/4-20, Serrated Flange Labels...
- Page 39 Schematic – Drive, Gas and Control (Mow Pro-60) CONTACT US AT www.DRpower.com...
- Page 40 Notes: ® TOW BEHIND DR FIELD and FINISH MOWER...
- Page 41 FIELD and FINISH MOWER is fit for ordinary purposes for which a product of this type is used. DR Power Equipment however, limits the implied warranties of merchantability and fitness in duration to a period of two (2) years in consumer use, ninety (90) days for any other use except all emission related components.
- Page 42 Warranty CALIFORNIA EVAPORATIVE EMISSION CONTROL WARRANTY STATEMENT YOUR WARRANTY RIGHTS AND OBLIGATIONS The California Air Resources Board and Country Home Products, Inc. are pleased to explain the evaporative emission control system warranty on your 2018 DR® Field and Finish Mower. In California, new equipment that use small off-road engines must be designed, built and equipped to meet the State’s stringent anti-smog standards.
- Page 43 (2) Any warranted part that is scheduled only for regular inspection in the written instructions supplied is warranted for the warranty period stated above. Any such part repaired or replaced under warranty will be warranted for the remaining warranty period. (3) Any warranted part that is scheduled for replacement as required maintenance in the written instructions supplied is warranted for the period of time before the first scheduled replacement date for that part.
- Page 44 Daily Checklist for the TOW-BEHIND DR FIELD and FINISH MOWER When performing any adjustment or maintenance, you must first shut off the engine, wait five minutes to allow parts to cool and disconnect the spark plug wire, keeping it away from the spark plug. To help maintain your TOW-BEHIND DR FIELD and FINISH MOWER for optimum performance, we recommend you follow this checklist each time you use your machine.
Need help?
Do you have a question about the Mow Pro-44 and is the answer not in the manual?
Questions and answers