
Summary of Contents for Delta UV ELP210/3AM
- Page 1 ELP AMALGAM RANGE INSTALLATION AND MAINTENANCE MANUAL © ELP AM Series - Manual 2011 - 042011 Copyright Delta UV Page 1...
- Page 2 NSF Listing # http://www.nsf.com/Certified/Pools/ o EPA Established #075659-FRA-001 Delta UV declares to be in conformance with the applicable provisions of the Code of Federal Regulations (CFR) requirements including Title 21, Chapter 1, Subchapter J pertaining to radiological health. All Delta UV systems are sized to match the maximum flow rate of the circulation pump(s).
-
Page 3: Important Safety Instructions
5. WARNING –Risk of Electric Shock. Install at least 5 feet (1.5 m) from inside wall of hot tub or spa or swimming pool using nonmetallic plumbing SAVE THESE INSTRUCTIONS © ELP AM Series - Manual 2011 - 042011 Copyright Delta UV Page 3... - Page 4 10. WARNING - Do not simply throw the old lamps into the trash as they contain Mercury and must be disposed of properly. www.lamprecycle.org SAVE THESE INSTRUCTIONS © ELP AM Series - Manual 2011 - 042011 Copyright Delta UV Page 4...
- Page 5 (See A. Technical characteristics) ● Check that cable complies with legislation and the required power level. (See A. Technical characteristics) ●Do not use the Delta UV reactor for any other use than that for which it was designed. © ELP AM Series - Manual 2011 - 042011...
-
Page 6: Table Of Contents
C. STARTING UP…………………………………………………………………………………….13 D. USE………………………………………………………………………………………………...14 E. MAINTENANCE…………………………………………………………………………………..16 F. TROUBLESHOOTING……………………………………………………………………………22 G. ALARM CONTACT………………………………………………………………………………..22 ANNEX 1: Clearance dimensions - Blown up view - Designation ANNEX 2: Electrical diagrams © ELP AM Series - Manual 2011 - 042011 Copyright Delta UV Page 6... - Page 7 This Icon alerts the reader that the information noted regards a potential vision related safety issue This Icon alerts the reader to use gloves when touching an object © ELP AM Series - Manual 2011 - 042011 Copyright Delta UV Page 7...
-
Page 8: Technical Specification
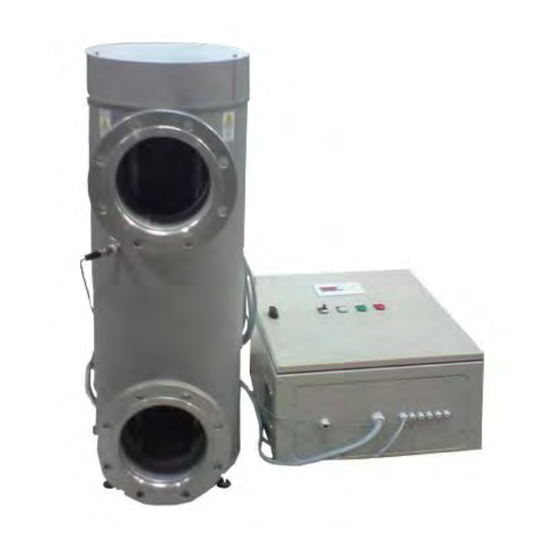
2010 gpm 2520 gpm mJ/cm² (1) At the end of the lifetime of the lamps, at the most unfavorable point in reactor, for a transmittance of 98%. © ELP AM Series - Manual 2011 - 042011 Copyright Delta UV Page 8... - Page 9 1. Monitor 6.circuit 7. 24Vdc Power breaker supply connector block 5. Default indicator light 4. Manual 8.Electronic ON/OFF switch ballasts 3.Power indicator light 2.Lamp operating indicator light © ELP AM Series - Manual 2011 - 042011 Copyright Delta UV Page 9...
-
Page 10: Installation Instruction
- Close the valve 2 and the valve 3 After maintenance: Close the By-Pass - Open the valve 2 - Open slowly the valve 3 - Close the valve 1 © ELP AM Series - Manual 2011 - 042011 Copyright Delta UV Page 10... - Page 11 60°C copper. Conductors size see page 8. Main Earthing Ground: 60°C copper. Conductors size see page 8. 60°C copper conductors Neutral For conductors size see page 8. Line © ELP AM Series - Manual 2011 - 042011 Copyright Delta UV Page 11...
- Page 12 © ELP AM Series - Manual 2011 - 042011 Copyright Delta UV Page 12...
-
Page 13: Starting Up
C. STARTING UP C.1 Starting the UV lamp Check that the electrical connection is compliant. Check that the top of the equipment is correctly positioned. Switch on the reactor Check that the lamps are working properly: the indicator light for each lamp should be lit Check that the hour counter is running C.2 Calibration of the UV sensor... -
Page 14: Use
D. USE D.1 MANUAL OF THE MONITOR BIO-UV MIII Radiance UV Reset counter at management zero During 5s During 5s EGEND Main Display R On GENERAL INFORMATION: Definition of the letter on the first display means that the reactor is switched on and Monitor operating. - Page 15 CONTENT OF MENUS AND SUB-MENUS: Use the + or – keys to change from one menu to another. Press on key A for 5 seconds to enter a menu. When the word "OFF" is displayed, this means that the display option is not available on your device. Display of UVC intensity measured by the sensor.
-
Page 16: Maintenance
E. MAINTENANCE E.1 REPLACE/REMOVE UV LAMPS: 10 minutes NO TOOLS HAVE TO BE USED AND ARE NECESSARY TO REALIZE THESE OPERATIONS except for removing and refitting the cover at the top. When a lamp is defective (except when the set of 3 lamps is less than 4 000 h), we recommend to change all lamps YOU MUST STOP ABSOLUTELY THE POOL/SPA FILTRATION SWITCH OFF the power supply on the front panel of the... - Page 17 Refit the bonnet. Check the calibration of the UV-C ray measurement sensor. (See chapter on the setting of the UV Monitor). Open the valve, turn on the filtration, turn on the on/off switch © ELP AM Series - Manual 20112 – 05/12 Copyright Delta-UV Page 17...
- Page 18 E.2 CHANGE/CLEAN QUARTZ SLEEVES AND O-RINGS: 20 minutes NO TOOLS HAVE TO BE USED AND ARE NECESSARY TO REALIZE THESE OPERATIONS. Make the operations 1 to 5 of the remove UV lamps operation (see previous page) Drain the unit: - unscrew at the bottom of the UV unit the stainless steel small nut Unscrew the stainless steel holding the quartz sleeves and making the watertightness Remove the plastic washer.
- Page 19 Place the plastic washer inside the stainless steel thread. Re-tighten the nut by hand, tightening it normally, to the maximum. Open the valve, start the filtration, when the unit is under pressure the vessel is pressured, and then you can check that there is no leakage in the quartz tube and at the watertightness.
- Page 20 E.3 QUARTZ SLEEVES : CLEANING IN PLACE To set this operation, you need : To install a PVC tank with a tranparent tube with the following dimensions : Diameter 2’’, length 20’’. This tube will be above a PVC valve. 1 liter of muriatic acid 20’’...
- Page 21 E.4 MAINTENANCE FILE CAUTION : This sheet must be kept up to date. It provides a record of the reactor’s operating cycle. Date ACTION © ELP AM Series - Manual 20112 – 05/12 Copyright Delta-UV Page 21...
-
Page 22: Troubleshooting
F. TROUBLESHOOTING One of the lamp operating indicators is not lit Invert the lamp connector linked to the unlit operating indicator with another one. Is the same lamp still off ? The original lamp is out of The ballast linked to the unlit lamp order. - Page 23 Electrical components are not guaranteed against overvoltage and lightening damage. CAUTION: The quartz sleeve and the lamps are not guaranteed against breakage. Delta UV Faulty parts must be returned to , with details of the unit type and serial number, for exchange after technical evaluation.
- Page 24 PARTS LIST N° DESIGNATION REFERENCE MILLENIUM III 70-02602 Lamp operating indicator 70-02618 Power light indicator 70-02616 Default light indicator 70-02603 Circuit breaker Contact us 24Vdc power supply 70-02601 Ballast 70-10610 N° DESIGNATION REFERENCE UV lamp 70-18610 Quartz sleeve join 44-02256 Quartz sleeve 70-50610 Bimetal Thermostat...
- Page 25 ANNEX 1 Clearance dimensions Blown up view Designation © ELP AM Series - Manual 20112 – 05/12 Copyright Delta-UV Page 25...
- Page 26 ANNEX 2 Electrical diagrams © ELP AM Series - Manual 20112 – 05/12 Copyright Delta-UV Page 26...
Need help?
Do you have a question about the ELP210/3AM and is the answer not in the manual?
Questions and answers