
Subscribe to Our Youtube Channel
Summary of Contents for Akai AK64FSO
- Page 1 60cm Freestanding Electric Cooker INSTRUCTION MANUAL MODEL: AK64FSO AFTER SALES SUPPORT (AU) 1300 886 649 (NZ) 0800 836 761...
-
Page 2: Table Of Contents
Contents General Safety Instructions Product Overview Getting Started Instructions Baking, Roasting and Grilling Other Useful Information Installation After Sales Support (AU) 1300 886 649 (NZ) 0800 836 761 | info@tempo.org... -
Page 3: General Safety Instructions
General Safety Instructions Read this manual thoroughly before first use, even if you are familiar with this type of product. The safety precautions enclosed herein reduce the risk of fire, electric shock and injury when correctly adhered to. Keep the manual in a safe place for future reference, along with the completed warranty card, purchase receipt and carton. - Page 4 General Safety Instructions (Cont.) Usage conditions and general warnings • Domestic use only: This appliance is intended for indoor household use only. It is not suitable for commercial or industrial use. Do not use the appliance outdoors. Do not use this appliance for anything other than its intended purpose, and only use it as described in this manual.
- Page 5 General Safety Instructions (Cont.) Cooker warnings • Do not store flammable materials in the cooker or near the appliance. • Do not lean on the open oven door. Do not use it as a shelf. Do not put pans weighing more than 15kg on the opened oven door. •...
-
Page 6: Product Overview
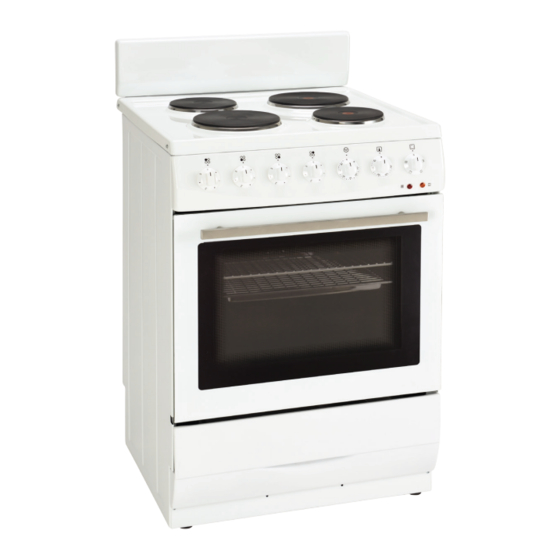
Product Overview Cooker: front view Splash guard Hob with 4 hotplates Control dials Pilot lights: oven (red), hob (orange) Oven door handle Oven door with viewing window Storage drawer Adjustable feet After Sales Support (AU) 1300 886 649 (NZ) 0800 836 761 | info@tempo.org... - Page 7 Product Overview (Cont.) Baking Tray Oven rack Grid 10 Baking tray 11 Oven rack After Sales Support (AU) 1300 886 649 (NZ) 0800 836 761 | info@tempo.org...
-
Page 8: Getting Started
Getting Started Unpacking the appliance • Unpack the appliance and remove all packaging materials from around the cooker and from inside the oven cavity. Empty the bottom storage drawer. • Keep all packaging materials until you have made sure your new electric cooker is undamaged and in good working order. - Page 9 Getting Started (Cont.) Hotplate preparation • The top surface of the hotplates are sealed with a heat-resistant coating. Before first use, the hotplates should be heated for a short period without a pot or pan on it to harden the protective coating. If this is not done, premature rusting may occur.
-
Page 10: Instructions
Using the hotplates The level of heat can be adjusted gradually by turning the appropriate knob to the right or Instructions left. Switching on the plate results in a red signal light on the control panel turning on. Switching off Using the hotplates MAX. - Page 11 brand of "Shine On" which is available from most leading electrical retailers and supermarkets in Australia. Turn the oven to a temperature of 250 degrees C for approximately 30 minutes. When cooled, wipe away any residue. Instructions (Cont.) When heating the oven for the first time it is normal for the stove to give off smoke and manufacturing odours.
-
Page 12: Using The Oven
Instructions (Cont.) OPERATION OPERATION We recommend the Hillmark Oven functions and operation Using the oven m most leading electrical retailers Oven guide levels The oven is controlled by the function Shelf positions grees C for approximately 30 knob, timer knob and the temperature Baking pans and accessories (oven grid, baking tray, etc) may be inserted into the oven in sidue. - Page 13 egetables, Instructions (Cont.) ups,larger The timer The function knob The function knob When using the oven, you must set the cooking time with the timer dial (Fig. 5). ameter, as in that If you don't want th controlled by the me you can turn the mech ance.
-
Page 14: Oven Functions
Instructions (Cont.) Oven functions OPERATION There are five settings on the function dial (Fig. 7). Possible settings of the oven function knob Caution! When the functions with fan have been Separate oven lighting OPERATION selected but the temperature knob is set to zero only the fan will be on. -
Page 15: Baking, Roasting And Grilling
Baking, Roasting and Grilling Baking tips IMPORTANT! • The baking chart on the following page gives approximate times and temperature ranges for some cakes, pastries, biscuits and frozen foods. Use the chart as a guide only and adjust according to your own experience and preference. - Page 16 Baking, Roasting and Grilling (Cont.) Baking chart Type of Pastry Shelf Position Temperature Baking Time lowest position = 1 (°C) (minutes) highest position = 5 Sweet Pastry Raisin cake 150-160 55-70 Cheesecake (tart form) 160-170 60-80 Fruitcake 170-180 50-70 Sponge cake 160-170 30-40 Jelly roll...
-
Page 17: Roasting Tips
Baking, Roasting and Grilling (Cont.) Roasting tips IMPORTANT! • The roasting chart on the next page gives approximate times and tem- perature ranges for some commonly roasted meat cuts, poultry and fish. • Roasting times largely depend upon the type of meat, its size and quality, so you may expect some variations. -
Page 18: Roasting Chart
Baking, Roasting and Grilling (Cont.) Roasting chart Type of Meat Weight Shelf Position Temperature Roasting Time (kg) lowest position = 1 (°C) (minutes) highest position = 5 Beef Beef loin 200-220 100-120 Beef loin 200-220 120-150 Roast beef, rare 220-230 30-40 Roast beef, well done 220-230... - Page 19 Baking, Roasting and Grilling (Cont.) Grilling tips IMPORTANT! • The grilling chart on the next page gives approximate times and temperatures for some commonly grilled meat cuts, fish and toast. • Use the chart as a guide only and adjust according to your own experience and preference, as grilling times may vary according to the weight and quality of meat.
-
Page 20: Grilling Chart
Baking, Roasting and Grilling (Cont.) Grilling chart Type of Meat Weight Shelf Position Temp. Grilling Time lowest position = 1 (°C) (minutes) highest position = 5 Meat and Sausages 2 Beef steaks, rare 14-16 2 Beef steaks, medium 16-20 2 Beef steaks, well done 20-23 2 Pork fillets 19-23... -
Page 21: Other Useful Information
Other Useful Information Cleaning and maintenance WARNING! • Before cleaning the cooker, make sure all controls for the hotplates and cooker are set to the “0” (Off) position. Do not start cleaning until the appliance has completely cooled. • Do not attempt any maintenance yourself. If you are experiencing problems with the appliance, contact a qualified electrician or our after sales support line for advice. - Page 22 Other Useful Information (Cont.) Cleaning the hob • Allow the appliance to cool down completely before cleaning. • Clean the enamelled parts of the cooker after every use. Use a soft cloth or sponge, dampened with warm water and mild detergent. •...
- Page 23 ed to clean the trim ring. Changing the Oven Lamp en the element is turned on after ing, some smoke may be generated Other Useful Information (Cont.) Before any maintenance is started In o e sealant on the element. This is involving electrical parts, the al and will cease after approx 2 appliance must be disconnected...
- Page 24 Other Useful Information (Cont.) Removing the oven door To make cleaning easier, you can remove the oven door. Just follow the simple steps below: • Open the oven door completely. • Tilt the safety catch part of the hinge upwards (Fig. 9). •...
-
Page 25: Troubleshooting Guide
Other Useful Information (Cont.) In case of an emergency In the event of an emergency, switch off all working units of the cooker, disconnect the mains plug and call our after sales support line for advice. Troubleshooting guide Some minor faults can be fixed by referring to the instructions given in the table below. -
Page 26: Technical Specifications
Other Useful Information (Cont.) Technical specifications 145mm Hotplate 1 x 1000W 145mm Rapid Hotplate 1 x 1500W 180mm Hotplate 1 x 1500W 180mm Rapid Hotplate 1 x 2000W Oven Oven chamber capacity Guide levels (shelf positions) Oven door Detachable Oven temperature range 50 –... - Page 27 Other Useful Information (Cont.) Energy-saving tips Using energy in a responsible way not only saves money but also helps the environment. This electric oven makes it easy to save energy. • Use appropriate pots and pans for cooking. Pans that match the size of the hotplate and have thick, flat bases are more energy efficient than ill-fitting ones.
-
Page 28: Installation
Installing the fix screws provide The kitchen should be dry and airy the slots prehol and have effective ventilation according prevent its mov Installation to the existing technical provisions. illustration as b The room should be equipped with a This freestanding electric oven must be installed by an appropriately ventilation system that pipes away qualified electrician following these installation instructions. - Page 29 nstructions. laced so as to Drill a hole on the floor,and insert o control Installation (Cont.) column peg into the hole. See the below. illustration • The cooker should stand on a hard, even floor; do not put it on a base. sed on fitted d with a heat •...
-
Page 30: Before First Use
OPERATION Installation (Cont.) a hard, base.) To fit the rear panel/splashback, slide the lugs on the bottom of the irstly by cooker on panel into the matching slots on rear of stove and fix with screws • To fit the rear panel/splashback, slide the lugs on the bottom of the panel cket to into the matching slots on rear of the cooker and fix with the screws provided. - Page 31 Installation (Cont.) guidelines Fitting The cooker is manufactured to work with three-phase alternating current (400V 3N~50Hz). The voltage rating of the cooker heating elements is 220- 240V. Adapting the cooker to operate with one-phase current is possible by appropriate bridging in the connection box according to the connection diagram (Fig.
- Page 32 Warranty returns Should you for any reason need to return this product for a warranty claim, make sure to include all accessories with the product. Product does not work? If you encounter problems with this product, or if it fails to perform to your expectations, make sure to contact our After Sales Support Centre on (AU) 1300 886 649 or (NZ) 0800 836 761 before returning it to the store for a refund.
Need help?
Do you have a question about the AK64FSO and is the answer not in the manual?
Questions and answers