Table of Contents
Advertisement
Quick Links
Advertisement
Table of Contents
Troubleshooting

Summary of Contents for TriContinent MULTIWASH III
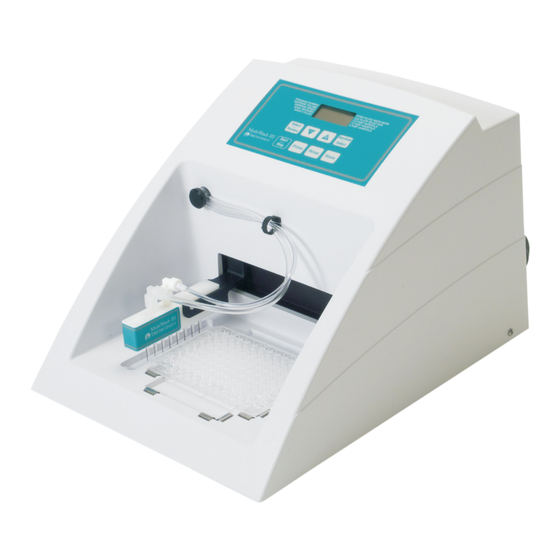
- Page 1 MULTIWASH III MICROPLATE WASHER OPERATION AND MAINTENANCE MANUAL 8618-01 E...
- Page 2 Date of Issue Signature TriContinent: 12555 Loma Rica Drive, Grass Valley, CA 95945 USA. Tel: 530.273.8888 or 800.WE.PIPET. Fax: 530.273.2586 Eastern USA sales office: P.O. Box 1129, Marblehead, MA 01945. Tel: 781.631.8316. Fax 781.639.0802 Western USA sales office: P.O. Box 2324, Del Mar, CA 92014. Tel: 858.481.0880. Fax: 858.481.0269 Internet: www.tricontinent.com...
-
Page 3: Table Of Contents
Multiwash III CONTENTS INSTALLATION ............1 UNPACKING . - Page 4 Multiwash III CONTENTS (CONTINUED) MAINTENANCE ............22 GENERAL.
- Page 5 Multiwash III (THIS PAGE INTENTIONALLY LEFT BLANK)
-
Page 6: Installation
Quick Start Guide ENVIRONMENTAL REQUIREMENTS Locate the MultiWash III so that it is shielded from excess exposure to dust, vibration, strong magnetic fields, direct sunlight, drafts, excessive moisture, or large temperature fluctuations. A surge protector or line conditioner should be used with the instrument if the voltage source is not stable. -
Page 7: Ac Line Voltage Selection
Multiwash III AC LINE VOLTAGE SELECTION This instrument was supplied with a Fuse Module and two different types of spare fuses. The Fuse Module is ready to be installed into the Power Entry Module located on the back of the instrument as shown in the following examples. -
Page 8: 220 Line Voltage Selection
Multiwash III 1.3.2 220 LINE VOLTAGE SELECTION The small arrow below the selected "220-240V" voltages shown on the Fuse Module must be aligned with the WHITE arrow on the Power Entry Module for proper operation. WARNING! Disconnect power cord before continuing onto the next steps! -
Page 9: Manifold Installation
Multiwash III MANIFOLD INSTALLATION CAUTION: Handle the manifold carefully. The dispense and aspirate needles on the manifold are fragile. The tubing must be connected correctly for proper functioning of the manifold. The connectors are color coded to assist in correctly connecting the manifold to the washer tubing. -
Page 10: Manifold Alignment
Multiwash III MANIFOLD ALIGNMENT 1.5.1 THUMBSCREW ADJUSTMENT Adjust the thumb screw to ensure the manifold is level. (See the Figures below). THUMB SCREW LEVEL 8-Port Standard Manifold Example THUMB SCREW LEVEL 12-Port Coaxial Manifold Example... -
Page 11: Horizontal Manifold To Microplate Adjustment
Multiwash III 1.5.2 HORIZONTAL MANIFOLD TO MICROPLATE ADJUSTMENT The best aspirate performance (leaving the minimum liquid in the plate wells) is obtained when the manifold aspiration needles are close to the left side wall of the well (flat bottom wells). - Page 12 Multiwash III 8-PORT STANDARD AND 12-PORT STANDARD MANIFOLDS POSITION SHOWN FOR FLAT PLATE SELECTION 8-PORT COAXIAL AND 12-PORT COAXIAL MANIFOLDS POSITION SHOWN FOR FLAT PLATE SELECTION...
-
Page 13: Vertical Manifold To Microplate Adjustment
Multiwash III 1.5.3 VERTICAL MANIFOLD TO MICROPLATE ADJUSTMENT To provide maximum flexibility in washing the microplate, the vertical aspiration position of the manifold is adjustable for well depth aspiration requirements and overflow wash applications. The factory default settings have been found to be acceptable for the majority of applications. - Page 14 Multiwash III “FINAL” ASPIRATION WELL POSITION “TOP OF WELL” ASPIRATION POSITION...
-
Page 15: Setting Up The Reservoirs
Multiwash III SETTING UP THE RESERVOIRS The connectors and fittings are color coded to assist in correctly connecting the tubing for the different bottle caps. It is critical for proper fluid aspiration that the Waste cap is tight on the bottle and both green fittings are fully seated. -
Page 16: Functional Description
The maintenance rinse will continue after every eight hours of non-use. If the Multiwash III is to be turned off, it is important to purge the Wash solution completely out of the system to prevent damage. This can be accomplished by performing the Rinse operation twice with distilled water. -
Page 17: Wash Cycle Options
Each row is left with wash solution to soak for the designated SOAK SECONDS. The minimum soak time, is determined by the amount of time it takes the Multiwash III to fill the number of rows with the dispense volume selected. While soaking, the display shows the remaining soak time. -
Page 18: Display
8 hours from the Rinse Reservoir. When the Start/Stop button is pushed to use the Multiwash III again, the AutoRinse valve will then rotate back into the Wash solution position. The instrument will first go through the Prime cycle to flush the lines of the... -
Page 19: Operation
Multiwash III OPERATION OVERVIEW 3.1.1 STRIP WASH MODE This mode soaks each row as it is PROGRAM NUMBER STRIP/PLATE WASH MODE DISPENSE VOLUME PLATE SELECTION washed, before moving on to the next DISPENSE SPEED 2-8 PORT MANIFOLD SOAK SECONDS 12 PORT MANIFOLD... -
Page 20: Rinse
The maintenance rinse will continue after every eight hours of non-use. If the Multiwash III is to be turned off, it is important to purge the Wash solution completely out of the system to prevent damage. This can be accomplished by performing the Rinse operation twice with distilled water. -
Page 21: Operating Instructions Summary
Multiwash III OPERATING INSTRUCTIONS SUMMARY See instructions for fuse module installation, setting up the reservoirs, and installing the manifold tubing in Section 1. The Manifold/ PROGRAM NUMBER STRIP/PLATE WASH MODE DISPENSE VOLUME PLATE SELECTION Select key is DISPENSE SPEED 2-8 PORT MANIFOLD... -
Page 22: Programming A Wash Cycle
Multiwash III PROGRAMMING A WASH CYCLE 3.3.1 PROGRAM NUMBER The instrument will save up to 50 user- PROGRAM NUMBER STRIP/PLATE WASH MODE DISPENSE VOLUME PLATE SELECTION entered wash sequences in "programs", DISPENSE SPEED 2-8 PORT MANIFOLD SOAK SECONDS 12 PORT MANIFOLD... -
Page 23: Dispense Speed
Multiwash III 3.3.4 DISPENSE SPEED STRIP/PLATE WASH MODE PROGRAM NUMBER Select PLATE SELECTION DISPENSE VOLUME DISPENSE SPEED 2-8 PORT MANIFOLD Review Press until the flashing arrow SOAK SECONDS 12 PORT MANIFOLD WASH CYCLES 8 PORT MANIFOLD appears next to DISPENSE SPEED. Press keys to adjust the initial speed up and down. -
Page 24: U/V Plate Selection
Multiwash III 3.3.8 U/V PLATE SELECTION PROGRAM NUMBER STRIP/PLATE WASH MODE Select DISPENSE VOLUME PLATE SELECTION DISPENSE SPEED 2-8 PORT MANIFOLD Review Press until the flashing arrow appears SOAK SECONDS 12 PORT MANIFOLD WASH CYCLES 8 PORT MANIFOLD next to UV PLATE SELECTION and the plate selection is displayed. -
Page 25: User Defined Program Log Sheet
Multiwash III 3.3.11 USER DEFINED PROGRAM LOG SHEET These two pages are provided for logging the Multiwash III settings for reference. Program # Used for Dispense Volume Wash Mode Dispense Speed Plate Selection Soak Seconds Manifold Selection Wash Cycles Program #... - Page 26 Multiwash III Program # Used for Dispense Volume Wash Mode Dispense Speed Plate Selection Soak Seconds Manifold Selection Wash Cycles Program # Used for Dispense Volume Wash Mode Dispense Speed Plate Selection Soak Seconds Manifold Selection Wash Cycles Program #...
-
Page 27: Maintenance
Multiwash III MAINTENANCE GENERAL The life expectancy of the liquid handling components in any equipment that contact saline solutions depends largely upon operator care. Allowing the wash solution in the manifold, tubing or dispense pump to dry out will create problems. The salt deposits left by the dried wash solution can easily clog the system. - Page 28 Multiwash III...
- Page 29 Multiwash III...
- Page 30 Multiwash III CLEANING MANIFOLD NEEDLES A needle cleaning wire is supplied with each manifold, and may be used to unclog aspirate or dispense needles which have been plugged by particulates or dried salt deposits. The standard manifold dispense needles are a composite assembly with an outside sheath of plastic, housing an inner precision bore glass capillary tube.
-
Page 31: Cleaning Manifold Needles
Multiwash III REPLACING STANDARD MANIFOLD DISPENSE NEEDLES Note: A needle service tool—included with the optional Maintenance Kit and in the Replacement Needle Kit—is required to replace manifold dispense needles. Insert the needle service tool under the dispense needle collar. Pry the dispense needle upward with the tool. -
Page 32: Replacing Standard Manifold Dispense Needles
Multiwash III INSTALLING MANIFOLD TUBING Use these step-by-step instructions to install the tubing for proper functioning of the manifold, remembering that the dispense and aspirate needles on the manifold are fragile. SYRINGE/MANIFOLD CONDUIT TUBING ASSEMBLY “B” CLEAR FITTING THREAD THRU... -
Page 33: Installing Manifold Tubing (Continued)
Multiwash III INSTALLING MANIFOLD TUBING (continued) SLOT IN CONDUIT ON RIGHT SIDE INSTALL BLACK CAP OVER CONDUIT WHITE FITTING CLEAR FITTING CLEAR FITTING (REF.) 10 ½” (266 mm APPROX.) WHITE FITTING (REF.) TURN THE CONDUIT SO THE TUBING RELIEF SLOT IS AT THE RIGHT SIDE WHEN VIEWED FROM THE FRONT OF THE CASE. -
Page 34: Fuse Module Removal And Fuse Installation Instructions
Multiwash III FUSE MODULE REMOVAL AND FUSE INSTALLATION INSTRUCTIONS (BOTH FUSES MUST BE INSTALLED FOR PROPER OPERATION.) SMALL SCREWDRIVER OR EQUIVALENT OPENING SLOT FOR FUSE DRAWER LOOKING AT FRONT/RIGHT SIDE OF FRONT VIEW OF POWER MODULE FUSE DRAWER WITH 110-120V... -
Page 35: Decontamination Procedure
Use a cleaning pad wetted with a solution of one part chlorine bleach in nine parts water (10% bleach solution) to clean all outside surfaces of the Multiwash III. Use care to avoid getting bleach solution inside the chassis. -
Page 36: Troubleshooting
Multiwash III TROUBLESHOOTING RE-INITIALIZING THE STORED PROGRAMS To re-initialize the Multiwash III's program settings, hold the Down Arrow key on the keypad as you turn the power switch on. This will return all user defined programs back to the factory settings! TROUBLESHOOTING TABLE The following checklist may help resolve problems in the operation of this equipment. - Page 37 Multiwash III TROUBLESHOOTING TABLE (CONTINUED) SYMPTOM PROBABLE CAUSE REMEDY 5. Unit dispenses only partially, or The manifold dispense needles are Clean or replace needles. See not at all. clogged, or have cracked glass. Sections 4.6-4.7. The Wash reservoir inlet filter is Backflush or replace filter.
- Page 38 Multiwash III TROUBLESHOOTING TABLE (CONTINUED) SYMPTOM PROBABLE CAUSE REMEDY 11. Grinding noise from the back of Syringe plunger is stuck due to Turn the power Off and On and the instrument and no fluid dried wash buffer freezing the verify if syringe is working.
-
Page 39: Error Codes
Multiwash III ERROR CODES Internal faults during the operation of the Multiwash III result in error codes being reported on the front panel display of the instrument. The table below lists the error codes and their meanings. The Multiwash III should be turned off after the error code is recorded. Turning off the Multiwash III resets the instrument and clears out the error code from the display. -
Page 40: User Trouble Shooting Notes
Multiwash III USER TROUBLE SHOOTING NOTES... -
Page 41: Specifications
1° to 40° C Fluid reservoir capacity: Wash, Rinse, Waste: 2L REGULATORY / CERTIFICATIONS TriContinent operates an ISO 13485 registered manufacturing facility that delivers the highest quality products. CE Mark UL61010A - 1 Revised 12/06/02 CAN / CSA - C22.2 NO. 1010.1-92 Revised 02/1997... -
Page 42: Appendix 1 Accessories And Replacements
WARRANTY WORKMANSHIP AND MATERIALS The Multiwash III is warranted against defects in materials and workmanship for a period of two years from the date it is shipped from the manufacturer. If notified of such defects during the warranty period, manufacturer will, at its option, either repair or replace products which prove to be defective. -
Page 43: Appendix 3 Quick Start Guide
Multiwash III APPENDIX 3 QUICK START GUIDE See instructions for fuse module installation, setting up the reservoirs, and installing the manifold tubing in Section 1. The Manifold/ PROGRAM NUMBER STRIP/PLATE WASH MODE DISPENSE VOLUME PLATE SELECTION Select key is DISPENSE SPEED...
Need help?
Do you have a question about the MULTIWASH III and is the answer not in the manual?
Questions and answers