
Related Manuals for Polar Electro SPORT TESTERT


Summary of Contents for Polar Electro SPORT TESTERT
-
Page 1: Heart Rate Monitor
S P O R T Heart Rate Monitor User’s Instruction Manual H E A R T R A T E M O N I T O R S POLAR ELECTRO OY Professorintie 5, FIN-90440 Kempele, Finland Tel.: 358-81-5202100. Telefax: 358-81-5202300 Pursuit... - Page 2 LIMITED ONE - YEAR WARRANTY POLAR warrants to the original consumeripurchaserthat the product will be free from defects in material or workmanship for one year from date of purchase with the exception of have just purchased the essential equipment battery and the elastic belt. for scientific training based on today’s most a d v a n c e d a t h l e t i c c o n c e p t s - - t h e P o l a r S p o r t .
-
Page 3: Table Of Contents
As you develop a long-term plan of training, tapering off, competition and rest, your Polar Sport Tester Heart Rate Monitor will give you an unerring method for controlling your work Polar Sport Tester ..........intensity, precisely tracking, and analysing and storing records of your progress. - Page 4 1. Attach the POLAR Transmitter onto the elastic This package includes belt. ALL NEW POLAR TRANSMITTER 2. Adjust the belt length so that the fit is snug, fully sealed . lightweight but not too tight. . ultra slim design comfortable to use POLAR-logo in the right position, insert the round end of the belt lock into the buckle to secure the Transmitter with elastic belt...
- Page 5 stretching the belt and moisten the conductive electrode strips located on both sides. Using the transmitter against the skin is best. However, if Your Polar Sport Tester Heart Rate Monitor is a you wish to wear the Transmitter over a shirt, highly sophisticated computer that allows you to moisten the shirt heavily in the electrode areas.
-
Page 6: Time
Principle 4.To enter a basic selection, and use its various functions, press the SET/START-STOP button to move from function to function within each of the four selections. Principle 5. Once you have entered a selection, TIME using the SET button, the SELECT button assumes a different role - and you can’t get back What the selection does: Allows you to set the to the selection cycle by simply pushing that... - Page 7 Step-by-step instructions for 4. At this point, the first two digits (representing setting the alarm the hours) will be flashing. Once you have set SELECT : button or down with the the time, press the SET SIGNAL : button. button. If first time, the letters ALM and When the correct hour is displayed, press the the time, 10:00 AM, will...
-
Page 8: Set
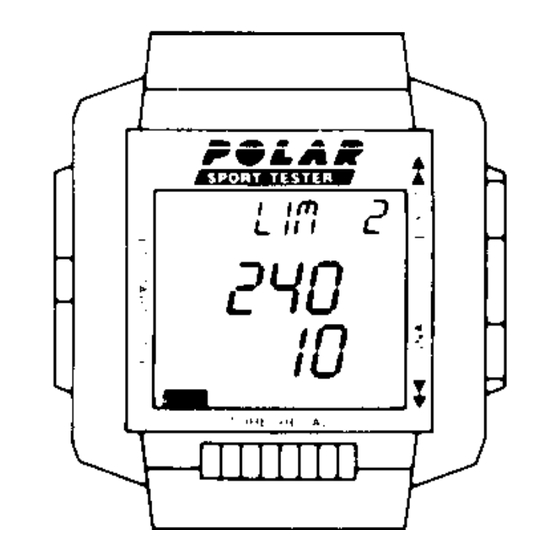
Step-by-step instructions for setting the timers activate the alarm, press the SIGNAL : button twice until the alarm symbol appears without With the time of ;ay appearing on the screen, flashing. To turn the alarm off, press the button once. The word press the SELECT . - Page 9 Step-by-step instructions 3. The first minute’s digit should now be flashing. for setting limits As in the TIME selection, use the SELECT : button to move up, or the SIGNAL : button to move down. The phrase LIM 1 will now appear and the upper position heart rate limit will be flashing.
-
Page 10: Measure
Step-by-step instructions MEASURE If you have just finished using the SET selection, you need only to press the SELECT : What the selection does: Allows you to measure button once, ant the word MEASURk appears on your heart rate and set the interval at which your the selection status line. -
Page 11: Recall
2. At any point you can press the SETISTART- STOP button and the letters INT will remain on the time, you can press the SET/START-STOP button display. to return to the beginning of the Measure selection or press STORE/RECALL to start 3. - Page 12 Step-by-step instructions 8. If you press the STORE/RECALL button again, you will see the time of day at which you began Cycle through the exercising and your starting heart rate. selections using the SELECT f button your heart rate after first recording interval that until the word RECALL will be displayed as well, and successive use of appears on the...
- Page 13 During recording, if you want to. Turn of the heart rate beep: Press the SIGNAL : button. After you’ve programmed in the heart rate limits and timers, you’re ready to use your Polar Sport Change from Limit 1 to Limit 2: Tester Heart Rate Monitor to monitor your exerci- Press the SELECT : button.
-
Page 14: The Transmitter
The Batteries Should your HRM need battery replacement or service we strongly recommend it be done by a POLAR authorized center only in order to The Wrist Monitor make sure that the unit is adequately tested for Water Resistance: Due to the many variables water resistance. - Page 15 When your Transmitter and Wrist Monitor are in use, strong electromagnetic sources such as television sets, electric motors, vehicles, radio and TV antennas and high voltage power lines To lengthen the useful life of your Polar Sport can cause erratic heart rate reception. This can Tester Heart Rate Monitor, keep the following in also happen if you attempt to use the heart mind:...
-
Page 16: Troubleshooting Your Polar Sport Tester
way or another to find the best position for the Transmitter. Make sure that the POLAR-logo on the Transmitter is in the correct position. What if there is any irregularity Check that the electrode strips are thoroughly moistened. The Transmitter will not function in the performance of your properly without moisture to make good electrical Polar Sport Tester? -
Page 17: Service
Transmitter: . Should your Polar Sport Tester need service during or after the warranty period, we highly Operating temperature: -10” to +50” C recommend that you send it to your dealer or (14” to 122” F) Estimated average distributor for repair. If you service the unit Battery: battery life: 2500 hours yourself, you will void the warranty.
Need help?
Do you have a question about the SPORT TESTERT and is the answer not in the manual?
Questions and answers