Table of Contents
Advertisement
Quick Links
Advertisement
Table of Contents

Summary of Contents for Atlona AT-UHD-HDVS-300-KIT
- Page 1 Soft Codec Conferencing System Atlona Manuals AT-UHD-HDVS-300-KIT Switchers...
- Page 2 Version Information Version Release Date Notes 01/16 Initial release 02/18 New manual format AT-UHD-HDVS-300-KIT...
- Page 3 Welcome to Atlona! Thank you for purchasing this Atlona product. We hope you enjoy it and will take an extra few moments to register your new purchase. Registration only takes a few minutes and protects this product against theft or loss. In addition, you will receive notifications of product updates and firmware.
- Page 4 Atlona requires that products returned are properly packed, preferably in the original carton, for shipping. Cartons not bearing a return authorization or case number will be refused. Atlona, at its sole discretion, reserves the right to reject any products received without advanced authorization. Authorizations can be requested by calling 1-877-536-3976 (US toll free) or 1-408- 962-0515 (US/international) or via Atlona’s website at www.atlona.com.
- Page 5 Damage, deterioration or malfunction resulting from the installation or removal of this product from any installation, any unauthorized tampering with this product, any repairs attempted by anyone unauthorized by Atlona to make such repairs, or any other cause which does not relate directly to a defect in materials and/or workmanship of this product.
-
Page 6: Important Safety Information
Where shielded interface cables have been provided with the product or specified additional components or accessories elsewhere defined to be used with the installation of the product, they must be used in order to ensure compliance with FCC regulations. AT-UHD-HDVS-300-KIT... -
Page 7: Table Of Contents
The Web GUI Introduction to the Web GUI Menu Bar Status page Firmware page Network page Control page Users page EDID page Settings page Setup page Command page Appendix Updating the Firmware Cable Termination Internal EDID Data Default Settings Specifications Index AT-UHD-HDVS-300-KIT... -
Page 8: Introduction
Introduction The Atlona AT-UHD-HDVS-300-KIT provides AV switching, USB and HDMI extension, plus integrated system control for huddle spaces and meeting rooms using PC-based conferencing codecs such as Skype® for Business, WebEx®, and GoToMeeting®. The transmitter and receiver kit offers five video inputs for HDMI, DisplayPort, and analog video signals. -
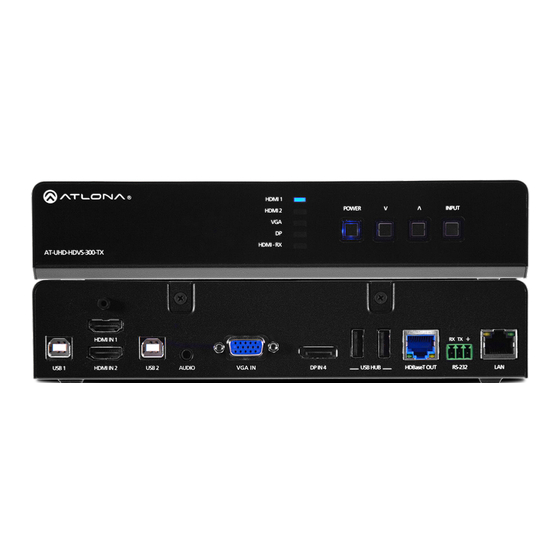
Page 9: Panel Description
USB device. 14 LAN AUDIO Connect an Ethernet cable from this port to the Connect a 3.5 mm mini-stereo cable from this port network. to the Line Out audio port of a computer or other line- level analog audio source. AT-UHD-HDVS-300-KIT... -
Page 10: Receiver
Connect up to three USB devices to these ports. These ports support both USB 2.0 and USB 1.1 devices. HDBaseT IN Connect an Ethernet cable from this port to the transmitter. DC 48V Connect the included power supply to this port using the included 2-pin captive screw connector. Refer to Power (page 11) for wiring information. AT-UHD-HDVS-300-KIT... -
Page 11: Installation
1. Insert the wires into the correct terminal on the included captive screw terminal block, as shown below. 2. Tighten the screws to secure the wires. Do not use high-torque devices as this may damage the screws and/or terminal block. 48 V Black (negative) White (positive) AT-UHD-HDVS-300-KIT... -
Page 12: Connection Instructions
GUI. Refer to The Web GUI (page 29) for more information. Ethernet cables should use EIA/TIA-568B termination. 7. Connect the included power supply to this port using the included 2-pin captive screw connector. Refer to Power (page 11) for wiring information. AT-UHD-HDVS-300-KIT... -
Page 13: Connection Diagram
Control Device AT-UHD-HDVS-300-TX AT-UHD-HDVS-300-RX CT OR LA N RS -2 Ba se US B A IN DI O US B US B 48 V U SB se T U SB Keyboards and/or other USB devices Webcam Laptop HD Display AT-UHD-HDVS-300-KIT... -
Page 14: Ip Configuration
(if available), will automatically assign an IP address to the unit. Execute the arp -a command at the Windows command line or use an IP scanner to locate the AT-UIHD-HDVS-300-KIT on the network. If the AT-UHD-HDVS-300-KIT is unable to detect a DHCP server, within 15 seconds, then the unit will be assigned the following. -
Page 15: Using Commands
2. At the command line, execute the IPDHCP command using the on argument, as shown. All characters are case-sensitive. IPDHCP on 3. Power-cycle the AT-UHD-HDVS-300-TX. 4. The unit is now set to DHCP mode and will be assigned an IP address by the DHCP server (if present). AT-UHD-HDVS-300-KIT... -
Page 16: Using The Web Gui
1. Open the desired web browser and enter the IP address of the AT-UHD-HDVS-300-TX. 2. Log in, using the required credentials. The factory-default username and password are listed below: Username: root Password: Atlona 3. Click the Network tab, located on the side menu bar. •... -
Page 17: Basic Operation
2. Launch a web browser and login to the web GUI. The factory-default username and password are listed below: Username: root Password: Atlona 3. Click Setting in the side menu bar. 4. Locate the USB Host section. The Follow Video radio button should already be enabled. The factory-default... - Page 18 Display_Port HDMI - RX Input 5 HDMI IN 5 HDMI_(RX) * Factory-default names as used in the web GUI. References to port names in the web GUI can be changed. Refer to Settings page (page 38) for more information. AT-UHD-HDVS-300-KIT...
- Page 19 R S -2 B a se U S B Media Player A IN D IO U S B U S B Keyboard Mouse t o p L a p t o p L a p Laptop 2 Laptop 1 AT-UHD-HDVS-300-KIT...
- Page 20 R S -2 B a se U S B Media Player A IN D IO U S B U S B Keyboard Mouse t o p L a p t o p L a p Laptop 2 Laptop 1 AT-UHD-HDVS-300-KIT...
-
Page 21: Follow Usb
USB mode. 1. Launch a web browser and login to the web GUI. The factory-default username and password are listed below: Username: root Password: Atlona 2. Click Setting in the side menu bar. 3. Locate the USB Host section. 4. Click the Follow USB radio button. -
Page 22: Manual
This mode provides manual selection of the USB host port to be used. 1. Launch a web browser and login to the web GUI. The factory-default username and password are listed below: Username: root Password: Atlona 2. Click Setting in the side menu bar. 3. Locate the USB Host section. -
Page 23: Rs-232 Control
Basic Operation RS-232 Control The AT-UHD-HDVS-300-KIT provides an RS-232 port on both the transmitter and the receiver. There are two modes of RS-232 control: Pass-through and display control. It should be noted that the AT-UHD-HDVS-300-KIT cannot be controlled using RS-232. Direct control of the AT-UHD-HDVS-300-KIT is only supported through the TCP/IP protocol. - Page 24 2. Launch a web browser and login to the web GUI. The factory-default username and password are listed below: Username: root Password: Atlona 3. Click Control in the side menu bar. 4. Click the RS-232 Control drop-down list and select Pass-Thru.
-
Page 25: Control Mode
Figure 1.5 - Control mode. Controlling a display or other RS-232 device from commands stored in the receiver. AT-UHD-HDVS-300-TX LA N RS -2 Ba se U SB A IN D IO U SB U SB AT-UHD-HDVS-300-RX 48 V se T B HU Display AT-UHD-HDVS-300-KIT... - Page 26 2. Launch a web browser and login to the web GUI. The factory-default username and password are listed below: Username: root Password: Atlona 3. Click Control in the side menu bar. 4. Click the RS-232 Control drop-down list and select Control.
- Page 27 11. Enter the command(s), required by the sink device, in each field. Refer to the User Manual of the sink device for a list of the required commands. In the example, below, the required command for powering-off the RS-232 device has been entered. AT-UHD-HDVS-300-KIT...
- Page 28 HDMI - RX AT-UHD-HDVS-300-TX NOTE: Powering-off the AT-UHD-HDVS-300-KIT places both the transmitter and receiver in a very low power state ( < 500 mA). Access to the web GUI will still be available after a power-off command has been processed.
-
Page 29: The Web Gui
The Web GUI Introduction to the Web GUI The AT-UHD-HDVS-300-TX includes a built-in web GUI. Atlona recommends that the web GUI be used to set up the AT-UHD-HDVS-300-TX, as it provides intuitive management of all features. The AT-UHD-HDVS-300-TX is shipped with DHCP enabled. Once connected to a network, the DHCP server will automatically assign an IP address to the unit. -
Page 30: Menu Bar
The window on the left side of the screen is the menu bar. The menu system is divided into three sections: Home, Settings, and Configuration. When the mouse is moved over each menu item, it will be highlighted in black. Click the menu item to go that page. Menu bar AT-UHD-HDVS-300-KIT... -
Page 31: Status Page
The default system settings filename is download.json. Network page (page 33) page. It is recommended to save the system settings before performing a firmware update. MAC Address The MAC address of the AT-UHD-HDVS-300-TX. Serial Number The serial number of the unit. AT-UHD-HDVS-300-KIT... -
Page 32: Firmware Page
HBaseT Firmware RX The current HDBaseT firmware version of the receiver. Choose file Click this button to select the firmware file. Click the Upload button to begin the update procedure. Refer to Updating the Firmware (page 43) for more information. AT-UHD-HDVS-300-KIT... -
Page 33: Network Page
23. HTTP Enter the HTTP listening port in this field. The default port is 80. IP Timeout Enter the time-out interval, in seconds, in this field. This field represents the time interval before the TCP/IP connection times out. AT-UHD-HDVS-300-KIT... -
Page 34: Control Page
Click the Blink button to start the POWER LED blinking. This feature is useful to identify the unit on a network, if multiple units are being used. RS-232 Control Click this drop-down list to select the desired RS-232 control method. The AT-UHD-HDVS-300-KIT supports either Control or Pass-Thru mode. Refer to RS-232 Control (page 23) for more information. -
Page 35: Users Page
Click the Add button to create the user, once the information in the username and password fields have been entered. Change Admin Password • Old password Enter the current password in this field. The default password is Atlona. • New Password Enter the new password in this field. •... -
Page 36: Edid Page
4K 30 MC 1024x768 RGB 2CH 4K 30 2CH 720P DD 1920x1200 RGB 2CH 720P 2CH 1080P DD 800x600 RGB 2CH 1080P MC Memory 1 1080P 2CH Memory 2 1080P 3D DD Memory 3 1080P 3D 2CH Memory 4 1080P DVI AT-UHD-HDVS-300-KIT... - Page 37 Saves the EDID of the display, connected to HDMI Out port on the receiver, to the specified memory location. Click the drop-down list to select the desired memory location (Memory 1 - Memory 4). Click the Save button to confirm the operation. AT-UHD-HDVS-300-KIT...
-
Page 38: Settings Page
Click the button, next to the input name, to switch to that auto-switching. When set to On, and a new source is input. connected, the AT-UHD-HDVS-300-KIT will automatically switch to that input (including HDMI IN 5 on the USB Host receiver). -
Page 39: Setup Page
Display is always ON, but the source can be powered-on or powered-off. Command On/Off, AV On/Off Both the source and display can be powered-on or powered-off. Command On/Off, AV No Change Display can be powered-on or powered-off, but the source is always on. AT-UHD-HDVS-300-KIT... - Page 40 Click the + and - buttons to increase or decrease the volume, respectively. Click the Mute button to mute the audio output. The AT-UHD-HDVS-300-KIT can control two separate IP devices on a network. However, only one device can be controlled at a time. Specify the IP settings in this section.
-
Page 41: Command Page
The Web GUI Command page The settings on this page only apply when the AT-UHD-HDVS-300-KIT is set to control mode. Refer to Control mode (page 25) for more information. Command field Terminating Character drop-down ASCII Click this radio button to view all command fields in ASCII format. - Page 42 Terminating Character Click these drop-down lists to select the terminating character, when sending the command. Setting Description None No end-of-line characters included Carriage return Line feed CR-LF Carriage return + Line feed Space Space character Null Null character (binary zero) AT-UHD-HDVS-300-KIT...
-
Page 43: Appendix
GUI must be on the same network as the AT-UHD-HDVS-300-KIT. 2. Type the IP address of the AT-UHD-HDVS-300-KIT into a web browser, as shown in the example below. IMPORTANT: If any stability issues are experienced, disable any anti-virus or firewall that may be interfering with network communication to the AT-UHD-HDVS-300-KIT. - Page 44 7. Click Firmware, on the left side of the screen. 8. Click the Choose File button, to select the firmware file. 9. Click the Update button. A progress bar will be displayed during the update process. 10. Once the update has been completed, re-login to the webGUI. AT-UHD-HDVS-300-KIT...
-
Page 45: Cable Termination
Appendix Cable Termination Atlona recommends EIA/TIA-568-B termination. Connector type and size is very important to ensure extenders work correctly. Always use the matching cable type with the correct RJ45 connector. • CAT5e cables should use only CAT5e RJ45 connectors •... -
Page 46: Internal Edid Data
1C 16 20 58 2C 25 00 A0 5A 00 00 00 9E 01 1D 00 72 51 D0 1E 20 6E 28 55 00 A0 5A 00 00 00 1E 00 00 00 00 00 00 00 00 22 AT-UHD-HDVS-300-KIT... - Page 47 1E 20 6E 28 55 00 A0 5A 00 00 00 1E 00 00 00 00 00 00 00 00 00 00 00 00 00 00 00 00 00 00 00 00 00 00 00 00 00 00 00 25 AT-UHD-HDVS-300-KIT...
- Page 48 1C 16 20 58 2C 25 00 A0 5A 00 00 00 9E 01 1D 00 72 51 D0 1E 20 6E 28 55 00 A0 5A 00 00 00 1E 00 00 00 00 00 00 00 00 2C AT-UHD-HDVS-300-KIT...
- Page 49 1E 20 6E 28 55 00 A0 5A 00 00 00 1E 00 00 00 00 00 00 00 00 00 00 00 00 00 00 00 00 00 00 00 00 00 00 00 00 00 00 00 2E AT-UHD-HDVS-300-KIT...
- Page 50 1920 x 1080p at 25Hz - HDTV (16:9, 1:1) 1920 x 1080p at 30Hz - HDTV (16:9, 1:1) 640 x 480p at 60Hz - Default (4:3, 1:1) CE audio data (formats supported) LPCM 2-channel, 16/20/24 bit depths at 32/44/48 kHz AT-UHD-HDVS-300-KIT...
- Page 51 720 x 480p at 60Hz - EDTV (4:3, 8:9) CE audio data (formats supported) AC-3 6-channel, 680k max. bit rate at 32/44/48 kHz 6-channel, 1536k max. bit rate at 32/44/48/88/96 kHz CE speaker allocation data FL/FR, FLFE, FC, RL/RR AT-UHD-HDVS-300-KIT...
- Page 52 680k max. bit rate at 32/44/48 kHz 6-channel, 1536k max. bit rate at 32/44/48/88/96 kHz 8-channel at 32/44/48 kHz DVD-A 8-channel at 48/96/192 kHz DTS-HD 8-channel, 16-bit at 44/48/88/96/176/192 kHz CE speaker allocation data FL/FR, FLFE, FC, RL/RR, RC, RLC/RRC AT-UHD-HDVS-300-KIT...
- Page 53 2D 10 10 3E 96 00 A0 5A 00 00 00 18 26 36 80 A0 70 38 1F 40 30 20 25 00 A0 5A 00 00 00 1A 00 00 00 00 00 00 00 00 00 CC AT-UHD-HDVS-300-KIT...
- Page 54 2D 10 10 3E 96 00 A0 5A 00 00 00 18 00 00 00 00 00 00 00 00 00 00 00 00 00 00 00 00 00 00 00 00 00 00 00 00 00 00 00 71 AT-UHD-HDVS-300-KIT...
- Page 55 1E 20 6E 28 55 00 A0 5A 00 00 00 1E 8C 0A D0 8A 20 E0 2D 10 10 3E 96 00 A0 5A 00 00 00 18 00 00 00 00 00 00 00 00 00 4F AT-UHD-HDVS-300-KIT...
- Page 56 60Hz - HDTV (16:9, 1:1) [Native] 1280 x 720p at 60Hz - HDTV (16:9, 1:1) 1920 x 1080i at 60Hz - HDTV (16:9, 1:1) 1920 x 1080p at 24Hz - HDTV (16:9, 1:1) 1920 x 1080p at 30Hz - HDTV (16:9, 1:1) AT-UHD-HDVS-300-KIT...
- Page 57 00 00 00 FD 00 32 4C 18 5E 11 00 0A 20 20 20 20 20 20 00 00 00 FC 00 41 54 4C 20 31 30 38 30 50 20 44 56 49 00 00 00 FF 00 33 43 4D 32 32 37 30 32 39 53 0A 20 20 00 4A AT-UHD-HDVS-300-KIT...
- Page 58 1920 x 1080p at 25Hz - HDTV (16:9, 1:1) 1920 x 1080p at 30Hz - HDTV (16:9, 1:1) 640 x 480p at 60Hz - Default (4:3, 1:1) CE audio data (formats supported) LPCM 2-channel, 16/20/24 bit depths at 32/44/48 kHz AT-UHD-HDVS-300-KIT...
- Page 59 00 00 00 FF 00 52 53 34 31 30 33 39 30 36 35 35 37 0A 00 00 00 FD 00 32 78 1F 64 11 00 0A 20 20 20 20 20 20 00 00 00 FC 00 41 54 4C 20 50 43 57 58 47 41 44 56 49 00 24 AT-UHD-HDVS-300-KIT...
- Page 60 50Hz - Doublescan (4:3, 16:15) 720 x 576i at 50Hz - Doublescan (16:9, 64:45) 1920 x 1080p at 25Hz - HDTV (16:9, 1:1) 1920 x 1080p at 30Hz - HDTV (16:9, 1:1) 640 x 480p at 60Hz - Default (4:3, 1:1) AT-UHD-HDVS-300-KIT...
- Page 61 60Hz - VESA STD 1280 x 800p at 60Hz - VESA STD 1280 x 720p at 120Hz - VESA STD 1024 x 768p at 120Hz - VESA STD 800 x 600p at 120Hz - VESA STD CE speaker allocation data FL/FR AT-UHD-HDVS-300-KIT...
- Page 62 00 9E 8C 0A D0 90 20 40 31 20 0C 40 55 00 00 00 00 00 00 18 01 1D 00 BC 52 D0 1E 20 B8 28 55 40 00 00 00 00 00 1E 00 04 AT-UHD-HDVS-300-KIT...
- Page 63 00 00 00 00 00 00 00 00 00 00 00 00 00 00 00 00 00 00 00 00 00 00 00 00 00 00 00 00 00 00 00 00 00 00 00 00 00 00 00 49 AT-UHD-HDVS-300-KIT...
- Page 64 00 00 00 00 00 00 00 00 00 00 00 00 00 00 00 00 00 00 00 00 00 00 00 00 00 00 00 00 00 00 00 00 00 00 00 00 00 00 00 5B AT-UHD-HDVS-300-KIT...
- Page 65 50Hz - Doublescan (4:3, 16:15) 720 x 576i at 50Hz - Doublescan (16:9, 64:45) 1920 x 1080p at 25Hz - HDTV (16:9, 1:1) 1920 x 1080p at 30Hz - HDTV (16:9, 1:1) 640 x 480p at 60Hz - Default (4:3, 1:1) AT-UHD-HDVS-300-KIT...
- Page 66 00 9E 8C 0A D0 90 20 40 31 20 0C 40 55 00 00 00 00 00 00 18 01 1D 00 BC 52 D0 1E 20 B8 28 55 40 00 00 00 00 00 1E 00 04 AT-UHD-HDVS-300-KIT...
-
Page 67: Default Settings
Display Auto Power On Display Auto Power Off Lamp Cool Down Timer 5 seconds Auto Power Off Timer 5 seconds Display Warm-Up Timer 5 seconds Volume Repetition Rate 200 milliseconds Command Transmission type ASCII Feedback Verify Comma delimiter interval 5 seconds AT-UHD-HDVS-300-KIT... -
Page 68: Specifications
32 kHz, 44.1 kHz, 48 kHz, 88.2 kHz, 96 kHz, 176.4 kHz, 192 kHz Bit Rate 24-bit (max.) Resolution / Distance 4K - Feet 4K - Meters 1080p - Feet 1080p - Meters CAT5e/6 CAT6a/7 HDMI IN/OUT *4096×2160@50/60Hz & 3840×2160@50/60Hz supported @ chroma subsampling 4:2:0 8-bit only. AT-UHD-HDVS-300-KIT... - Page 69 H x W x D (RX) 1.02 x 4.29 x 5 26 x 109 x 127 Weight Pounds Kilograms Device (TX) 2.65 Device (RX) 0.62 0.28 Certification Device CE, FCC Power Supply CE, FCC, Level VI, RoHS, cULus, RCM, CCC AT-UHD-HDVS-300-KIT...
-
Page 70: Index
EDID primary user name detailed summary presets Warranty Web GUI FCC statement Features Firmware displaying 31, 32 Installation IP configuration using commands using the front panel using the web GUI Operating notes Panel descriptions Password changing default Power connector AT-UHD-HDVS-300-KIT... - Page 71 • 408.962.0515 • 877.536.3976 © 2018 Atlona Inc. All rights reserved. “Atlona” and the Atlona logo are registered trademarks of Atlona Inc. All other brand names and trademarks or registered trademarks are the property of their respective owners. Pricing, specifications and availability...
Need help?
Do you have a question about the AT-UHD-HDVS-300-KIT and is the answer not in the manual?
Questions and answers