Table of Contents
Advertisement
Advertisement
Table of Contents

Related Manuals for Rosco Dual-Vision XC

Summary of Contents for Rosco Dual-Vision XC
-
Page 1: User Manual
Dual-Vision™ XC User Manual 90-21 144 Place, Jamaica, New York USA 11435 Phone: 800-227-2095 Fax: 718-297-0323 www.roscovision.com Version 1.0 ©2013 Rosco® Vision Systems, All Rights Reserved Specifications and details are subject to change without prior notice. Patent Pending... -
Page 2: Table Of Contents
AVI File Conversion ...................... 24 Interfacing with Google Maps ..................25 Additional Playback Functions and Pop-up Displays ............ 26 Setting Up and Analyzing G-SENSOR Data ............27 LCD Display ......................28 Troubleshooting ...................... 29 Spare Parts ......................30 Rosco Commercial Warranty ................. 31... -
Page 3: Safety Instructions
Insert foreign materials into the Dual-Vision™ XC device Attempt to disassemble, repair or modify the product Use cables, SD cards or fuses that are not provided by or recommended by Rosco® NOTE The windshield mounted Dual-Vision™ XC unit must have direct line-of-sight to the sky in order to reliably acquire GPS satellite signals. -
Page 4: Introduction
G-force data may ONLY be reviewed by accessing the contents of the SD card using Rosco’s proprietary Player software on any Windows PC. The software is provided at no additional cost to the end-user, and there are no follow-up fees for use or updating of the Player by authorized users. -
Page 5: Package Contents
Package Contents RECORDER RECORDER: RECORDER: Dual-Vision™ XC Recorder Dual-Vision™ XC Recorder without Security Lock. SD with Security Lock and Adhesive Mounting Kit. SD Card included with most models. Card included with most models. ACCESSORIES WIRING: Power Wire: Ignition Wire: YELLOW PDC: Power/Data Control Module With 3 AMP Mini-Fuses... -
Page 6: Package Contents
Package Contents ACCESSORIES EXTERNAL EXTERNAL DRIVER EVENT BUTTON IR MODULE IR POWER CABLE with CABLE Lock Washer #8 & Machine Screw Red Nylon Ring Terminal DUAL-VISION™ XC WINDSHIELD Two Red Nylon Butt Connectors MOUNTING BRACKET without SECURITY LOCK Two Cable Raceways Heat Shrink Tube DUAL-VISION™... -
Page 7: Installation
Installation This is the preferred installation for commercial and other fleet vehicles. The PDC Module provides the power regulation and data control necessary for proper operation of the Dual-Vision™ XC Recorder. Each vehicle has its own system and features. Please refer to your vehicle’s manual for details. -
Page 8: Pdc (Power/Data Control) Module Installation
PDC (Power/Data Control) Module Installation 1. Prepare all the parts necessary for installation. 2. Find the location of the fuse box in the vehicle. Identify the fuses for connection of the POWER wire and the YELLOW IGNITION wire. Identify appropriate location for installation of the PDC Module in the vehicle. -
Page 9: Mounting The Dual-Vision™ Xc Recorder
Mounting the Dual-Vision™ XC Recorder Determine Dual-Vision™ XC Recorder location on windshield. Typically the Recorder is mounted behind and slightly below the mirror. Make sure the interior-facing camera and the LCD display are not obstructed by the mirror. Different vehicle/windshield combinations allow many other acceptable mounting locations (see alternate Dual-Vision™... -
Page 10: Mounting The Dual-Vision™ Xc Recorder
Mounting the Dual-Vision™ XC Recorder IMPORTANT Installation of permanent mounting should only be done when windshield is at room temperature. Allow 2-4 hours for adhesive bond to cure properly before operating vehicle. To permanently set the Recorder mounting position and the camera angle, insert screws into the two bracket mounting holes using a screwdriver, as follows: Remove the Recorder from windshield mount, using care to avoid changing... -
Page 11: Installing External Ir Module And Driver Event Button
Installing External IR Module and Driver Event Button Clean the surface with commercial glass cleaner before attaching the External IR Module. Please make sure that the mounting direction of the IR module is as indicated by the yellow label. For the most effective lighting, make sure there are no obstructions in front of the External IR module. -
Page 12: Aux Camera (Optional)
AUX Camera (Optional) Dual-Vision™ XC is capable of recording video from a third camera which may be connected to the AUX Camera port on the PDC module. Rosco has a full range of interior and exterior cameras available. See your dealer, Rosco representative, or visit www.roscovision.com... -
Page 13: Technical Specifications
Technical Specifications PRODUCT SPECIFICATIONS Built-in Cameras Two 1.3 Megapixel CMOS Sensors Camera Viewing Angle Front 120° / Rear 170° Focus 30cm to Infinite Video Compression H.264 / AVC Constant Bit Rate Resolution VGA (640X480) Audio 1CH, Mono (in & out) Built-in GPS module w/antenna G-Sensor (X, Y, and Z) Built-in 3D Acceleration Sensor... -
Page 14: Sd Card
Consult Rosco or your Authorized Reseller for SD Card compatibility. Not all SD Cards work with Dual- Vision XC unit. The following is a list of approved SD Cards which may be purchased from Rosco. This list may be periodically updated without notice. -
Page 15: Sd Card Formatting
SD Card Formatting Open “SDFormatter V3.0.0.0” Program. Select the SD CARD drive. (SD Card will be automatically recognized if SD Card is inserted.) Click “Option” and enable “Format size adjustment” to “ON”. Click “Format” button to format the SD card. Click “OK”... -
Page 16: Operation
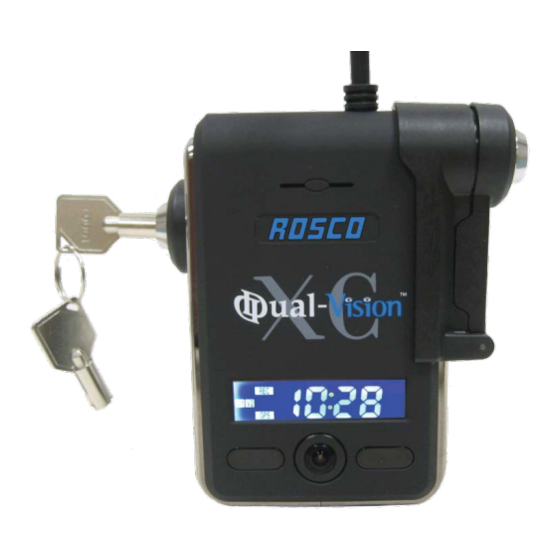
Operation 1. SD Card Port 7. LCD Display 2. Event Release Button* 8. Rear Camera (Interior View) 3. Driver Event Button 9. Infrared Illuminators 4. Windshield Mount Push Lock 10. Microphone 5. Speaker 11. Windshield Mount with built-in GPS Module 6. -
Page 17: Continuous And Event Recording
Continuous and Event Recording • When the ignition is OFF, Dual-Vision™ XC Recorder remains powered for an additional 5- 10 seconds to finish recording. If Parking Surveillance is ON, LCD Display will blink slowly and the recording will be continued. EVENT RELEASE BUTTON... -
Page 18: Dual-Vision™ Xc Player Program
Dual-Vision™ XC Player Program Configuring your PC to Enable Player Program Certain PC configurations cause a pop-up to appear when trying to open the Dual-Vision XC Player Program. The pop-up states “Admin rights required on this computer”. Follow this procedure upon first installing the program, in order to be able to open the Player Program without getting the pop-up message. -
Page 19: Important
Dual-Vision™ XC Player Program IMPORTANT If a warning appears and requires “administrator rights” on your PC, please perform the actions shown below. Right click on “Player.exe” file – this window will open. Click on “Compatibility” tab. In the “Compatibility” tab, place a check mark on “Run this program in Compatibility mode for:”... -
Page 20: System Setup And Configuration
System Setup and Configuration Configure your Dual-Vision XC Recorder prior to installation. (Player v1.1.0.1 or later) Run “player.exe” program located on your SD card, User Manual CD or Desktop (if copied to your PC) Click on the System Setup configuration icon ( ) located at the lower right corner of the player. -
Page 21: Parking Surveillance Setup
Parking Surveillance Setup CONFIGURATION ITEM DESCRIPTION Timer for parking OFF or ON 5 Min, 10 Min, 30 Min, 1 Hour up to 24 Hours Video Quality Recommendation: 1-Normal is satisfactory for most applications Frame Rate Recommendation: 1 or 2 frames / second / camera Audio Recording Turn audio ON or OFF for both cameras Configure sensitivity of G-Sensor (sets for each X, Y, Z axis by 0.1 Gravity Sensor... -
Page 22: Player Screen
Player Screen NAME DESCRIPTION Forward Camera Displays exterior video recorded through the windshield Interior Camera Displays interior video, typically driver and passengers Vehicle Speed Displays the speed of your vehicle Displays map coordinates (latitude and longitude) Vehicle Location Direction of Travel Displays vehicle direction G-Force Analyzer 3-axis graphic displays vehicle motion and any impact detected by the G-Sensor... -
Page 23: Video Playback Instructions
Video Playback Instructions 1. To playback video, select the “asd” icon ( ), if no asd files appear, click “change directory” button. 2. Select “Removable Disk” where the recorded data is stored and choose “data” folder. 3. Select and double click asd file to play video. Displays the type File name of of recorded... -
Page 24: Avi File Conversion
AVI File Conversion To convert a portion of the recorded data into an .avi file for viewing on programs such as Windows Media Player. Use of this feature enables sharing of the recorded data with any computer via email or file transfer. In Player, view the file containing the video of special interest. -
Page 25: Interfacing With Google Maps
Interfacing with Google Maps Dual-Vision™ XC records GPS data to enable historical review of vehicle location and route. The map coordinates can be synchronized with Google Maps® by clicking the Map icon ( ) on the lower right corner. To use this function, the PC must have an internet connection. -
Page 26: Additional Playback Functions And Pop-Up Displays
Additional Playback Functions and Pop-up Displays Double-clicking the display window will temporarily enlarge the recorded image in that window. Double-click again to return to original size. Use the mouse to move the screens within the desktop window. FRONT CAMERA REAR CAMERA AUX CAMERA SCREEN... -
Page 27: Setting Up And Analyzing G-Sensor Data
Setting Up and Analyzing G-SENSOR Data The G-Force sensor detects changes in directional forces affecting the vehicle. The Dual-Vision™ XC Player displays G-force data in a graphical format, and creates Events when those forces exceed supervisor-set values. One may interpret the data as follows: VEHICLE STOPPED DECELERATION ACCELERATION... -
Page 28: Lcd Display
LCD Display DISPLAY DESCRIPTION Display Time of Day when vehicle is stationary. Displays Speed when vehicle is moving. Event log almost full – counts down from 5 to FULL Displays number of total G-Force and Driver Button Events since last reset in “Configuration” Menu Displays number of total Speed Events and Tsga since last reset in “Configuration”... -
Page 29: Troubleshooting
LCD display Error notices on Contact your dealer or Rosco for ErrX Message display Assistance Remove and properly insert SD Card error SD card... -
Page 30: Spare Parts
Spare Parts Rosco Description Part Number DV212 Dual-Vision™ XC 16GB SD card with DVXC Player & SDFormatter DV213 Dual-Vision™ XC External IR Module Dual-Vision™ XC Security Mount Bracket with Keys DV216 DV217 Dual-Vision™ XC Key Set, 2pcs, Key Code "X"... -
Page 31: Rosco Commercial Warranty
If the alleged defect is due to any of these causes, the customer will be advised of the findings and asked what action is to be taken. If ROSCO is requested to repair the product, a repair charge estimate will be prepared and the customer’s written permission (purchase order, repair, etc.) will be necessary to proceed with the repair of...
Need help?
Do you have a question about the Dual-Vision XC and is the answer not in the manual?
Questions and answers