Table of Contents
Advertisement
Quick Links
Advertisement
Table of Contents

Summary of Contents for REXON BG1500R
- Page 1 ® 6 IN. (150 MM) BENCH GRINDER BG1500R INSTRUCTION MANUAL...
- Page 3 CONTENTS P 1 - 8 The original instruction manual is in English.
-
Page 4: Carton Contents
CARTON CONTENTS UNPACKING 1. Carefully remove the grinder from the carton. 2. Separate and layout all of the parts. Carefully check them according to the diagram below. WARNING! If any part is missing or damaged, please do not plug in or use the grinder until replacements have been obtained. -
Page 5: General Safety Rules
General Safety Rules for the connection of dust extraction and collecting equipment, ensure these are WARNING ! When using electric tools connected and properly used. basic safety precautions should always 11. DO NOT ABUSE THE CABLE. Never be followed to reduce the risk of fire, pull the cable to disconnect it from the electric shock and personal injury. -
Page 6: Additional Safety Rules For Bench Grinders
conditions that may affect its operation. 4. The adjustment of the tool rest should A guard or other part that is damaged be done frequently to compensate for should be properly repaired or replaced the wear on the wheel, keeping the by an authorised service centre unless distance between the tool rest and the otherwise indicated in this instruction... -
Page 7: Installation
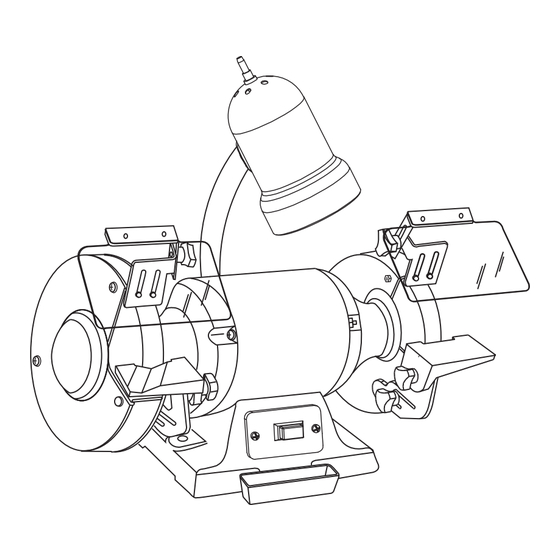
Wear safety goggles. Installation Wear ear protection. Wear a breathing mask. KNOW YOUR GRINDER (FIG. 1) 1. Worklight ON/OFF switch WARNING! To reduce the risk of 2. Worklight injury, user must read instruction 3. Eye shield mounting bracket manual. 4. Spark guard Keep hands away from blade: 5. - Page 8 TRANSPORTING THE GRINDER (FIG. 2) REPLACING THE BULB (FIG. 8) NOTE: Bulb is not supplied. 1. Always use the designated hand-hold (1) on the sides of grinder base for 1. Remove the light bulb (1) from transportation. lampshade (2). 2. Install the new light bulb (40 W bulb INSTALLING TOOL RESTS (FIG.
-
Page 9: Mounting The Tool
NOTE: Using a metal object, like a Conneting to the Power Supply screwdriver, is not recommended as it may damage the grinding wheel. Check that the power supply and outlet 5. Remove the hex nut (8 - Fig. 11), the used is in accordance with your grinder. -
Page 10: Operating The Tool
4. Feed the workpiece smoothly and Operating the Tool evenly into the grinding wheel. 5. Move the workpiece slowly and avoid STARTING AND STOPPING THE jamming the workpiece against the GRINDER (FIG. 15) wheel. If the wheel tends to slow down WARNING! To avoid injury, always keep from excessive force, you should the plug disconnected from the power... -
Page 11: Maintenance
This technique requires considerable 4. In normal use, grinding wheels may practice, so take your time and make a few become cracked, grooved, rounded at “dry runs” first with the grinder off. Be sure the edges, chipped, out of true or loaded to maintain the original cutting edge angle with foreign material. -
Page 12: Troubleshooting Guide
Troubleshooting Guide WARNING! To avoid injury from an accidental start, turn the switch OFF and always remove the plug from the power source before making any adjustments. SUGGESTED CORRECTIVE PROBLEM PROBLEM CAUSE ACTION Motor will not run. 1. Not plugged into power outlet. 1. - Page 13 Fig. 4 Fig. 1 Fig. 5 Fig. 2 Fig. 6 Fig. 3 Fig. 7...
- Page 14 Tighten Fig. 8 Fig. 12 Fig. 9 Fig. 13 Hole in casting Fig. 10 Fig. 14 Loosen Fig. 11 Fig. 15...
- Page 15 Fig. 16 Fig. 17 Fig. 18 11 11...
- Page 16 BG1500R PARTS LIST ORDER ONLY BY MODEL NUMBER AND PART NUMBER I.D. Description Size Q’ty I.D. Description Size Q’ty X6BB LAMP ASSEMBLY 1 X6CC RIGHT SAFTY GUARD COVER X6BE INSTRUCTION MANUAL 1 X6CD LOCK NUT X6BF LAMP LABEL 1 X6CE WHEEL...
- Page 17 Schematic MODEL: BG1500R...
- Page 18 NOTES...
- Page 20 ®...
Need help?
Do you have a question about the BG1500R and is the answer not in the manual?
Questions and answers