
Subscribe to Our Youtube Channel
Related Manuals for pro.point 8344749

Summary of Contents for pro.point 8344749
- Page 1 V 1.0 8344749 Pen Probe Style Autoranging Digital Multimeter User Manual Please read this manual before use.
-
Page 3: Specifications
V 1.0 8344749 Pen Probe Style Autoranging Digital Multimeter SPECIFICATIONS Display 3-1/2 digit LCD with a maximum reading of 1,999 Polarity Auto polarity indication Over-range indication “ ” shown on the display Sampling rate 3 times per second Power single standard 9V battery... -
Page 4: Electrical Specifications
8344749 Pen Probe Style Autoranging Digital Multimeter V 1.0 ELECTRICAL SPECIFICATIONS Accuracy is specified for a period of one year after calibration and at 23°C ± 5°C with relative humidity up to 75%. Normally, accuracy specifications take the form of: ± (% of reading + number of least significant digits) -
Page 5: Important Safety Precautions
V 1.0 Pen Probe Style Autoranging Digital Multimeter 8344749 IMPORTANT SAFETY PRECAUTIONS WARNING! Read and understand all instructions before using this tool. Keep this manual for the safety warnings and precautions, operating, inspection and maintenance instructions. When using this tool, basic precautions should always be followed to reduce the risk of personal injury and/or damage to the equipment. -
Page 6: Operation
8344749 Pen Probe Style Autoranging Digital Multimeter V 1.0 CAUTION! To avoid possible damage to the meter or to the equipment under test, follow these guidelines: 1. Disconnect circuit power and discharge all capacitors before measuring resistance or continuity. 2. Select the proper function and range for your measurement. -
Page 7: Measuring Dc Voltage
V 1.0 Pen Probe Style Autoranging Digital Multimeter 8344749 9. Probe of the black test lead (negative polarity) 10. Black test lead MEASURING DC VOLTAGE 1. Set the function switch to the position. 2. Press the button to select DC voltage measurement. appears on the display. -
Page 8: Replacing The Battery
V 1.0 Multimètre numérique à commutation automatique de calibre, style sonde stylo 8344749 PERFORMING A CONTINUITY TEST 1. Turn off the power to the circuit under test, and then discharge all capacitors and inductors. 2. Set the function switch to the position. -
Page 9: Maintenance
8344749 Multimètre numérique à commutation automatique de calibre, style sonde stylo V 1.0 MAINTENANCE Before making any adjustments or changing any accessory, turn off the tool and remove the battery. 1. Check for damaged parts. Before using any tool, any part that appears to be damaged should be carefully checked to determine that it will operate properly and perform its intended functions. - Page 11 V 1.0 8344749 Multimètre numérique à commutation stylo automatique de calibre, style sonde Manuel d'utilisateur Veuillez lire ce manuel avant d'utiliser cet outil.
-
Page 13: Fiche Technique
8344749 V 1.0 Multimètre numérique à commutation stylo automatique de calibre, style sonde FICHE TECHNIQUE Affichage afficheur ACL de 3 1/2 chiffres, avec une lecture maximale de 1 999 Polarité Indication automatique de polarité Indication de dépassement de plage «... -
Page 14: Spécifications Électriques
V 1.0 Multimètre numérique à commutation automatique de calibre, style sonde stylo 8344749 SPÉCIFICATIONS ÉLECTRIQUES L’exactitude est spécifiée pour une période d’un an après l’étalonnage et à 23 °C ± 5 °C avec une humidité relative jusqu’à 75 %. Habituellement, les spécifications d’exactitude comprennent : ± (% de lecture + nombre des caractères... -
Page 15: Consignes De Sécurité Importantes
8344749 Multimètre numérique à commutation automatique de calibre, style sonde stylo V 1.0 CONSIGNES DE SÉCURITÉ IMPORTANTES AVERTISSEMENT ! Veuillez lire et comprendre toutes les instructions avant d’utiliser cet outil. Conservez ce manuel qui contient les avertissements et les mesures de sécurité, les instructions de fonctionnement, d’inspection et d’entretien. - Page 16 V 1.0 Multimètre numérique à commutation automatique de calibre, style sonde stylo 8344749 8. Lorsque vous mesurez le courant, coupez l’alimentation du circuit avant de brancher le multimètre au circuit. N’oubliez pas de brancher le multimètre en série avec le circuit.
-
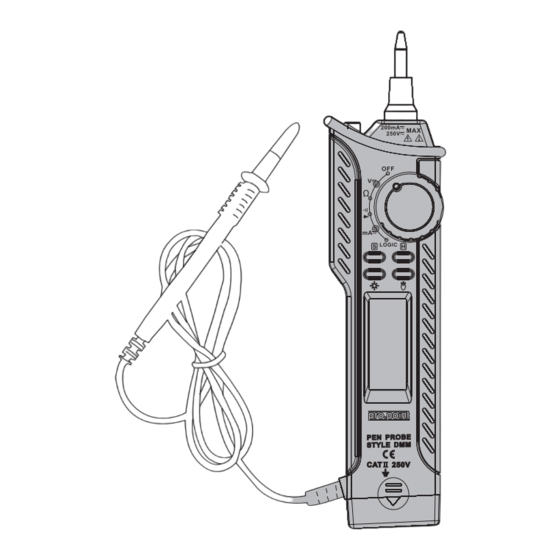
Page 17: Identification Des Pièces
8344749 Multimètre numérique à commutation automatique de calibre, style sonde stylo V 1.0 FONCTIONNEMENT IDENTIFICATION DES PIÈCES 1. Affichage 2. Bouton Pour activer la fonction lampe de poche, appuyez sur ce bouton et maintenez-le enfoncé. Pour éteindre la lampe de poche, relâchez le bouton. - Page 18 V 1.0 Multimètre numérique à commutation automatique de calibre, style sonde stylo 8344749 MESURE DU COURANT C.C. 1. Réglez le sélecteur de fonction à la position 2. Appuyez sur le bouton pour sélectionner la mesure de courant c.c. apparaît à l’écran.
-
Page 19: Remplacement De La Pile
8344749 Multimètre numérique à commutation automatique de calibre, style sonde stylo V 1.0 REMPLACEMENT DE LA PILE ATTENTION ! Avant d’essayer d’ouvrir le boîtier de l’instrument, assurez-vous de débrancher le fil d’essai et la sonde d’essai de tout circuit sous tension pour éviter le risque de choc. -
Page 20: Entretien
V 1.0 Multimètre numérique à commutation automatique de calibre, style sonde stylo 8344749 ENTRETIEN Avant d’effectuer tout réglage ou de changer tout accessoire, coupez l’alimentation de l’outil et enlevez la pile. 1. Vérifiez s’il y a des pièces endommagées. Avant d’utiliser un outil, toute pièce qui semble endommagée doit être vérifiée attentivement pour déterminer si elle est en bon état de fonctionnement et permet d’exécuter les...
Need help?
Do you have a question about the 8344749 and is the answer not in the manual?
Questions and answers