
Related Manuals for ValueStore US Portable Ultrasound V12

Summary of Contents for ValueStore US Portable Ultrasound V12
- Page 1 User Manual Portable Ultrasound V12 Veterinary Ultrasound Scanner www.ValueStore.us CustomerCare@valuestore.us...
-
Page 2: Table Of Contents
Table of contents STATEMENT ..............................4 ........................ 4 ANUFACTURER’S ESPONSIBILITY ................................ 5 ACKING ................................6 ARRANTY ..............................7 ETURN OLICY ............................8 MPORTANT NFORMATION PREFACE ............................... 9 1.1 P .......................... 9 RODUCT NFORMATION ..........................11 AFETY RECAUTIONS SYSTEM BASICS ..........................14 1.1 S ............................ - Page 3 3.8.6 How to set the color of screen background? ................34 3.9 F ..........................34 UNCTIONS 3.9.1 Image Save ..........................35 3.9.2 Image Review ..........................35 3.9.3 Image Procession ........................36 3.9.4 Color ............................36 3.9.5 Area-Volm ..........................36 3.9.6 Histogram ..........................37 3.10 M ..........................
-
Page 4: Statement
Statement The Dodson Group Co. Ltd. (hereinafter called The Dodson) owns the intellectual property rights to this The Dodson product and this manual. This manual may refer to information protected by copyright of The Dodson. The Dodson maintains the contents of this manual as confidential information. Disclosure of the information in this manual in any manner whatsoever without the written permission of The Dodson is strictly forbidden. -
Page 5: Packing List
Packing List S/NO Description Quantity Check List Remarks √ Main unit √ Multi-frequency mechanical sector probe √ Rubber protector for main unit √ AC-Adapter with cable √ Rechargeable battery √ Neck belts √ User manual Please to contact the manufacturer immediately if there is any damage in shipment within five (5) working days of receipt of this goods. -
Page 6: Warranty
Warranty This warranty is exclusive and is in lieu of all other warranties. Expressed or implied, including warranties of merchantability or fitness for any particular purpose. Definitions • Main unit: Integrated facility that implements the specified function separately, the main unit includes power supply. -
Page 7: Return Policy
Return Policy Return Procedure In case that it becomes necessary to return this product or part of this product, the following steps should be followed: 1. Return authorization: Contact Customer Care at customercare@valuestore.us and please provide the Order Number, and a brief description of the reason for return (just for statistics propose). -
Page 8: Important Information
Important Information 1. The responsibility for maintenance and management of the product after delivery resides with the customer who has purchased the product. 2. The warranty does not cover the following items, even during the warranty period: Damage or loss due to misuse or abuse. Damage or loss caused by Acts of God such as fires, earthquakes, floods, lightning, etc. -
Page 9: Preface
Preface To ensure safe and correct operation of the system, read carefully and understand this operator’s manual before operating the system 1.1 Product Information Product Name: Veterinary Ultrasound Scanner Model: V12 Symbols in Operator’s Manual The following table explains the safety symbols that may be used in this manual. Signification Symbol Indicates an imminently hazardous situation, which, if not avoided, will result... - Page 10 Video output USB port Packing and transportation labels explanation: Handle with care Temperature limit Upwards Limited layers of stowage Protect against wetness Protect against heat www.ValueStore.us CustomerCare@valuestore.us...
-
Page 11: Safety Precautions
Safety Precautions The operators are asked to observe the following safety precautions. DANGER Do not use flammable gasses such as anesthetic gas, oxygen or hydrogen, or flammable liquid such as ethanol, near the system, because there is danger of explosion. 1. - Page 12 12. After disinfecting or sterilizing accessories, thoroughly clear chemicals from the accessories. Residual chemicals may damage the accessories and cause injury. 13. Do not let the patient contact the system or other equipments. If the system or other equipment are defective, electric shock may occur. 14.
- Page 13 NOTE 1. Do not use the system in the vicinity of strong electromagnetic field (for example a transformer), which may affect the performance of the monitor. 2. Using devices transmitting RF signals in the vicinity of the system may affect the system’s performance.
-
Page 14: System Basics
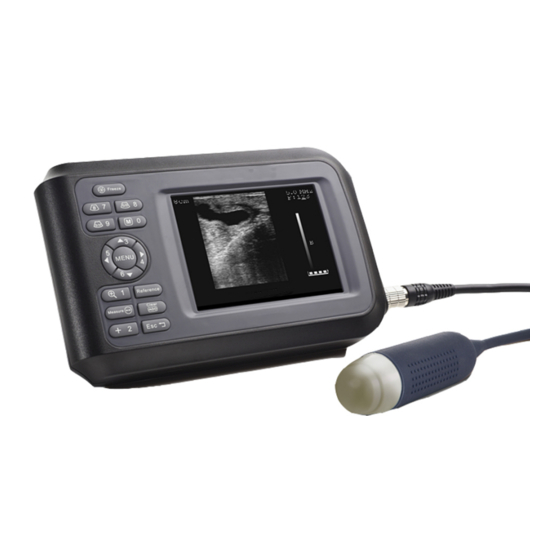
1 System Basics This ultrasound scanner is suitable for diagnosis on pigs, dogs, cats, sheep and other animals. 1.1 Structure Front-side of Scanner Left-side of Scanner... -
Page 15: Main Features
Back Side of Scanner Part Description Keyboard Program the scanner TFT color LCD 5.5 inch screen Rubber Protector Around the scanner against dirt and impact from the outside Power switch Power Indicator It will be lighten when the machine is turn on. DC12.6 Connection of AC-adapter, input power supply is by DC12.6V Video output to see real time images in your TV or monitor. -
Page 16: Technical Specifications
1.3 Technical Specifications MODEL Ultrasound Scanner V12 Probe 3.5MHz Mechanical Sector Probe (multi-frequency) Detect Depth (mm) ≥140 ≤4 (Depth≤80) Resolution Lateral ≤5 (80<Depth≤130) (mm) Axial ≤2 (Depth≤80) Blind zone (mm) ≤8 Horizontal ≤20 Geometric position precision Vertical ≤10 Monitor size 5.5 inch Display mode B, B+B, B+M, M... -
Page 17: Principle Diagram
1.4 Principle diagram Electric principal block diagram... -
Page 18: System Connection
2 System Connection This chapter introduces how to operate & install system and the battery. 2.1 Environmental Requirements 1. Environment temperature range:+5℃~+40℃ 2. Relative humidity range:30%~80% 3. Atmosphere pressure range:700hPa~1060hPa When using, avoid strenuous vibration, keep it away from devices with high field, intense magnetic field or high voltage;... - Page 19 Probe connection sketch : Warning Avoid by all means unplugging or plugging the probe when the main unit is turned on, it can cause permanent damage to the main unit and probe. Once the probe is connected to the main unit, do not unplug nor plug it unless the main unit is turned off. :...
-
Page 20: Battery Installation & Disassembly
2.3.2 Battery Installation & Disassembly Battery Installation: Set the battery into the battery slot and move the battery release key on its back to top till the battery is inserted completely and then release the key. Push the battery into the rabbet like the arrowhead with little force Attention: Don’t Force it. -
Page 21: Power Supply
2.4 Power Supply There are two modes of the power supply for the device, by the adapter and the built-in battery. Supply via Adapter 2.4.1 1. Check the input power cord plug of the adapter to see if it matches the EPS outlet. 2. -
Page 22: Charging Via Adapter
Charging via Adapter 2.5.2 1. Take out the battery from the main unit or take out the spare battery. 2. Connect the flat end marked with an arrow of the auto-charger to the charging terminal of the battery. 3. Plug the other end of the auto-charger into the cigar lighter socket. 4. -
Page 23: Shutdown
WARNING If you find any abnormality, turn off the system and see if the section lists any solution for the problem. If not, contact Customer Care or your seller. Check whether the startup is normal. Check whether the system has any abnormal noise or smell or is overheated. Check by hand whether the surface of transducer is overheated WARNING Using overheated transducers may burn patients. -
Page 24: Operating & Setting
3 Operating & Setting This chapter describes how to use the keyboard function and preset parameters. You can preset system operating status, configuration parameters of each exam mode, post process and others. The system runs automatically with the preset parameters after each startup. Before examining patients, ensure proper parameters have been preset. -
Page 25: Operating Procedure
● Hosp: ---- Hospital name. ● Name: ---- Patient name Annotations ● AGE: --- Patient’s age. ● SEX: --- Patient’s sex by F and M defined. (see Article 3.4.5 Annotation Menu) Current date of the scanner Current Date (The date displayed on the frozen image is the date when the image is frozen) Current time of the scanner Current Time (The time displayed on the frozen image is the time when the image is frozen) -
Page 26: General Setting
3.6 General Setting The parameters at the top right corner of the screen will be changed while you do the setting. PROB: SEC-18 FREQ: 3.5MHZ GAIN: 31 IMO ☆: 36 ▎ 30 IC0/CC0/BC0 3.6.1 How to set probe’s working frequency? ●... -
Page 27: How To Back To Default Setting
3.6.4 How to back to Default setting? V1.20 1. NAME 2. AGE 3. SEX 4. COMMENT 5. TIME 6. HOSP 7. LANGUAGE 8. ERASE 9. DEFAULT TSET BEEP-OFF ● Press first, the signal FREEZE will be shown at the right bottom of the screen. FREEZE ●... - Page 28 --- Press Clear to erase the wrong letter(s) input previously. --- Press MENU to confirm the characters chosen and the needed ones will be showing at the top screen in NAME item. ● Age Input --- Choose 1. AGE by pressing key /1 key.
-
Page 29: Keyboard
● Current time --- Select 4. TIME by pressing the key ►/4, the following sub-menu appears on the screen: YY-MM-DD ■ HH-MM-SS --- 2 bytes allowed in each item. Input “13” to indicate the year of 2017. --- 24 hours setting for the current time. --- The cursor will be switched to the next line for real-time clock setting. - Page 30 Keyboard of V12 Freeze Key Press it to freeze/UNfreeze the echo image. FREEZE is righted at the lower corner of the screen, the image is at frozen status. Alphanumeric keys M 0 ~ BM/9 All of them are dual functional keys. Function keys are effective when the system is in real-time.
- Page 31 ● M 0 under MENU key (when the scanner is frozen) --- Press Freeze first, then press MENU; the main menu will be shown on the screen. --- Reference Article 3.6.5 for more details. ● Image Magnification (available in real-time) --- Press it to have the image magnified at difference depth when the scanner is in real-time status.
-
Page 32: Parameters Setting
EQUINE: GSD CAT: HD BOVINE: BL CAT: BD BOVINE: SL DOG:GSD BVINE: HL DOG:CRL 10. SWINE: HL DOG:HD 11. SHEEP: USD DOG:BD --- Select the number you need to choose the right item for the measurement. Reference Article 2.4 for more details about the procedure. -
Page 33: How To Set Probe Frequency
3.8.1 How to set probe frequency? --- Press 5◄ or ►4 to light FREQ first. --- There are three frequencies 2.5/3.5/5.0 for your choice. Press ▲3 and ▼6 to make the selection. 3.8.2 How to set Gain? --- Press 5◄ or ►4 to light FREQ first. --- Press ▲3 and ▼6 to make the selection. -
Page 34: How To Set The Character's Color
character 3.8.5 How to set the ’s color? --- --- Press key M / 0 to generate the function menu appeared on the screen. V1.2 0: SAVE 1: SVLOAD 2: IMAGEPROC 3: COLOR 4: AREA-VOLM 5: HISTOGARM --- Press key▲3 to light CC0 first. CC is the short for Character Color. --- There are 2 difference color designed in this system. -
Page 35: Image Save
3.9.1 Image Save ---- Press FREEZE key first to lighten FREEZE on the bottom right screen. --- Then press M / 0 key to generate FUNCTION MENU on the screen. --- Select “0.SAVE’ by pressing the key of / 1. There is sentence showing on the left top of screen “SAVING …. 5”. -
Page 36: Image Procession
3.9.3 Image Procession --- This function is not available when the system is not in real-time. --- Press M / 0 to have FUNCTION MENU displayed on the screen. --- Select “2. IMAGE PROC” by pressing the key of + 2. --- Repeat + 2 key to select the 2 presetting, and the third pressing key to choose 3... -
Page 37: Histogram
3.9.6 Histogram ---- Press FREEZE key first to lighten FREEZE on the bottom right screen. --- Then press M / 0 key to generate FUNCTION MENU on the screen. there is a square frame appeared on the screen --- Select “5.HISTOGRAM ’ by pressing the key of 5◄ . ---- Move this square frame by press to the interested position on the image. -
Page 38: Area/ Volume Measurement
--- The ratio between these four distances will be shown on its items when the measurements are done. --- Press Clear key to clear the measuring marks and lines on the screen. The echo image will be kept on there. ●Mouse Operation: --- Press Left Button and the caliper displayed on the screen. -
Page 39: Volume Measurement
* The measure result(s) will be shown automatically at the left side of screen. ● By Ellipse: --- Press + / 2 to select the way by Ellipse: * A caliper will be shown on the screen. * Move this ellipse to the focus with the arrow keys ▲3, ►4, 5 ◄, ▼6. * Press Measure , the arrow keys are activating to adjust the ellipse size. -
Page 40: Heart Rate Measuring
Illustration of volume measuring ( 3 Axis Method ) By Ellipse Method Procedures: ( Kidney as example) 1. Catch the cross and longitudinal sections of the kidney and freeze. 2. Measure the perimeter and area of cross and longitudinal sections. 3. -
Page 41: Histogram
3.11 Histogram Freeze the image first. --- Press M/0 to have FUNCTION MENU displayed on the screen. --- Select “5.HISTOGRAM” by pressing the key of ◄/5, a sampling window displayed: --- Press the arrow keys to move this window to the area where needed for checking. --- Press Measure on keyboard of scanner... - Page 42 0. EQUINE:GSD 0. CAT:HD Page: Page: 1. BOVINE:BL 1. CAT:BD 2. BOVINE:SL 2. DOG:GSD 3. BOVINE:HL 3. DOG:CRL 4. SWINE:HL 4. DOG:HD 5. SHEEP:USD 5. DOG:BD --- Input the number and select the related OB menu and acquire the distance as per distance measurement method.
- Page 43 6. Confirm the distance value as per distance measurement methods and the corresponding data display behind “G·A”. With this measurement to set up a chart to find the growth curves to estimate embryo size and GA. Here GA refers to the duration from the copulation instead of impregnation. ●...
- Page 44 1. Keep the cow standing. 2. Put the probe against the abdomen side center, shift it a little bit left or right and hold it closely against the skin. Clean the abdomen skin if there is mud to ensure a clear display of the abdominal pelvic structure. 3.
- Page 45 1. Keep the cow standing. 2. Put the probe, a little bit left or right of the center, on the ventral abdominal wall closely along the side of teats and skull to rear leg. If the is mud on this part, clean with water first incase the abdomen pelvic structure could not be displayed accurately.
- Page 46 Abdomen check: 1. Abdomen examination can be done when the sheep is standing or lying or seating. Put the probe against the appointed abdomen center where there is no fur. 2. Clean the abdomen skin if there is mud to ensure a clear display of the abdominal pelvic structure. 3.
-
Page 47: Power Off
Note At OB measurement, when the distance is less than the following value, the GA of this animal will not display. Refer to the following table for detailed data: D1<6mm EQUINE D1<8mm BOVINE–BL D1<1mm BOVINE–SL D1<3mm BOVINE–HL D1<15mm SHEEP D1<31mm SWINE D1<15mm CAT–HD... -
Page 48: Checking & Maintenance
4 Checking & Maintenance 4.1 Service life Bases on the manufacturer’s design, production related files, this model’s use life is six years. The Product’s material will gradually aging, if the product continually use over the designed use life, it may bring the problem of the performance reduced and fault rate rise. -
Page 49: Probe Maintenance
4.4 Probe maintenance ► Probe is an expensive part and frangible. Never hit it or drop it on floor. ► Please use medical ultrasound gel during diagnoses. Do daily inspection on the probe enclosure to see if it is cracked and avoid liquid leakage to spoil the built-in components ►... -
Page 50: Correct Usage Of Probe
Must not use extender, ethylene oxide or any other organic solvent, which tend to deface the probe's protective foil. Keep device or probe from any type of liquid's infiltration. Must not clean device or probe by airing or heating. 4.6 Correct usage of probe In order to prolong probe's service life and obtain optimum performance follow these instructions: 1. -
Page 51: Instrument Test And Calibration
16. Must not bead the battery terminals. 17. Must not decompound the battery in any way. 18. Must not place the battery in microwave oven or pressure vessels. 19. Must not combine the battery with primary battery (such as dry battery) or battery with different capacity, models and types. -
Page 52: Appendix B Acoustic Output Reporting Table
Appendix B Acoustic output reporting table Index Non- Non- scanning scanning Non- Mode Scanning Scanning scanning Aaprt> Aaprt≤1 Acoustic working 3.69 3.69 3.60 3.69 3.60 frequency (MHz) Output power (mw) 0.03 0.03 Bounded output Power 24.7 24.7 (mw) Attenuated output power 0.01 (mw) Spatial-peak temporal-... - Page 53 Index Non- Non- scanning scanning Non- Mode Scanning Scanning scanning Aaprt> Aaprt≤1 Acoustic working 4.11 4.11 4.02 4.11 4.02 frequency (MHz) Output power (mw) 0.02 0.02 Bounded output Power 23.7 23.7 (mw) Attenuated output power 0.009 0.01 (mw) Spatial-peak temporal- average intensity (mw/cm 0.28 0.97...
-
Page 54: Appendix C Obstetrics
Appendix C Obstetrics Gestational Table 1: Equine All measurements +/- 3 days Measurement (mm) Week (Gestational Sac Diameter) - Page 55 Gestational Table 2: Bovine All measurements +/- 3 days Measurement (mm) Week (Body Length)
- Page 56 Gestational Table 3: Sheep Measurement (mm) Week (Umbilicus to Spine Distance) All measurements +/- 3 days...
Need help?
Do you have a question about the Portable Ultrasound V12 and is the answer not in the manual?
Questions and answers