Advertisement
Quick Links
AM
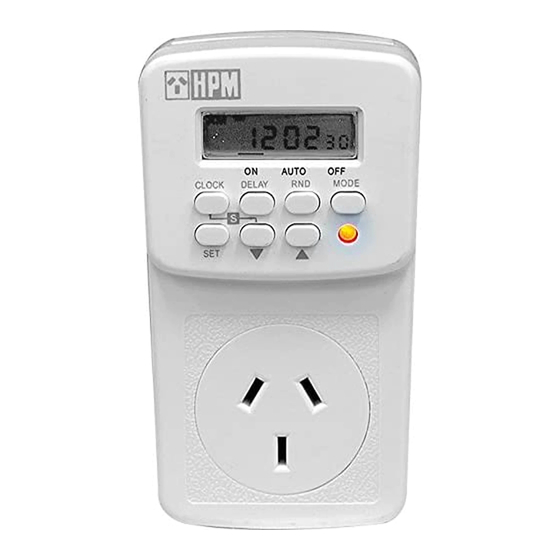
LCD Display
CLOCK Button
CLOCK
DELAY Button
SET Button
SET
Button
S
Summer Time
1
Specification
Supply voltage
Frequency
Battery
Switching Current
Max Load
2
Time Display
To change from 12-hour display to 24-hour display, or vice
versa, press the CLOCK button and hold it until the LCD display
changes.
Please note that you can reset this digital timer at any stage by
removing the batteries.
3
Setting the Day and Time
Step 1: Press and hold the SET button until the day shown on the
LCD flashes.
Step 2: Use the
and
buttons to select the day of the week.
When correct, press SET to confirm the selection. The hour
figure on the display will flash
Step 3: Use
and
to select the correct hour. Press SET to
confirm your selection, and the minutes figure will flash.
Step 4: Use the
and
to set the minutes. Press SET to finish
setting the time. Press CLOCK to return to clock mode.
Step 5: The clock can be reset at any time by repeating steps
1 - 4. When setting the clock remember to use standard time.
See Daylight Saving (Summer Time) section for details on easily
switching between daylight savings (summer) time and standard
time.
4
Setting the Timer
There are 14 different programme blocks that can be set.
Step 1: To select the first block make sure the timer is displaying
the current time and press
bottom left corner.
M
T
W
T
F
S
S
O
U
E
H
R
A
U
ON
OFF
ON
AUTO
OFF
DELAY
RND
MODE
RND Button
MODE Button
S
Button
Red
LED Light
Socket
& Plug
240V a.c.
50Hz
AAA size
10A max
2400W
once. "1
ON
" will appear in the
7 Day Digital Timer
Step 2: Press SET to enter programming mode. The days of the
week at the top of the LCD screen will flash
Step 3: Press
or
to scroll through the day of the week
setting options. The day of the week setting options are listed
below:
MO TU WE TH FR SA SUN (this program will operate every day
of the week)
MO TU WE TH FR SA (this program will operate every day
except Sunday)
MO TU WE TH FR (this program will operate on weekdays only)
TH FR SA (this program will operate on Thu, Fri & Sat only)
MO TU WE (this program will operate on Mon, Tue & Wed only)
SA SU (this program will operate on Sat & Sun only)
TU TH SA (this program will operate on Tue, Thu & Sat only)
MO WE FR (this program will operate on Mon, Wed & Fri only)
MO
TU
WE
TH
(the program will only operate on the day selected)
FR
SA
SU
Once you are happy with your day/s selection, press SET to
confirm. The hour figure will now flash.
Step 4: Use
or
to select the time (hour) you want the
program to start. Press SET to confirm the setting - the minutes
figure will flash.
Step 5: Press
or
to select the time (minutes) you want the
program to start. Press SET to confirm.
Step 6: If you want to revise the day or time set repeat steps
1 - 5.
Step 7: When you are happy with the start time chosen, press
once to scroll to the program finish time. "1
in the bottom left corner.
Step 8: Set the off day and time using the procedure in steps
2 - 5.
Step 9: To set another programme block press
the next block. To finish programming press CLOCK to return to
clock mode.
5
Deleting Programmes
Step 1: To delete ALL pre-programmed settings remove the
timer from the mains power source and remove the batteries.
The clock will need to be reset when the batteries are replaced.
Step 2: To delete an individual timer setting, re-programme the
required block so the start and finish times are the same
OR
Scroll to the block you wish to delete and press the MODE button.
The display will change to --:--. To retrieve the setting press the
MODE button again.
6
Using the Timer
Step 1: To use the timer plug it into a power source and plug an
appliance into the timer. Be sure to turn your appliance on.
Cat. D817/2
Instruction Manual
OFF
" will be displayed
to scroll to
Advertisement

Summary of Contents for HMP D817/2
- Page 1 7 Day Digital Timer Cat. D817/2 Instruction Manual Step 2: Press SET to enter programming mode. The days of the week at the top of the LCD screen will flash Step 3: Press to scroll through the day of the week LCD Display setting options.
- Page 2 Warranty Customer Service HPM Cat D817/2 is warranted as here and after appears, For all Customer Service and Technical Support please call Monday to Friday during business hours. against faulty material and/or workmanship for a period of one year from date of purchase.
Need help?
Do you have a question about the D817/2 and is the answer not in the manual?
Questions and answers