Table of Contents
Advertisement
Advertisement
Table of Contents

Related Manuals for Lucaffe Raffaello Latte PRO

Summary of Contents for Lucaffe Raffaello Latte PRO
-
Page 1: Instruction Manual
Fully Automatic Coffee Machine Instruction Manual... -
Page 2: Parts Description
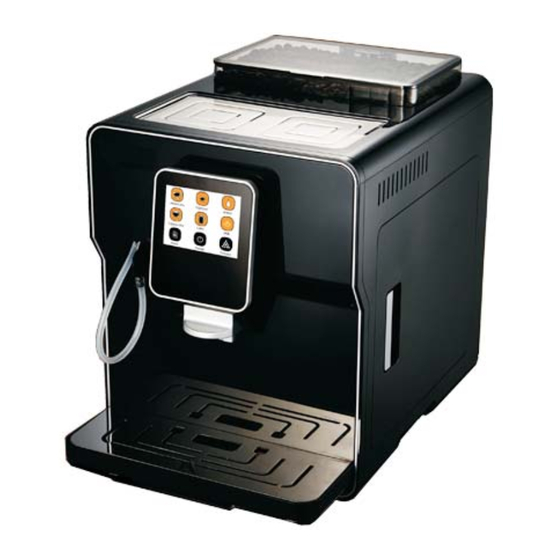
Parts description Adjusting knob coarse fine 6.Power cord Drip tray 11.Right door 7.Control panel 2.Coffee spout 12.Brewing unit 8.Filler funnel lid 3.Milk frother 13.Waste bin 9.Filler funnel for ground coffee 4.Water tank 14.Grinder adjustment switch 10.Bean tank Left door 15.Milk frother control... - Page 3 Control panel induction Espresso Latte Hotwater Americano ESPRESSO WATER AMERICANO Milk foam Cappuccino MILK CAPPUCCINO LATTE Add powder Setting MENU POWER POWDER Power...
-
Page 4: Important Safeguards
IMPORTANT SAFEGUARDS When using electrical appliances, basic safety precautions should always be followed, including the following: 1.Read all instructions. 2.Do not touch hot surfaces. Use handles or knobs. 3.To protect against fire, electric shock and injury to persons do not immerse cord, plugs, or appliance in water or other liquid. -
Page 5: Instructions For The Power Supply Cord
1.Check voltage to be sure that the voltage indicated on the nameplate corresponds with your voltage. 2.Never use warm or hot water to fill the water tank. Use cold water only. 3.Keep your hands and the cord away from hot parts of the appliance during operation. 4.Never clean with scrubbing powders or harsh cleaners. -
Page 6: Power Supply-Power Cord
expertise, unless they are supervised by a person responsible for their safety, or they are instructed by this person on how to properly use the machine. POWER SUPPLY-POWER CORD Only connect the machine to a suitable socket. The socket to which the machine is connected must be: - Compatible with the type of plug installed on the machine;... -
Page 7: Cleaning And Storing The Machine
machine on very hot surfaces and close to open flames. CLEANING AND STORING THE MACHINE Keep the machine at its best, clean and store it properly. Since the machine uses natural ingredients of brew beverages (coffee beans, water, milk, etc.),some residues of ground coffee or condensed water could be present on its supporting surface. For this reason we recommend to periodically clean both the visible parts of the machine and the area beneath it. -
Page 8: General Cleaning
Only coffee beans must be put into the coffee bean tank. round coffee, instant coffee or any other object is put the coffee bean tank, may damage the machine. ADJUSTABLE COFFEE GRINDERS Warning! The grinder adjustment knob, which is placed inside the coffee bean tank, must be turned with the coffee grinder adjustment key only when the coffee grinder is working. -
Page 9: First Installation
working properly. Repair is not covered by warranty. DESCALING Not doing this will ultimately make your appliance stop working properly, and in this case repair is not covered by warranty.. Warning! Never drink the descaling solution or any products dispensed until the cycle has been carried out to the end. - Page 10 90 %...
-
Page 11: Making Americano
MAKING AMERICANO 1. Adjust the height of the dispensing spout 2. Press the Americano icon to brew Americano style Coffee AMERICANO ESPRESSO WATER CAPPUCCINO LATTE MILK MENU POWER POWDER... -
Page 12: Making Espresso
MAKING ESPRESSO 1. Adjust the height of the dispensing spout 2. Press the espresso icon to brew an espresso style coffee ESPRESSO WATER AMERICANO CAPPUCCINO LATTE MILK MENU POWDER POWER... -
Page 13: Making Hot Water
MAKING HOT WATER 1. Place the cup below the dispensing spout 2. Press the hot water icon, the machine will start to disperse hot water 3. Once you have your desired amount of the hot water, press the icon to stop ESPRESSO WATER AMERICANO... -
Page 14: Making Cappuccino
MAKING CAPPUCCINO 1. Insert the milk frother into the machine 2. Place the milk hose into the milk (we recommend using pure milk) 3. Press the CAPPUCCINO icon, the machine will start to make a cappuccino 4. Once you have reached your desired amount of milk you can press the icon to stop the process AMERICANO ESPRESSO WATER... -
Page 15: Making Latte
MAKING LATTE 1. Insert the milk frother into the machine 2. Place the milk hose into the milk (we recommend using pure milk) 3. Press the LATTE icon, the machine will start to make a LATTE 4. Once you have reached your desired amount of milk you can press the icon to stop the process AMERICANO ESPRESSO WATER... -
Page 16: Making Hot Milk/Milk Foam
MAKING HOT MILK/MILK FOAM 1. Insert the milk frother into the machine 2. Place the milk hose into the milk (we recommend using pure milk) 3. Press the MILK icon, the machine will start to add the milk into your cup 4. -
Page 17: Milk Foam Control
MILK FOAM CONTROL Open the left door and you can see the milk frother control. The quality of the milk foam will depend on the milk you use and the temperature of the milk. When frothing the milk please make sure you turn the milk frother control counter clockwise if it is not in the correct position the milk will not foam up as much. - Page 18 ADJUST COFFEE GRINDER The grinder adjustment knob, which is placed inside the coffee bean tank, must be turned with the coffee grinder adjustment key only when the coffee grinder is in operation. Do not put any material other than coffee beans into the tank. Do not pour ground and /or instant coffee into bean tank. NEVER use coffee beans that have been stored in a freezer.
- Page 19 MENU FOR CUSTOMIZATION AND MAINTENANCE PRESS MENU ICON 1.Coffee parameter setting A. Americano settings: The machine will first disperse coffee followed by hot water. (to reduce the amount of caffeine) You can adjust the flow of the espresso coffee, the temperature, the W50ml 40ml grams of the beans and the flow of hot water.
- Page 20 C. Cappuccino settings: You can choose the flow of the espresso coffee, the temperature, the grams of the coffee beans and the amount of time to froth the milk. Once you have programmed 40ml your preference press the exit icon to store your new settings. D.
- Page 21 Detergent...
- Page 22 Clean water AMERICANO ESPRESSO WATER CAPPUCCINO LATTE MILK MENU POWER POWDER...
- Page 23 3.Setting the stand-by time You can choose 0.5h, 1h, 1.5h ……24h. 4.Voico/Silent setting Press the audio settings Icon, to turn sound on or off 5.Setting the display contrast. Press the energy-saving Icon: You can select power saving mode, semi-saving mode and without saving mode 6.
- Page 24 7. View all how many cups of coffee have been made You can view the number of different varieties of coffee you have made with your machine 8. Preprogrammed setting F o r y o u r c o n v e n i e n c e y o u r c o f f e e m a c h i n e c o m e s preprogrammed to the recommended default factory settings.
-
Page 25: Milk Frother Cleaning
MILK FROTHER CLEANING 1. Insert the milk frother into the machine 2. Place milk hose into a cup of water and place a another cup under the milk dispenser 3. Press the MILK icon, to start cleaning. 4. At the end, empty the container and repeat above steps until pipeline has been flushed out and completely cleaned of any old milk. -
Page 26: Brewing Unit Cleaning
BREWING UNIT CLEANING 1. Open the right side door 2. Remove the waste bin 3. Remove the Brewing unit, and rise with warm water 4. Insert the brewing unit back and wait to hear a “Click” to confirm its back in the correct position... -
Page 27: Warning Signals
WARNING SIGNALS 1.Fill the water tank. 2.Add beans to the bean tank. 3.Drip tray missing, Insert the drip tray correctly. 4.Coffee waste bin missing, insert the coffee waste bin correctly. - Page 28 5.Brewer missing, the brewer must be inserted into the machine. 6.1.Empty the coffee waste bin (its full of used coffee pods). 7.Right door open, close the door. 8.Ventilate, water tank not in correct place, push the water tank into the correct position 9.Prime the circuit.
-
Page 29: Troubleshooting
TROUBLESHOOTING If in the case that the machine should fall to the ground and malfunction, you should immediately unplug the machine from power point. If a mechanical failure to the machine should occur, you may contact your vendor or authorized dealer to resolve your problem. - Page 30 MEMO...
Need help?
Do you have a question about the Raffaello Latte PRO and is the answer not in the manual?
Questions and answers