Table of Contents
Advertisement
Quick Links
Advertisement
Table of Contents

Related Manuals for Control Module Genus G2

Summary of Contents for Control Module Genus G2
- Page 1 Genus® G2 User Manual UM 3000-1 Rev E November 2017...
-
Page 2: Table Of Contents
Genus G2 User Manual UM3000-1 Table of Contents Declarations................................4 Servicing .................................. 4 Introduction ................................5 Genus G2 Terminal ..............................6 Terminal Front ..............................6 The User Interface .............................. 6 Terminal Features ............................... 7 Product Specifications ............................8 File System Specification ............................ 9 Terminal Connections ............................ - Page 3 Genus G2 User Manual UM3000-1 Save Settings Button ............................ 37 Reset Terminal ............................. 37 Logout ................................37 Network Setup ..............................38 Web Service Setup ............................39 Enable Web Service ............................. 40 Discovery URL .............................. 40 Bulk Transaction Count ..........................40 Data Maintenance .............................
-
Page 4: Declarations
Control Module, Inc. FCC Compliance The Control Module Model Genus G2 Time and Attendance Terminal conforms to the requirements of FCC PART 15, SUBPART B, CLASS A, 2004 for radiated and conducted emissions without modifications. -
Page 5: Introduction
UM3000-1 Introduction Welcome to Control Module’s Genus® G2 Data Collection Terminal. The “Genius of Genus” is that it offers an intelligent Java programming language and enables companies – for the first time – to realize the maximum potential of their workforce management terminals, by using them as a powerful interface to connect highly customized applications and the databases that fuel them. -
Page 6: Genus G2 Terminal
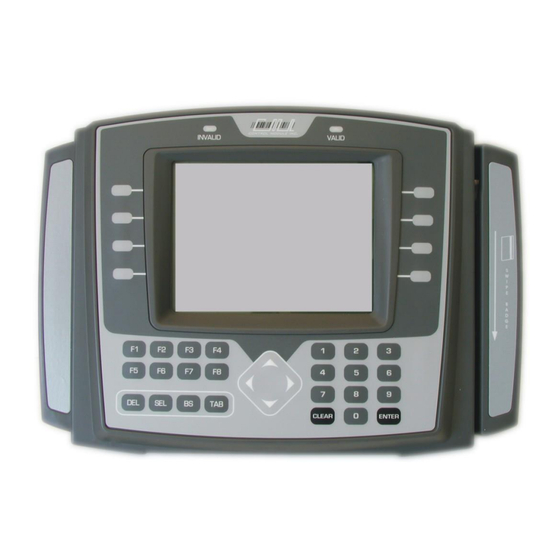
The User Interface The user interface offers options for data entry into the Genus G2 Terminal through the 36-key ATM style membrane keypad, softkey, function, navigation and user programmable function keys, and/or internal card readers. User output is via a 320X240 backlit blue graphic LCD display. The terminal also has the capability to produce multiple sound tones to help guide the user. -
Page 7: Terminal Features
Genus G2 User Manual UM3000-1 Terminal Features Memory Configuration Contains 32 MB of dynamic memory, 2 MB of non-volatile memory for data retention, and 40 MB of Flash memory for program storage. Programmability Designed to be a Java-capable embedded data collection platform. Users can create, load, and execute PersonalJava-compliant applications that utilize existing OEM classes for display, keyboard, biometric, barcode, magnetic, proximity, and smartcard (Mifare, iClass). -
Page 8: Product Specifications
Genus G2 User Manual UM3000-1 Product Specifications Keypad – with local buffering 10 Numeric Keys, (0 through 9) 8 Function Keys (F1 through F8) Clear and Enter Keys Navigation Keys for cursor position and network parameters, alpha characters and special symbols. 8 Softkey aligned keys 4 Parameter Edit keys, Delete, Select, Backspace and Tab Display... -
Page 9: File System Specification
Genus G2 User Manual UM3000-1 File System Specification The terminal provides file systems on different hardware devices. Instead of using the common alphabet notation for file system devices (‘A:’, ‘C:’), the Genus terminal identifies the file storage devices as: Storage Device Memory size Location Seldom write, frequent read. -
Page 10: Terminal Connections
Genus G2 User Manual UM3000-1 Terminal Connections Off Line/On Line Power Ethernet Ethernet Port Connector: 8 position RJ45. The Ethernet port supports the 10/100BASE-T Pinouts: network connections. It is located on the 1 = Receive + 5 = Input Power backplate of the terminal and connects directly to 2 = Receive –... -
Page 11: Ups Options
The Genus G2 Terminal provides UPS options. UPS 2050-012 UPS Module. The 2050-012 module provides backup power to the Genus G2 terminal, and integrated readers and communications options in the event of a main power failure and brownout conditions. Battery. The 2050-012 module uses a Ni-Cd 8-cell arrangement (9.6V @ 1000 mAh) to provide DC backup... -
Page 12: Installation
Genus Loader will display with program and version numbers at the top of the screen. For more information on the Loader Setup, refer to the reference section in this document. Power-On Diagnostic Display Genus G2 will display with program and version numbers at the top of the screen. Revision E November 2017... -
Page 13: Online Mode
Offline Mode The Genus G2 terminal offline mode is utilized for initial setup and when any of the following options require a change: communications, readers, security, time/date, terminal maintenance and terminal administration. To enter Offline Mode, move the switch located on the backplate of the terminal to the left position prior to power-up. -
Page 14: Menu Options In Offline Mode
Genus G2 User Manual UM3000-1 Programmable Function Keys Numeric keypad Used to setup Direction keys allow Clear and Enter keys Terminal user to scroll through are display specific. Parameters menus Menu Options in Offline Mode Main Main Terminal Information screen Security PIN Network Setup, includes option for WiFi Telnet... -
Page 15: Active Keypad In Offline Mode
Genus G2 User Manual UM3000-1 Active Keypad in Offline Mode The keypad is used to set terminal parameters and input data. Key activity works differently depending on the current display parameters. Left and Right Advances through menu selections located at the bottom of the display. Arrows Advances through all parameters displayed, and returns to the menu selections located at the bottom of the display. -
Page 16: User Operational Displays
Genus G2 User Manual UM3000-1 User Operational Displays This section provides descriptions, additional information, and key activity for each menu option. Setup PIN Personal Identification Number (PIN) is used for security to prevent unauthorized entry into Setup Mode. From the options at the bottom of the display press to advance to and highlight PIN . -
Page 17: Network Setup
Genus G2 User Manual UM3000-1 Network Setup Use Network Setup to configure the terminal’s network parameters, including DHCP, IP address, gateway, subnet mask, DNS servers, and telnet menu. 1. From the options at the bottom of the display press to advance to and highlight Net . 2. - Page 18 Genus G2 User Manual UM3000-1 Gateway IP Used to specify a gateway address for the terminal. This entry is optional if the terminal does not need to communicate with devices outside the immediate subnet. Primary DNS Used to specify a primary Domain Name Server (DNS). This entry is optional if the terminal does not need access to DNS services.
-
Page 19: Telnet Setup
Genus G2 User Manual UM3000-1 Telnet Setup Establishes the settings for the Telnet interface to the Terminal. 1. From the options at the bottom of the display press to advance to and highlight Telnet . 2. Press to advance to and highlight enable Telnet. Enable Telnet enables the Telnet interface to the terminal. -
Page 20: Restart The Terminal
Genus G2 User Manual UM3000-1 Apply 9. Use to highlight and press to save settings. 10. Use to return to the Main Menu at the bottom of the screen. Note: You will need restart the terminal for Telnet changes to take effect. See the Reference Section in this document for additional Telnet information. -
Page 21: Time Setup
Genus G2 User Manual UM3000-1 Time Setup Time 1. From the options at the bottom of the display press to advance to and highlight Time . 2. Press to highlight the hour field (Time is set to a 24-hour clock). 3. -
Page 22: Date- Day
Genus G2 User Manual UM3000-1 Date- Day 10. When in the correct Month, Press to advance to and highlight the new date. 11. Press to accept the highlighted day date. Date- Year The year can be edited in the date field, however if the slash separator is deleted by Mistake, return to Step 10 to recover the date format. -
Page 23: Reader Setup
Genus G2 User Manual UM3000-1 Reader Setup 1. From the options at the bottom of the display press to advance to and highlight Reader. 2. Press to highlight the active field for Reader 0, Reader 1 or Reader 2. Reader 0 corresponds to the internal connection for Barcode or Magnetic readers located on the right side of the G2 Terminal when looking at the Terminal front. -
Page 24: Barcode Setup
Genus G2 User Manual UM3000-1 Barcode Setup 1. Use to select type of reader (Barcode, Proximity/Wiegand, Magnetic, or None). 2. Press to configure Barcode reader. The following screen displays. The box to the right of the first format will be highlighted. 3. - Page 25 Genus G2 User Manual UM3000-1 6. Press to highlight the Length Qualifier field. 7. Press to highlight a Length Qualifier. <= Length Qualifier options include (equal) or (less than or equal). 8. Press to highlight the Length field. The Terminal accepts up to 32 characters in the length field. 9.
-
Page 26: Proximity/Wiegand Setup
Genus G2 User Manual UM3000-1 Proximity/Wiegand Setup 1. Press to highlight the active field for Reader 1. 2. Use to set the type of reader for Proximity Wiegand. 3. To accept changes, press to advance to and highlight Apply, and press to save settings. -
Page 27: Biometric Reader Setup
Genus G2 User Manual UM3000-1 Biometric Reader Setup 1. Press to advance to and highlight Enable Biometric Reader. 2. Press to check for Enable or uncheck for Disable Biometric Reader. 3. Once Enable Biometric Reader is checked, press to setup a biometric reader. Loading Biometric Information will display followed by Biometrics Setup. - Page 28 Genus G2 User Manual UM3000-1 4. Press to advance to and highlight Apply. 5. Press to test the reader. Messages from the reader test may either prompt the user or provide information. These messages are as follows: Place Finger on Sensor... Finger enrolled, Remove Finger Place Finger on Sensor...
-
Page 29: System Maintenance
Genus G2 User Manual UM3000-1 System Maintenance From the options at the bottom of the display press to advance to and highlight Maint . Note: Test Com Port is not used at this time. Clear RAM Clear RAM will clear the ‘\ramdisk’ transaction files currently residing in the terminal. 1. -
Page 30: Tadmin Setup (Enable/Disable Only)
Genus G2 User Manual UM3000-1 TAdmin Setup (Enable/Disable only) Terminal Administration is used to configure host-side software and communication connections. This is only required when working with CMI’s TAdmin host software. 1. From the options at the bottom of the display press to advance to and highlight TAdmin . -
Page 31: Local Port
Genus G2 User Manual UM3000-1 Local Port 1. Press to highlight Local Port. 2. Use to delete the field and use the numeric keypad to enter a new value. Mode There are two Mode options available, Online or ONOFF. Online Mode will attempt to transmit transactions to the host as they occur. -
Page 32: Dial Up Networking Setup
Genus G2 User Manual UM3000-1 Dial Up Networking Setup Creates a DUN parameter set under an Alias name to be used with TAdmin. Select New/Existing 1. Press to advance to 2. Press to access DUN aliases. 3. Use the arrow key and to edit an existing DUN Alias or to create a NEW DUN. - Page 33 Genus G2 User Manual UM3000-1 12. Use to edit the field as needed and the numeric keypad to enter new value. 13. Press to advance to and highlight Apply and press to save settings. 14. Press to return to Main Menu. Note: Modem parameter configuration can be found in the Genus API Documentation.
-
Page 34: Web Setup
Genus G2 User Manual UM3000-1 Web Setup Web Setup enables communication for Web Services on the Terminal, and between the host system and the Terminal. Note: Settings for the Web Browser Interface can be configured in Offline Setup at the terminal or through the Web Browser to the terminal IP. -
Page 35: Web Browser Interface
Genus G2 User Manual UM3000-1 Web Browser Interface The web browser interface provides system administrators with the ability to remotely login, view and change system parameters and settings on the Terminal. Navigation hierarchy: Home page (Genus Administration) Network Setup ... -
Page 36: Home Page - Genus Administration
Genus G2 User Manual UM3000-1 Home Page – Genus Administration Once logged in to the terminal, the Genus Administration home page is displayed. The Genus Administration page displays the following information as retrieved from the current Terminal session or as used during a previous session and retained in the browser. ... -
Page 37: Total Ram
Genus G2 User Manual UM3000-1 Total RAM The Total RAM displayed refers to the total amount of dynamic RAM available for program execution. Free RAM refers to the amount of dynamic RAM remaining at that point in time. File Versions and Fields The fields adjacent to the Genus Version, Classes Version, Application Version, Lib 1, 2, 3 and CMTML File Versions are editable fields that accept a URL to point to a new version of that file represented. -
Page 38: Network Setup
Genus G2 User Manual UM3000-1 Network Setup The network setup screen provides standard network setting fields to allow administrators to configure the terminal’s network parameters. All settings on the Network Setup page, except Enable WSDL, correspond to the Offline Setup menus in the Terminal. Network parameters include: ... -
Page 39: Web Service Setup
Genus G2 User Manual UM3000-1 Web Service Setup The Web Service Setup screen provides system administrators with the ability to reconfigure the Terminal settings for host-side web service. This page provides a listing of all configuration name/value pairs with the ability to edit, add, or remove entries. ... -
Page 40: Enable Web Service
Genus G2 User Manual UM3000-1 Enable Web Service This setting will enable the Web service setup for the host side. The Enable Web Service corresponds to the Enable Host Web Service option in the Offline Setup on the Terminal. Discovery URL The Discovery URL is the URL the Terminal will use to download its web service connection information. -
Page 41: Clear Ram
Genus G2 User Manual UM3000-1 Clear RAM This will clear the ‘\ramdisk’ on the terminal, typically erasing transaction data. A warning message for loss of data and transactions will display if the Clear RAM button is selected. Note: After a Clear RAM, the Terminal requires two complete power cycles for this command to be effective. -
Page 42: Application Log
Genus G2 User Manual UM3000-1 Application Log The Application Log will display any application starting messages and critical system messages. Transaction Log The Transaction Log displays the type, name, date and timestamp for each transaction that occurs and are currently stored in the data queue. Up to 50 transactions can be displayed per page. Revision E November 2017... -
Page 43: Debugging
Genus G2 User Manual UM3000-1 Debugging The Debug Setup page allows an administrator to enable application and system debugging. Configurable options: Enable/disable debugging Max Debug Storage (bytes) Debug Level Storage Limit Action Max Debug Time (hours) Note: The default location for the debug file is \ramdisk\errors.txt Debug Level This setting defines the minimum level of messages that will be logged. -
Page 44: Troubleshooting Terminal Issues
Genus G2 User Manual UM3000-1 Troubleshooting Terminal Issues Terminal Issue Possible Causes Resolution Terminal does not power on. No Power to the terminal. Verify power cable is connected to terminal. If a UPS is included, verify power is connected to the UPS and the power cable from the UPS is connected to the Terminal. -
Page 45: Reference
Genus G2 User Manual UM3000-1 Reference Steps to Re-Program Genus Firmware In the event an update becomes available for the Genus terminal, the firmware can be updated in the field. The following items are required to re-program Genus firmware: Genus terminal to be programmed, connected to the network ... -
Page 46: Loading A Customer-Defined Java Application
Genus G2 User Manual UM3000-1 Loading A Customer-Defined Java Application This application runs on the terminal and handles both a user interface and any backend processing or communication. This is created by the user of the terminal, a value-added Reseller, or CMI. tftp -i <ip address>... -
Page 47: Calculating Number Of Transactions That Can Be Stored
Genus G2 User Manual UM3000-1 Calculating Number of Transactions That Can Be Stored The number of transactions that can be stored is determined by the size of the transaction. Each transaction minimally has 45 bytes as header data and up to 4KB of transaction data. A transaction looks as follows: [45 Bytes –... -
Page 48: Service & Technical Support
Genus G2 User Manual UM3000-1 Service & Technical Support RMA Policy Return Material Authorization (RMA) Procedure: The CMI Service Center assigns an RMA number for all products returned for service. If you have a product that requires service, please contact the CMI Service Center at 1-800-527-4998 or 860-253-4218.
Need help?
Do you have a question about the Genus G2 and is the answer not in the manual?
Questions and answers