
Related Manuals for Digital Aquatics ReefKeeper

Summary of Contents for Digital Aquatics ReefKeeper
- Page 1 ReefKeeper 4/5/2005 Last Revised: Digital Aquatics, LLC 6/28/2005 www.DigitalAquatics.com...
- Page 2 Digital Aquatics, LLC. Digital Aquatics hereby grants permission to download a single copy of this manual and of any revision to this manual onto a hard drive or other electronic storage medium to be viewed for personal use, provided that such electronic or printed copy of this manual or revision must contain the complete text of this copyright notice and provided further that any unauthorized commercial distribution of this manual or any revision hereto is strictly prohibited.
-
Page 3: Table Of Contents
Table of Contents Table of Contents............3 Feed Duration............6 Set Time ..............6 Introduction Appendix About this manual............4 Troubleshooting ............6 Product Information Limited Warranty............6 Remote Display ............5 Service Details ............6 Power Controller............5 Temperature Probe ............5 Installation Power Controller Installation........ -
Page 4: Introduction
INTRODUCTION About this manual It is strongly recommended that you read the entire manual before attempting to utilize the ReefKeeper for actual aquarium control. The latest version of this manual may be downloaded from our website at www.DigitalAquatics.com. www.DigitalAquatics.com 6/28/2005... -
Page 5: Product Information
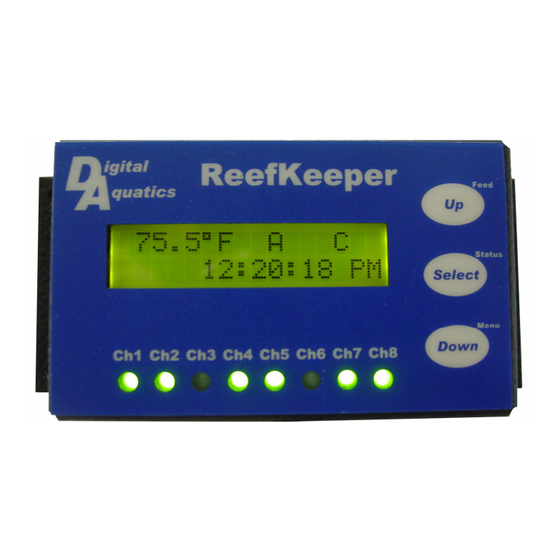
Eight LEDs along the bottom of the face plate correspond to the eight available channels on the power controller, indicating which channels are currently turned on. • Three buttons along the right allow you to configure your ReefKeeper as well as enter Feed Mode and view the night/day mode status. •... -
Page 6: Installation
6 feet long; plan distance from an AC wall plug accordingly, do not use extension cords or splitters to power the ReefKeeper. There are four mounting holes, two on each side of the module. Use these to mount the power controller in a convenient location within 5 feet of where you would like to mount the remote display and within 6 feet of where you would like to install the water temperature probe. -
Page 7: Remote Display Installation
Remote Display Installation The remote display may be mounted on the face of your aquarium cabinet or other convenient location. It can also be mounted flush to a cabinet, giving it a more finished appearance. If you would like to mount it flush, make a rectangular cutout in your cabinet. -
Page 8: Temperature Probe Installation
Temperature Probe Installation • Plug the temperature probe plug into the connector jack on the power controller. • Route the temperature probe cable through convenient locations and insert it into your tank or sump reservoir. • For best results, ensure that the end of the temperature probe is at least 6 inches below the surface of the water in your tank. -
Page 9: Menu System And User Interaction
MENU SYSTEM AND USER INTERACTION The menu system for the ReefKeeper is designed to provide quick access to commonly used functions. All user input takes place via the 3 buttons at the right of the front panel of the ReefKeeper. When the screen is displaying the normal status display, pressing the bottom button (the “Menu”... -
Page 10: Overview
Overview The ReefKeeper menu system is designed to be as easy-to-navigate as possible. The following is a look at the general operation of the menu system. After reading this section, you should be comfortable with basic configuration of your ReefKeeper. -
Page 11: Feed Mode Hotkey
When you press the Status hotkey (the Select button, from the normal operating screen), the Status screen is displayed. The status screen looks like the example shown here. It provides you with the version of software that your ReefKeeper is currently running and the Day/Night Mode status. -
Page 12: Setup Channels
Setup Channels If you would like to reset all 8 channels to their factory-programmed default values, press the Up and Down buttons simultaneously. You will be presented with a confirmation screen asking if you would like to erase your changes to the channel configuration and revert to the defaults. - Page 13 By default, the channels are configured as follows. You, of course, may change any channel to be any function. Channel 1 Other light Turn on: 8 AM Turn off: 8 PM Channel 2 Metal halide light Turn on: 9 AM Turn off: 7 PM Channel 3 Fan/Chiller...
- Page 14 If you set the channel to control a light, select whether the light is a metal halide or other type of light. If it is a Metal Halide, the ReefKeeper will ensure that it has time to cool down after a power loss before turning back on. After making your selection, set the time that you would like the light to turn on.
-
Page 15: Setup Wavemaker
ReefKeeper. This will allow redundant protection from a single-point failure. If you set the channel to be always on, it will act as regular power outlet, with no switching. -
Page 16: Setup Temp
You may calibrate the temperature displayed to increase the accuracy of the ReefKeeper by pressing Up or Down. Make your selection and you will be returned to the main menu. Feed Duration In this menu, you may specify the length of time Feed Mode will last. -
Page 17: Appendix
Ensure that your temperature probe is securely plugged into the power controller. If it is plugged in securely, and the message is still displayed, the probe may be faulty. Contact Digital Aquatics technical support at support@digitalaquatics.com The temperature is inaccurate Enter the “Setup Temp”... -
Page 18: Limited Warranty
Limited Warranty Digital Aquatics LLC warrants this product to be free from defects in materials and workmanship for one year from date of shipment. Digital Aquatics will, at its sole discretion, repair or replace any components that fail in normal use. The customer is responsible for any transportation costs.
Need help?
Do you have a question about the ReefKeeper and is the answer not in the manual?
Questions and answers