Advertisement
Quick Links
Safety Precautions
• Do not pressurize above 50 psi.
• Do not adjust the tip or change spray patterns while
depressing the valve lever or atomizing cap.
• Open cap slowly to release air before removing;
keep bottle upright when releasing pressure.
• Do not store for long periods or transport the unit while
bottle is pressurized.
• Do not use plastic bottle if there is any signs of damage.
Before Starting
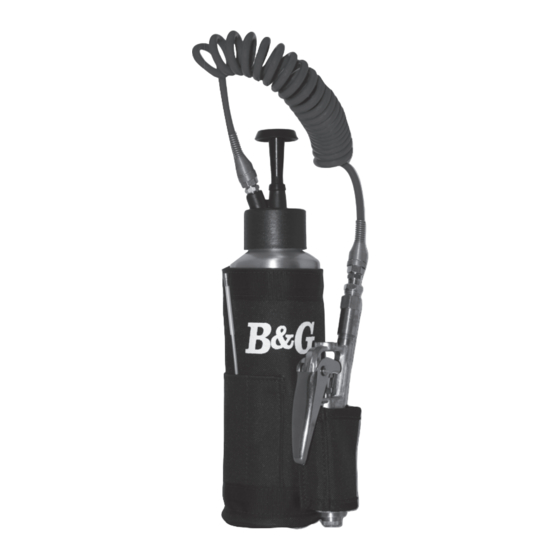
• Inspect the plastic bottle, coiled hose, tank gasket,
discharge valves, and nozzle for signs of wear or
damage. These parts must be in full working condition
to permit pressurization of the bottle.
Operating Instructions
Mixing and Filling
• Mix insecticides for the Professional ACCU-Spray in a
separate container and then add 16 oz. to the bottle.
• When mixing insecticides for the standard ACCU-Spray
(plastic bottle), note the 16 oz. (473 ml) mark on the side
and mix insecticide accordingly.
• Follow all label directions when mixing insecticides.
• Add only 16 oz. (473 ml) of liquid to the bottle to maintain
proper head space for air pressure.
Pressurizing the Bottle
• Pump plunger up and down 8-10 times until there is pres-
sure against the plunger; do not over-pressurize.
Calibration Syringe
ACCU-Spray comes with a syringe for mixing the correct
amount of insecticide in the bottle.
The syringe is marked in milliliters. The intended use of the
syringe is for the tip to be inserted into the reservoir of a tip-
n-pour bottle, and to draw up insecticide concentrate.
• Insecticide amounts for 16 oz.:
Phantom™ = 8.9 ml
Talstar™ = 1.2 or 3.7 ml
Suspend™ = 2.8 or 5.5 ml
Tempo SC™ = 2.0 ml
Demand CS™ = 1.5 or 3.0 ml
Kicker™ = 7.8 or 15.6 ml
ACCU-SPRAY
USER'S MANUAL
Care and Maintenance
• Flush bottle, valve, and
coiled hose with clean
water regularly.
• After rinsing the bottle
with clean water, pressur-
ize the unit and flush the
valve and hose.
• Inspect hoses and hose
connections, gaskets, and
other fittings for wear;
replace when necessary.
• Do not use metal objects
to clean the orifices in the
nozzle, this will disrupt
the liquid spray pattern.
• Use B&G Repair Kit
(#24000037) for regular
care and maintenance.
The Kit includes a check
valve, pump tube plunger
gasket, and a cap gasket.
• Replacing the pump tube plunger
gasket requires stretching the gasket
over the end of the tip.
• Remove and clean around the check
valve at the tip of the pump tube.
Trouble Shooting
Problem: Bottle not holding pressure, air leaks from top
of bottle.
Solution: • Tighten cap
• Replace cap gasket
Problem: Bottle not getting air pressure
Solution: Replace pump tube plunger gasket
Problem: Pump tube fills with water when pumping
Solution: • Clean around the check valve at the bottom
of the tube
• Replace the check valve
Problem: Holds pressure, but will not spray; spray is weak
or sputtering
Solution: • Nozzle clogged, clean with a soft brush
• Siphon tube clogged, clean end
• Clean strainer at the hose/valve junction
Problem: Valve body leaking
Solution: Tighten packing nut, replace packing washers
(in GD-124 Repair Kit)
95138474 Rev 2/10
Advertisement

Related Manuals for B&G ACCU-SPRAY


Summary of Contents for B&G ACCU-SPRAY
- Page 1 Mixing and Filling gasket, and a cap gasket. • Mix insecticides for the Professional ACCU-Spray in a • Replacing the pump tube plunger separate container and then add 16 oz. to the bottle. gasket requires stretching the gasket •...
- Page 2 EXTENDA-BAN VALVE 16 17 ITEM NUMBER DESCRIPTION ACCU-SPRAY 24000031 Tip Kit 22000015 Handle Cap (Dark Gray PVC) 24000062 Valve Rebuild Kit 24000029 Complete Valve Assembly 24000028 Hose S/A, Delivery System (Blue) 24000078 Hose S/A AccuSpray Professional 24000037 Pump Rebuild Kit...
Need help?
Do you have a question about the ACCU-SPRAY and is the answer not in the manual?
Questions and answers