Table of Contents
Advertisement
3.300.1766 - CR220
3.301.1767 - CR221
ISTRUZIONI PER L'USO E L'INSTALLAZIONE
PROGRAMMING INSTRUCTIONS AND INSTALLATION GUIDE
Easy 503
Il Cronotermostato
The Chronothermostat
Art.
Easy 503
Easy 503 Bianco/ White
Easy 503 Antracite/ Anthracite
Italiano
English
Made
Made
Made
Made
Made
in in in in in
Italy
Italy
Italy
Italy
Italy
Advertisement
Table of Contents

Summary of Contents for Tecnocontrol Easy 503
- Page 1 Made Made Made in in in in in Italy Italy Italy Italy Italy Art. Easy 503 Easy 503 Bianco/ White 3.300.1766 - CR220 Easy 503 Antracite/ Anthracite 3.301.1767 - CR221 ISTRUZIONI PER L’USO E L’INSTALLAZIONE PROGRAMMING INSTRUCTIONS AND INSTALLATION GUIDE...
-
Page 2: Descrizione Generale
Easy 503 visualizzazione grafica delle temperature programmate, modificabili mediante comandi semplici e funzionali che ne fa- cilitano la programmazione. Easy 503 evita gli sprechi di energia azionando l’impianto di ri- scaldamento o condizionamento solo quando serve. GENERAL DESCRIPTION GENERAL DESCRIPTION... -
Page 3: Collegamento Elettrico
INSTALLATION INSTALLATION Easy 503 can be directly installed on a 3 module recess box or on the wall. In either cases, it is advisable to position it at a height of 1,5 meters from the wall, in a dry place, away from... - Page 4 INSTALLAZIONE SU SCATOLA 503 INSTALLAZIONE SU SCATOLA 503 INSTALLAZIONE SU SCATOLA 503 INSTALLAZIONE SU SCATOLA 503 INSTALLAZIONE SU SCATOLA 503 Dopo aver effettuato il collegamento elettrico fissare la BASE (con le Fessure dell’ANTINA verso il basso) direttamente sulla scatola da incasso 3 moduli, utilizzando le viti tipo “A” in dotazione (Fig.2 ).
-
Page 5: Installazione A Parete
Frontale Chronothermostat unit Copribatterie Battery Cover Base Viti “B” Screws “B” Fig.3 INSTALLAZIONE A PARETE INSTALLAZIONE A PARETE INSTALLAZIONE A PARETE INSTALLAZIONE A PARETE INSTALLAZIONE A PARETE Dopo aver fissato la base (con le Fessure dell’ANTINA verso il basso) alla parete mediante tasselli e viti (tipo “C”) in dotazio- ne, collegare elettricamente il cronotermostato e fissarlo alla base con le viti tipo “B”. -
Page 6: Power Supply
ALIMENTAZIONE ALIMENTAZIONE ALIMENTAZIONE Easy 503 va alimentato con due comuni batterie AA (stilo) Alcaline da1,5V che ne garantiscono il funzionamento per almeno 2 anni. Per l’inserimento delle batterie sfilare il COPRIBATTERIE e posi- zionare le batterie facendo attenzione alla polarità indicata al- l’interno del vano. - Page 7 INITIALISATION INITIALISATION INITIALISATION As soon as Easy 503 chronothermostat is fed power it carries out a control cycle switching on all segments of the display and activating the charge for a few seconds. If the initialization might prejudice the correct functioning of the charge, power up the...
-
Page 8: Funzionamento E Programmazione
°C/h °C/h °C/h (Fig.5), l’orario o la tem- peratura ambiente. Easy 503 appena alimentato presenta un diagramma standard di utilizzo, mentre l’orologio parte dall’ora 00.00 di Lunedì (LU LU). Per modificare il programma standard portarsi al giorno desi- derato mediante il tasto DAY DAY (Fig.5) e variare il grafico giorna-... - Page 9 °C/h °C/h key °C/h (Fig.5). A standard utilization diagram is shown once the Easy 503 chronothermostat is powered on; the clock starts at 00.00 of Monday (LU). To modify the programme, move to the desired day using the DAY key (Fig.5) and adjust the daily graphic utilizing the four central keys designed in the shape of a cross.
- Page 10 TASTO COPY TASTO COPY TASTO COPY TASTO COPY TASTO COPY Per copiare il programma del giorno appena programmato in altri giorni premere per due secondi il tasto COPY. Sul display apparirà la scritta COPY e lampeggerà il cursore del giorno in cui copiare il programma. Con i tasti +h +h o -h -h si scor- rono i giorni della settimana e per confermare il GIORNO in cui...
- Page 11 +°C e -°C -°C -°C . -°C +°C -°C Da questo momento Easy 503 inizia il suo regolare funziona- mento indicando ogni inserimento del carico (riscaldamento o condizionamento) mediante l’accensione del simbolo della fiam- ma sul display (Fig.5). SET KEY SET KEY...
-
Page 12: Funzionamento Manuale
Premendo il tasto AUT/MAN (Fig.5) il cronotermostato entra nel funzionamento manuale spegnendo il grafico (che rimane memorizzato) e accendendo il simbolo della mano (Fig.5). Ora Easy 503 si comporta come un semplice termostato am- biente dove la regolazione avviene impostando la temperatura +°C +°C... -
Page 13: Funzione Reset
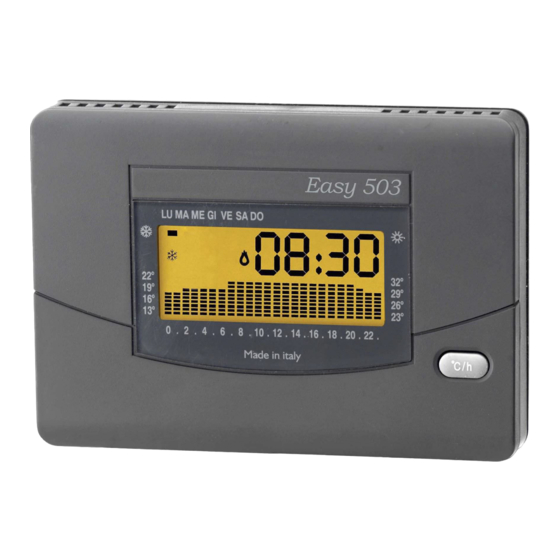
The chronothermostat is switched off by pressing the (R in Fig.5) for two seconds. The Easy 503 chronothermostat will deactivate the functions re- lative to the set programmes, which anyway remain memorized, and will alternately visualize the word OFF with the current hour and the detected temperature. - Page 14 A A A A A segmento indicante il giorno attuale o, durante la programmazione, il giorno programmato. B B B B B display numerico indicante l’ora attuale o la temperatura ambiente visualizzabili alternativamente premendo il tasto E. Durante la pro- grammazione indica la temperatura impostata C C C C C segmento lampeggiante, indica la temperatura esterna o, durante la programmazione, la temperatura programmata.
- Page 15 G G G G G E E E E E Fig.5 R Q N O P R Q N O P R Q N O P R Q N O P R Q N O P Indicazione modo di funzionamento INVERNO WINTER function mode indication Indicazione modo di funzionamento ESTATE SUMMER function mode indication...
- Page 16 A A A A A Segment indicating the current day or the programmed day, whilst programming. B B B B B Numerical display indicating the current hour or the ambient temperature alternately made visible by pressing the E key. Whilst programming, it indicates the set temperature.
-
Page 17: Condizioni Generali Di Garanzia
CONDIZIONI GENERALI DI GARANZIA CONDIZIONI GENERALI DI GARANZIA CONDIZIONI GENERALI DI GARANZIA CONDIZIONI GENERALI DI GARANZIA CONDIZIONI GENERALI DI GARANZIA IL PRESENTE CERTIFICATO E' L' UNICO DOCUMENTO CHE DA' IL PRESENTE CERTIFICATO E' L' UNICO DOCUMENTO CHE DA' IL PRESENTE CERTIFICATO E' L' UNICO DOCUMENTO CHE DA' IL PRESENTE CERTIFICATO E' L' UNICO DOCUMENTO CHE DA' IL PRESENTE CERTIFICATO E' L' UNICO DOCUMENTO CHE DA' DIRITTO ALLA RIPARAZIONE DEL PRODOTTO IN GARANZIA... -
Page 18: Certificato Di Garanzia
DA COMPILARE E SPEDIRE IN CASO DI GUASTO DA COMPILARE E SPEDIRE IN CASO DI GUASTO APPARECCHIO: APPARECCHIO: APPARECCHIO: APPARECCHIO: APPARECCHIO: Bianco Cod. 3.300.1766-CR220 Easy 503 Easy 503 Easy 503 Easy 503 Easy 503 Easy 503 Easy 503 Antracite Cod. 3.3001.1767-CR221... - Page 19 CARATTERISTICHE CARATTERISTICHE CARATTERISTICHE TECNICHE TECNICHE TECNICHE CARATTERISTICHE CARATTERISTICHE TECNICHE TECNICHE Alimentazione: 2 batterie stilo alcaline AA da 1,5V. Autonomia batterie: oltre 2 anni. Display: retroilluminato Controllo automatico della scarica delle batterie con 2 soglie d’intervento. Sostituzione delle batterie senza perdita di dati. Campo di regolazione: da 5 a 30°C in inverno, da 15 a 35°C in estate.
- Page 20 Tecnocontrol Srl GECA Srl via Miglioli, n°47 via E.Fermi, n°98 20090 Segrate (MI) Italy 25064 Gussago (BS) Italy Tel. +39 02 26922890 Tel. +39 030 3730218 www.tecnocontrol.it www.gecasrl.it La ditta costruttrice si riserva il diritto di apportare qualsiasi modifica, estetica o funzionale, senza preavviso alcuno ed in qualsiasi momento.
Need help?
Do you have a question about the Easy 503 and is the answer not in the manual?
Questions and answers