
Summary of Contents for Fluid 8021216
- Page 1 HD Vehicle Video Camera With Touchscreen 8021216 User Manual Please read carefully and keep this manual for future reference.
-
Page 2: Table Of Contents
TABLE OF CONTENTS IMPORTANT SAFETY INSTRUCTIONS . . . . . . . . . . . . . . . . . . . . . . . . . . . . . . 3 PRECAUTIONS . -
Page 3: Important Safety Instructions
IMPORTANT SAFETY INSTRUCTIONS 1. Read these instructions. 2. Keep these instructions. 3. Heed all warnings. 4. Follow all instructions. 5. Do not use this apparatus near water. 6. Refer all servicing to qualified service personnel. CAUTION RISK OF ELECTRIC SHOCK DO NOT OPEN CAUTION: TO REDUCE THE RISK OF ELECTRIC SHOCK, DO NOT REMOVE COVER (OR BACK). -
Page 4: Precautions Continued
Use of this device while driving could divert your attention away from the primary task of driving. All distractions endanger the driver, passengers and bystanders OVERVIEW Thank you for purchasing the Fluid HD Dash Video Camera. PACKAGE CONTENTS • Camera • Power cord • Mount and holder... -
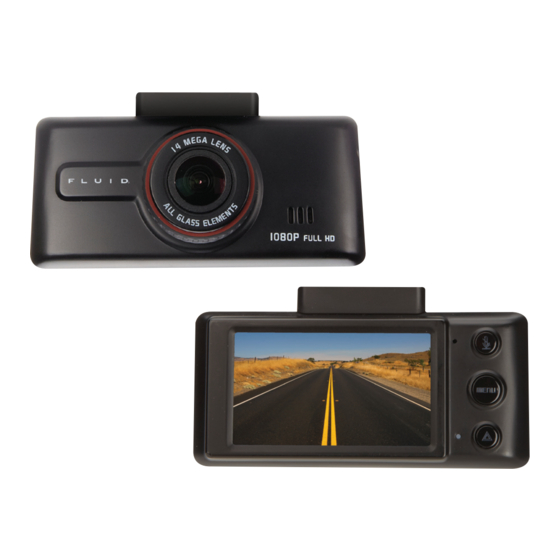
Page 5: Identifying The Parts
• Built-in MIC and speaker • Built-in super capacitor to serve as UPS (Uninterruptible Power System) when the external power supply is cut off • Composite video broadcasting signal output with line-out • GUI (Graphic User Interface) adopts the combination design by buttons and touchscreen, simple and easy to use • Supports multiple languages • Supports 5V external mobile power bank supply IDENTIFYING THE PARTS FRONT BACK 1. Lens 6. Speaker 11. Mute Button 2. Power/REC 7. -
Page 6: Installation
INSTALLATION Place the holder’s sheath into the Adjust the camera until it is aimed in square hole on the top of the camera. the right direction. Insert an SD card. Plug in the power cord. INSTRUCTIONS: 1. Insert the holder’s sheath into the square hole on the top of the camera and push it along until the end. The camera will be firmly fastened to the holder. -
Page 7: Power On/Off
POWER ON/OFF POWER SUPPLY This product has no built-in battery. There are two options of supplying power. Option 1: Supply DC 12/24V from the vehicle’s cigarette lighter socket. The power supply is ready to use. The built-in super capacitor can be charged and serve to supply power when the external DC 12/24V supply is cut off. Movie files will not be damaged if the power supply is suddenly cut off. -
Page 8: Functions Introduction
When using power supply Option 1, the external power supply can be cut off directly. When the external power supply is cut off, the built-in super capacitor serves as UPS (Uninterruptible Power System) so that the camera can end movie recording and begin the normal powering off sequence. -
Page 9: Capture Mode
BUTTON NAME DESCRIPTION POWER/REC When shortly pressed, start/stop movie recording. MUTE Enable/disable audio recording. MENU Pop up menu, enter setting mode. Under recording mode, trigger EMERGENCY emergency movie recording. After 20 seconds, the current file will be saved. CAPTURE MODE MIC disabled/ Photo Resolution Photo Qty. enabled Playback Folder Settings Mode-Video/ Current date and time Capture Under the recording mode, press the “POWER/REC” button stop recording, click the... -
Page 10: Led Display Status
LED DISPLAY STATUS • When MIC is ON (mute disabled), “MIC”button LED turns white • When MIC is OFF (mute enabled), “MIC” button LED turns orange • In case of emergency event trigger, “Emergency” button LED turns blue • When the triggered video file storage is completed, “Emergency” button LED turns white • The LED flashes green during recording • The LED will turn solid green while taking a picture • The LED flashes red when there is no memory card inserted The LED flashes red when there is no free space on the memory card REVIEW FOLDER SELECTION On the video page, click icon to enter the playback folder selection or click on a blank area of screen, which appears as following: Back to recording mode... -
Page 11: Movie Play
• Under browse mode, movie files are listed with separate folders in chronological order • Folder “VIDEO” contains normal recorded movie files • Folder “EVENT” contains emergency recorded movie files and protected movies • Folder “JPEG” contains normal photo files MOVIE PLAY The current browsed file index/total file count Return Previous video Movie play/ Delete menu Enter recording Pause Next video The duration of the The current playtime played movie file During movie play the following buttons have the below function. BUTTON NAME DESCRIPTION... -
Page 12: Capture Review
BUTTON NAME DESCRIPTION When shortly pressed, return to MENU Recording/Capture mode. EMERGENCY No function. CAPTURE REVIEW The current browsed file index/total file count Return Previous video Delete menu Enter recording Next video PLAYBACK MENU On the playback page, click to delete current file or delete all files. The screen appears as below:... -
Page 13: Settings
SETTINGS Under movie recording mode, click icon to enter menu setting page. The screen appears as below:... -
Page 14: Menu Setting Options
MENU SETTING OPTIONS CLASSIFY MENU ITEM DESCRIPTION Format the SD card, all data will be Format Format erased. Beep Beep Beep ON/OFF. Date Time Set current date and time. Support English, Chinese Traditional ), Chinese Simplified ( Language Japanese ( ), Spanish (Español), Setup Korean ( ), and French (Français). -
Page 15: Motion
turns or turning over. The accelerations are defined below. The detected 3-axis acceleration values are recorded into movie clips simultaneously. The collision detect feature can be configured in the recording settings page under the setting mode. There are four options: • Collision detect is ON with high sensitivity. • Collision detect is ON with mid sensitivity. • Collision detect is ON with low sensitivity. • Collision detect is OFF. Impact sensitivity should be set according to pavement turbulence. The default value is “Mid”. When collision is detected, the screen will display the icon prompt. The current recorded file will last for 20 seconds and then it will be truncated and stored in folder “EVENT”. -
Page 16: Troubleshooting
TROUBLESHOOTING PROBLEM SOLUTION • Format card. SD card inserted, camera • Insert card again when powered ON, LED display camera is powered OFF. prompt “Please insert card!”. • Use high quality and high speed SD card. Camera does not record • Format card. automatically when powered • Use high quality and high speed SD card. • Ensure the lens is clean; this The video is not clear. -
Page 17: The Fcc Wants You To Know
such as every 2 to 4 weeks. 4. The camera has a built-in high voltage circuit and its PCBs (Printed Circuit Boards) are highly integrated. DO NOT detach it without the instructions from qualified professionals. THE FCC WANTS YOU TO KNOW This equipment has been tested and found to comply with the limits for a Class B digital device, pursuant to Part 15 of the FCC Rules. -
Page 18: Warranty
THE SOURCE – WARRANTY The Source warrants that this product will be free from defects in materials and workmanship for a period of (1) year from the date of purchase. Within this period, simply take the product and your proof of purchase to any The Source store or participating dealer and the product will be replaced (where available) without charge.