Table of Contents
Advertisement
Available languages
Available languages
Quick Links
POOLS
Nos reservamos el derecho de cambiar total o parcialmente las características de nuestros artículos o contenido de este documento sin previo aviso.
Nous nous réservons le droit de modifier totalement oru en partie les caracteristiques de nos articles ou le contenu de ce document san pré avis.
Wir behalten uns das recht vor die eigenschaften unserer produkte oder den inhalt diese prospektes teilweise oder wollstanding, ohne vorherige benachichtigung
Ci riservamo il diritto di cambiare totalemente o parzialmente le caratteristiche tecniche dei nostri prodotti ed il contenuto di questo documento senza nessum
Wij behouden ons het recht voor geheel of gedeeltelijk de kenmerken van onze artikelen of de inhouk van deze handleiding zonder voorafgaand bericht te wijzigen.
Reservamo-nos no dereito de alterar, total ou parcialmente as caracteristicas os nossos artigos ou o conteúdo deste documento sem aviso prévio.
AR705R0001-01
AR705R0001-01
www gre es
®
We reserve to change all of part of the articles or contents of this document, without prior notice.
AR700 – AR7050 – AR710 – AR715
SKID PACK
Installation and maintenance manual
FILTER MONOBLOC
Manual de instalación y mantenimiento
FILTRO MONOBLOC
Manuel d'installation et d'entretien
MONOBLOCK-FILTER
Einbau-und betriebsanleitung
FILTRO MONOBLOCCO
Manuale di installazione e manutenzione
MONOBLOC-FILTER
gebruiksaanwijzingen monobloc filter
FILTRO MONOBLOCO
Manual de instruções e manutenção
su andern.
preavviso.
Advertisement
Table of Contents

Subscribe to Our Youtube Channel
Summary of Contents for San Marina Pools AR700
- Page 1 ® POOLS AR700 – AR7050 – AR710 – AR715 SKID PACK Installation and maintenance manual FILTER MONOBLOC Manual de instalación y mantenimiento FILTRO MONOBLOC Manuel d’installation et d’entretien MONOBLOCK-FILTER Einbau-und betriebsanleitung FILTRO MONOBLOCCO Manuale di installazione e manutenzione MONOBLOC-FILTER gebruiksaanwijzingen monobloc filter FILTRO MONOBLOCO Manual de instruções e manutenção...
-
Page 2: Packaging Components
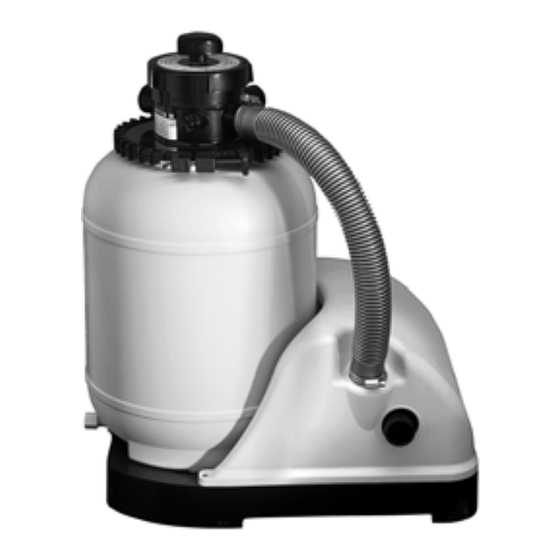
The main components of this filter are as follows: Modelo Fig. Pos. Denominacion AR700 / AR700C TOP selector valve AR700 / AR700C Filter Ø300 AR700 / AR700C Plastic Base Ø300 AR700 / AR700C Hose connection of Ø38 x 360... -
Page 3: Electric Connection
• Place the inner collector properly on the bottom of the filter (Fig. 6). • Insert inside the filter 25 Kg of sand for AR700 and AR7050. Insert inside the filter 40 Kg of sand for AR710 and 70 Kg of sand for AR715. - Page 4 The upper selector valve is responsible for selecting the 6 different filter functions: backwash, recirculation, rinse, filter, waste, and close for the models AR710 and AR715. To change the valve setting, proceed as follows for models AR700 and AR7050: Fig 7 • Always disconnect the socket.
-
Page 5: Operation
• Pressure gauge indicates that there is excess pressure (needle pointing between yellow and red, or on red). To perform filter backwash, proceed as follows in models AR700 and AR7050: • Disconnect the filter from the power point. Never move the selector valve while the motor is running. - Page 6 • Loosen the upper triangular knob on the valve until the cover can be lifted from its housing and turned. Place the valve on the backwash setting, reinserting the cover in its housing and retightening the knob. Do not overtighten the knob as the valve may be damaged Fig 7.
-
Page 7: Replacing The Cable
A hose which extends beyond the length required to reach all points of the pool is more difficult to use. Cut off the section of the hose which is not needed. Check that the rubber terminals conserve their seal. Priming the bottom cleaner hose: Insert the bottom cleaner into the pool vertically, with the pole and the hose connected. - Page 8 MODELS AR700 AND AR7050 SOLUTION PROBLEM CAUSE Place Teflon in the housings. Insert the hose Improper connection between the terminals and The filter leaks through the hose terminals terminals up until the bottom of the housing and the hoses. tighten the clamps.
- Page 9 Filtro, bomba y válvula selectora en un mismo aparato. Los principales componentes de este filtro son: Modelo Fig. Pos. Denominacion AR700 / AR700C Valvula de 4 vias colector excentrico AR700 / AR700C Cuerpo filtro Ø300 AR700 / AR700C Base monobloc Ø300 AR700 / AR700C Manguera de conexión de Ø38 x 360...
-
Page 10: Conexión Eléctrica
• Asentar correctamente el colector interior en el fondo del filtro, Fig.6. • Introducir en el interior del filtro la arena 25 Kg en el modelo AR700 y AR7050, 40 Kg en el modelo AR710 y 70 Kg en el modelo AR715. La arena de sílex tiene una duración ilimitada. Sólo debe reponerse en caso de pérdida. Tome la referéncia del nivel de arena de sílex para reposiciones futuras, Fig.5. - Page 11 (backwash), recirculación (recirculate), enjuague (rinse), vaciado (waste) y cerrado (closed) en el modelo AR710 y AR715. Para variar la posición de la válvula, proceder como sigue para los modelos AR700 y AR7050: Fig.7. • Desconectar siempre el enchufe. • Aflojar el pomo triangular superior de la válvula hasta que nos permita levantar la tapa de su alojamiento y girarla.
- Page 12 • Que el manómetro nos indique una presión excesiva (aguja indicando entre amarillo y rojo, o sobre rojo). Para el lavado del filtro deberemos proceder como sigue en modelos AR700 y AR7050: • Desconectar el filtro de la toma de corriente. No mover nunca la válvula selectora con el motor en marcha.
- Page 13 • Conectar la 3ª manguera a la salida de desagüe (waste) de la válvula y dirigir el otro extremo de la manguera a un desgüe o alcantarilla. • Poner en marcha el filtro durante 2 min. aproximandamente (hasta que dejen de salir impurezas con el agua). •...
-
Page 14: Mantenimiento
Una longitud de manguera mayor a la necesaria para llegar a todos los puntos de la piscina dificulta su uso. Recorte el tramo de manguera que le sobre. Vigile que por los terminales de goma no pierda su estanqueidad. Cebado de la manguera del limpiafondos: Introducir despacio en el interior de la piscina el limpiafondos con la pertiga y la manguera conectada, verticalmente, dejando que se llene de agua, manteniendo el resto de la manguera fuera del agua. - Page 15 MODELOS AR700 Y AR7050 PROBLEMA CAUSA SOLUCIÓN Poner treflón en los alojamientos, introducir los El filtro gotea por los terminales de las Mala conexión de los terminales con las terminales de las mangueras hasta el fondo del mangueras mangueras alojamiento y apretar las abrazaderas La válvula no está...
- Page 16 éléments nécessaires au filtrage de l’eau, c’est-à-dire le filtre, la pompe et la vanne de sélection. Les principaux éléments de ce filtre sont: Modelo Fig. Pos. Denominacion AR700 / AR700C Vanne TOP AR700 / AR700C Filtre Ø300 AR700 / AR700C Base injectée Ø300 AR700 / AR700C Tuyau connexion Ø38 x 360...
- Page 17 • Loger le collecteur intérieur correctement dans le fond du filtre (Fig. 6). • Introduire à l’intérieur du filtre 25 kg de sable pour les modèles AR700 e AR7050, Introduire à l’intérieur du filtre 40 kg de sable pour les modèles AR710 e 70 Kg de sable pour le modèle AR715 (Fig. 5 ), le sable étant livré en sacs de 25 •...
- Page 18 (backwash), remise en circulation (recirculation), rinçage (rinse), filtrage (filter), vidange (waste), et fermeture (closed) en modèles AR710 e AR715. Pour faire changer la position de la vanne, procéder comme suit pour les modèles AR700 e AR7050 : Fig 7 • Toujours débrancher la prise de courant.
- Page 19 • Lorsque le manomètre indique un excès de pression (l’aiguille se trouvant entre le jaune et le rouge ou sur le rouge). 5.3.1 Pour le lavage du filtre, procéder comme suit pour modèles AR700 e AR7050 • Débrancher le filtre de la prise de courant. Ne jamais bouger la vanne de sélection quand le moteur est en marche.
- Page 20 • Faire pression avec fermeté sur les commandes supérieures de la vanne jusqu’à ce que cesse la résistance du ressort interne, désencastrer le nerf avant de son logement, jusqu’à ce qu’il nous permette de le faire tourner sur lui- même Fig 7. •...
-
Page 21: Entretien
5.5.1 Amorçage du tuyau du nettoyeur de fond : Introduire délicatement le nettoyeur de fonds avec la perche et le tuyau connecté à l’intérieur de la piscine , verticalement et en le laissant se remplir d’eau, tout en maintenant le reste du tuyau en dehors de l’eau. Introduire ensuite petit à petit le tuyau dans l’eau de 50 cm en 50 cm, les segments introduits devant se remplir complètement d’eau au fur et à... - Page 22 MODÈLES AR700 E AR7050 SOLUTION PROBLÈME CAUSE Mettre du Téflon dans les logements, introduire Le filtre goutte par les bouts des tuyaux Mauvaise connexion des bouts avec les tuyaux les extrémités des tuyaux jusqu’au fond de leur logement et bien serrer les brides Débrancher le filtre et placer la vanne dans la...
- Page 23 Funktionsfähigkeit verfügen Sie über die unterschiedlichen Elemente, die für das Filtern von Wasser erforderlich sind: Filter, Pumpe und Wechselventil in einem einzigen Apparat. Die wichtigsten Teile dieses Filters sind: Modelo Fig. Pos. Denominacion AR700 / AR700C Ventil TOP AR700 / AR700C Filterkörpen Ø300 AR700 / AR700C Eingespritzte basis Ø300 AR700 / AR700C Verbindungs-schlauch Ø38 x 360...
- Page 24 AR715 / AR715C O-Ring Manometers, schlauch Schwimmbecken, skimmer & silikagels NICHT Modell AR700 / AR7050 / AR710 / AR715 1.1 VORRAUSSETZUNGEN FÜR DIE KORREKTE INSTALLATION Die Installation dieser Anlage ist sehr einfach, deshalb kann ein Erwachsener sie in ungefähr 2 STUNDEN fertigstellen.
- Page 25 (backwash), Zirkulieren (recirculation), Spülen (rinse), Filtern (filter), Entleeren (waste), und Schließen (closed) AR710 & AR715. Stellung des Ventils zu verändern, muss wie folgt vorgegangen werden AR700 & AR7050: Fig 7 • Der Stecker muß immer herausgezogen werden. • Der obere dreieckige Knof des Ventils ist zu lockern, bis es möglich ist, den Deckel anzuheben und zu drehen.
- Page 26 • Das Manometer zeigt einen zu hohen Druck an (die Nadel steht zwischen Gelb und Rot oder auf Rot)). 5.3.1 Für die Reinigung des Sikikagels muss wie folgt verfahren werden AR700 & AR7050: • Die Stromzufuhr zum Filter wird unterbrochen. Das Wechselventil darf nie bei laufendem Motor betätigt werden.
- Page 27 • Der 3. Schlauch wird am Wasseraustritt (waste) des Ventils angeschlossen und das andere Schlauchende zum Wasserabfluß oder städtischen Entwässerungsnetz geführt. • Der Filter wird für ungefähr 2 min. angestellt (bis das Wasser ohne Verschmutzungen austritt). • Der Filter wird wieder abgestellt und ruht 2 min. lang, um das Absetzen des Silikagels zu ermöglichen. Dadurch wird vermieden, daß...
-
Page 28: Wartung
VERMEIDEN SIE, DASS SICH DER SCHLAUCH AUF DEM BODEN DES SCHWIMMBECKENLINERS ANSAUGT. DAS KÖNNTE ERNSTHAFT DIE PUMPE BESCHÄDIGEN, WEIL SIE OHNE WASSER LÄUFT, ODER ABER DURCH DIE ANSAUGUNG DEN LINER. 5.5 Reinigung des Swimmingpoolbodens Zur Reinigung des Schwimmbeckenbodens kann die Filterpumpe mit einem der folgenden Zubehörteile verwendet werden: Bodenreiniger “Riñón”, Bodenreiniger “Oval”... - Page 29 Nutzungsjahre des Filters auftreten und die Sie beheben können. Falls Sie Ihr Problem nicht lösen können, nehmen Sie Kontakt mit dem Hersteller Ihres Swimmingpools unter der in seinen Anweisungen angegebenen Telefonnummer und zu den angegebenen Zeiten auf. AR700 & AR7050 LÖSUNG PROBLEME...
- Page 30 I principali componenti di questo filtro sono: Modelo Fig. Pos. Denominacion AR700 / AR700C Valvola TOP AR700 / AR700C Corpo filtro Ø300 AR700 / AR700C Base iniettata Ø300 AR700 / AR700C Manicotto di collegamento de Ø38 x 360...
-
Page 31: Collegamento Elettrico
• Insediare correttamente il collettore interno nel fondo del filtro (Fig. 6). • Introdurre all'interno del filtro 25 kg di sabbia fornita AR700 e AR7050. Introdurre all'interno del filtro 40 kg di sabbia fornita AR710. Introdurre all'interno del filtro 70 kg di sabbia fornita AR715 (Fig. - Page 32 La valvola selezionatrice superiore ha il compito di selezionare le 6 differenti funzioni del filtro: lavaggio (backwash), ricircolo (recirculation), risciacquo (rinse), filtraggio (filter), scarico (waste) e chiusura (closed). AR710 e AR715 Per cambiare la posizione della valvola, bisogna procedere nel seguente modo AR700 e AR7050: Fig.7 • Disinserire sempre la spina.
- Page 33 • Che il manometro ci indichi una pressione eccessiva (ago che indica tra il giallo ed il rosso, o sul rosso). 5.3.1 Per il lavaggio della sabbia, dovremo procedere nel seguente modo AR700, AR7050: • Disinserire il filtro dalla presa di corrente. Non muovere mai la valvola selezionatrice con il motore in marcia.
- Page 34 5.3.2 Per il lavaggio della sabbia, dovremo procedere nel seguente modo AR710, AR715: • Disinserire il filtro dalla presa di corrente. Non muovere mai la valvola selezionatrice con il motore in moto. • Premere con forza il comando superiore della valvola, fino a vincere la resistenza della molla interna, disincastrando la molla anteriore dalla sua sede, fino a quando possa girare su sé...
-
Page 35: Manutenzione
Una lunghezza del tubo flessibile maggiore a quella necessaria per arrivare in tutti i punti della piscina rende difficile il suo uso. Tagli il pezzo di tubo flessibile eccedente. Controlli che nei terminali di gomma non si perda la tenuta stagna. 5.5.1 Innesco del manicotto del puliscifondo: Introdurre lentamente all’interno della piscina il puliscifondo con la pertica ed il tubo flessibile collegato, verticalmente, lasciando che si riempia d’acqua, tenendo il resto del tubo flessibile fuori dall’acqua. - Page 36 Nel caso in cui non possa risolvere il suo problema, si metta in contatto con il fabbricante, al numero di telefono e nell’orario indicati nelle istruzioni. MODELOS AR700 e AR7050 SOLUZIONE PROBLEMA...
- Page 37 Een toestel met een vernieuwend ontwerp en grote functionaliteit waarmee u over de benodigde elementen beschikt om het water te zuiveren. Filter, pomp en wisselklep in één apparaat.De belangrijkste onderdelen van dit filter zijn: Modelo Fig. Pos. Denominacion AR700 / AR700C Ventiel TOP AR700 / AR700C Filterhuis Ø300 AR700 / AR700C Ingespoten basis Ø300 AR700 / AR700C Aansluitslang Ø38 x 360...
-
Page 38: Elektrische Aansluiting
• Plaats het interne verzamelvat op de juiste wijze onder in het filter (Fig.6). • Breng 25 kg van het meegeleverde zand in het filter AR700, AR7050. Breng 40 kg van het meegeleverde zand in het filter AR710. Breng 70 kg van het meegeleverde zand in het filter AR715. - Page 39 De bovenste wisselklep bedient de vier verschillende 6 functies van het filter . zuiveren (filter), reinigen (backwash), legen (waste), sluiten (closed), (recirculate) en (rinse). Om de stand van de klep te wijzigen, dient men als volgt te werk te gaan AR700 en AR7050: Fig.7 Neem altijd eerst de stekker los.
- Page 40 • Wanneer de manometer een te hoge druk aangeeft (de wijzer staat tussen het gele en rode gebied of in het rode gebied). 5.3.1 Om het filter automatisch te reinigen gaat men als volgt te werk AR700 en AR7050: • Sluit het filter van de stroomtoevoer af. Beweeg de wisselklep in geen geval met draaiende motor.
- Page 41 hZet het filter ongeveer 2 minuten aan (totdat er geen vuile deeltjes meer met het water meestromen). hZet het filter uit en laat het 2 minuten stilstaan, zodat het silex neerslaat en het niet in het zwembad stroomt. hPlaats de klep weer in de gewenste stand (zuiveren of dicht) en verwijder de slang van de waterafvoer. Fig.7 5.3.2 Om het filter automatisch te reinigen gaat men als volgt te werk AR710 en AR715: •...
- Page 42 Bodemreiniger “Riñón”, bodemreiniger “Oval” (ook heeft men een slang van Ø38 mm en de stok) nodig. Raadpleeg hierover de winkel of de afdeling Aftersales van de fabrikant bij wie u het zwembad gekocht heeft. Gebruik altijd originele onderdelen. Een slang die langer is dan nodig om het hele zwembad te beslaan, is moeilijker in gebruik. Snijd daarom de slang op de juiste lengte af.
- Page 43 Indien u het probleem niet kunt oplossen, neem dan telefonisch contact op met de fabrikant van het zwembad wiens nummer en kantooruren in de handleiding vermeld staan. MODELS AR700 EN AR7050 OPLOSSING PROBLEEM...
- Page 44 água: filtro, bomba e válvula selectora num só aparelho. Os principais componentes deste filtro são: Modelo Fig. Pos. Denominacion AR700 / AR700C Valvula de 4 vias colector excentrico AR700 / AR700C Filtro Ø300 AR700 / AR700C Base monobloc Ø300 AR700 / AR700C Mangueira de ligaçao de Ø38 x 360...
-
Page 45: Ligação Eléctrica
• Assente correctamente o colector interior no fundo do filtro (Fig. 6). • Introduza no interior do filtro somente 25 Kg de areia AR700 e AR7050. Introduza no interior do filtro somente 40 Kg de areia AR710. Introduza no interior do filtro somente 70 Kg de areia AR715. - Page 46 (backwash), recirculação (recirculation), enxaguamento (rinse), filtração (filter), esvaziamento (waste), e fechamento (closed). AR710 e AR715 Para modificar a posição da válvula, proceda do seguinte modo en modelos AR700 e AR7050: Fig.7 • Desligue sempre a ficha da tomada. • Afrouxe o manete triangular superior da válvula girando-o até que a tampa se levante do seu alojamento para poder girá-la.
- Page 47 • Indicação de uma pressão excessiva no manómetro (agulha situada entre os sinais amarelo e vermelho, ou sobre o sinal vermelho). 5.3.1 Para a lavagem da areia, deveremos proceder da seguinte forma AR700 e AR7050: • Desligue o filtro da tomada. Não mova nunca a válvula selectora com o motor em funcionamento.
- Page 48 • Pare o filtro e deixe-o descansar durante 2 min. para permitir o assentamento do sílex e evitar que seja expelido à piscina. • Coloque a válvula novamente na posição desejada (filtragem ou fechamento) e retire a mangueira da saída de esvaziamento.
- Page 49 Limpador de fundos “Riñón”, Limpador de fundos “Oval” (também precisará utilizar a mangueira de Ø38 mm e a vara). Consulte o seu estabelecimento ou o Serviço de Pós-venda do fabricante da piscina para a sua aquisição. Utilize sempre reposições originais. Um mangueira com um comprimento superior ao necessário para chegar a todos os pontos da piscina dificulta a operação.
- Page 50 MODELOS AR700 E AR7050 SOLUÇÃO PROBLEMA CAUSA Ponha teflon nos alojamentos, introduza os Ligação incorrecta dos terminais com as O filtro goteja pelos terminais das mangueiras terminais das mangueiras até ao fundo do mangueiras alojamento e aperte as braçadeiras A válvula não está na posição de filtração Desligue o filtro e situe a válvula na posição...
- Page 51 3,5 m. Fig.2 Fig.1 Fig.1 Pos.1 Pos.2 Pos.3 Fig.3 AR700 AR710 AR7050 AR715 Fig.4...
- Page 52 AR700X AR705X AR7050 AR710X AR715 Fig.5 AR700 AR715 AR7050 AR710 Fig.6 AR7050 AR710 AR700 AR715 Fig.7...
- Page 53 AR700 AR7050 AR715 AR710 Fig.8 PUMP Fig.9 Fig.10 Fig.11...
- Page 54 PUMP AR7050 AR710 FIG.12 Fig.12 AR7050 AR710 Fig.13...
- Page 55 Fig.14...
- Page 56 AR715 MONOBLOC CON BOMBA SENNA OMSCHRIJVIN Referencia DENOMINATION DENOMINACIÓN DESIGNATION BESCHREIBUNG DENOMINAZIONE DESCRIÇAO 200473000 Pressurer gauge set Cjto. Manometro Ensemble manomètre Bouchon de purge + Sand purgue + sand Tapón purga + junta Entlüftungsdeckel + Tappo di spurgo + O- Reinigingsplug + Tapäo purga + Junta 157800602G...
- Page 57 AR710 REFERENCIA DENOMINATION DENOMINACIÓN DESIGNATION BESCHREIBUNG DENOMINAZIONE OMSCHRIJVING DESCRIÇAO 200473000 Pressure gauge set Conjunto manometro Ensemble manomètre Bouchon de purge + Sand purgue + sand Tapón purga ¾” + Entlüftungsdeckel + Tappo di spurgo + Reinigingsplug + Tapäo purga + Junta 157800602G Joint du couvecercle pugue seal...
- Page 58 AR7050 OMSCHRIJVIN REFERENCIA DENOMINATION DENOMINACIÓN DESIGNATION BESCHREIBUNG DENOMINAZIONE DESCRIÇAO 09090R2000 Pressure gauge set Conjunto manometro Ensemble manomètre Bouchon de purge + Sand purgue + sand Tapón purga 3/8” + Entlüftungsdeckel + Tappo di spurgo + O- Reinigingsplug + Tapäo purga + Junta 09090RG10 Joint du couvecercle pugue seal...
- Page 59 AR700 REFERENCIA DENOMINATION DENOMINACIÓN DESIGNATION BESCHREIBUNG DENOMINAZIONE OMSCHRIJVING DESCRIÇAO 09090R2000 Pressure gauge set Conjunto manometro Ensemble manomètre Bouchon de purge + Sand purgue + sand Tapón purga 3/8” + Entlüftungsdeckel + Tappo di spurgo + Reinigingsplug + Tapäo purga + Junta...
- Page 60 GUARANTEE CERTIFICATE 1 GENERAL TERMS 1.1 In accordance with these provisions, the seller guarantees that the product corresponding to this guarantee (“the Product”) is in perfect condition at the time of delivery. 1.2 The Guarantee Term for the Product is two (2) years from the time it is delivered to the purchaser. 1.3 In the event of any defect in the Product that is notified by the purchaser to the seller during the Guarantee Term, the seller will be obliged to repair or replace the Product, at his own cost and wherever he deems suitable, unless this is impossible or unreasonable.
- Page 61 GARANTIEZERTIFIKAT 1 ALLGEMEINE GESICHTSPUNKTE 1.1 In Übereinstimmung mit diesen Verfügungen garantiert der Verkäufer, dass das Produkt dieser Garantie (“das Produkt”) entspricht und dass es im Moment der Übergabe in allen Punkten mit den Anforderungen übereinstimmt. 1.2 Der Garantiezeitraum für das Produkt beträgt zwei (2) Jahre und wird ab dem Augenblick der Lieferung an den Käufer gerechnet. 1.3 Falls ein Mangel am Produkt auftritt und der Käufer den Verkäufer innerhalb des Garantiezeitraums darüber unterrichtet, muss der Verkäufer das Produkt auf eigene Kosten dort reparieren oder ersetzen, wo es für ihn am günstigsten ist, es sei denn, dies ist unmöglich oder unverhältnismäßig.
- Page 62 GARANTIECERTIFIKAAT 1 ALGEMENE ASPEKTEN 1.2 In overeenkomst met de voorliggende bepalingen wordt door de verkoper gegarandeerd dat het produkt verkocht onder deze garantie (“het Produkt”) geen enkel defekt vertoont op het moment van levering. 1.3 De Garantieperiode voor het Produkt bedraagt twee (2) jaar en is geldig vanaf het moment dat het Produkt aan de koper geleverd wordt. 1.4 Indien er zich een defekt aan het Produkt zou voordoen en de koper dit zou mededelen aan de verkoper gedurende de geldige Garantieperiode, dan zal de verkoper het Produkt repareren of laten repareren op zijn eigen kosten alwaar de verkoper dit geschikt zou achten, behalve in het geval dat dit onmogelijk of buitensporig zou zijn.
- Page 63 Con objeto de reducir la cantidad de residuos de aparatos eléctricos y electrónicos, la peligrosidad de los componentes, fomentar la reutilización de los aparatos, la valorización de sus residuos y determinar una gestión adecuada tratando de mejorar la eficacia de la protección ambiental, se establecen una serie de normas aplicables a la fabricación del producto y otras relativas a la correcta gestión ambiental cuando se conviertan en residuo.
- Page 64 Allo scopo di ridurre la quantità di residui di apparati elettrici ed elettronici, la pericolosità dei componenti, promuovere il riutilizzo degli apparecchi, la valutazione dei loro residui e determinare una gestione adeguata cercando di migliorare l’efficacia della protezione ambientale, si stabiliscono una serie di norme applicabili alla fabbricazione del prodotto ed altre relative alla corretta gestione ambientale quando si trasformino in residui.
- Page 65 METALAST, S. A. U. C/ Andorra Parcela, 49 11 A Poligon Plà de Llerona (08520) Les Franquesses del Valles MONOBLOC - FILTER PRODUCTOS: PRODUKTEN: PRODUKTER: GB PRODUCTS: ∅300 / ∅380 / ∅430 PRODUKTE: PRODUKTER: PRODUKTER: PRODUITS: CON VÁLVULA 1-1/4'' PRODOTTI: TOUTTEET: CON VÁLVULA 1-1/2'' ΠΡΙΟΝΤΑ:...
- Page 66 • TECHNISCHE ANGABEN • DATI TECNICI • TECHNISCHE GEGEVENS • CARACTERISTICAS TECNICAS AR700 AR700C AR7050 AR7050C AR710 AR710C AR715 AR715C ∅ Filter / ∅ Filtre / ∅ Filtro / ∅ Filtro / ∅ Sandfilter / ∅ Sandfilter / ∅ Filtro 300mm...
Need help?
Do you have a question about the AR700 and is the answer not in the manual?
Questions and answers