
Summary of Contents for CasaCam BC200
- Page 1 5 Inch Wireless Touch Monitor with P/T HD Camera BC200 Wilreless P/T HD Camera BM200M 5 Inch Wirelss Touch Monitor 1 ...
- Page 2 WARNING STRANGULATION HAZARD ‐ Keep cord out of child's reach. NEVER place camera or cords within 3 feet of crib or playpen. Never use extension cords with AC Adapters. Only use the AC Adapters provided. • Some adult assembly or installation required. • This product contains small parts that may cause choking. Keep small parts away from children. • This product is NOT intended to replace proper supervision of children. You MUST check your child’s activity regularly, as this product will not alert parents to silent activities of a child. • Before using this product, read and follow all instructions contained in this booklet, and read and follow all instructions and warnings on the product. • NEVER use the transmitter or monitor near water, including near a bathtub, sink, laundry tub, wet basement, etc. • This product is intended for indoor use only. • This product is not intended for use as a medical monitor and its use should not replace adult supervision. • The transmitter detects normal sound levels within a range of 2 to 3 meters (6 to 10 feet) from a child. If the child moves outside of this range, if may not be able to detect sounds from him or her. • It is essential that you check the operating range and condition of the transmitter monitor on initial installation and on a regular basis after that. • Check reception regularly. Test monitor before use and after changing camera location. • Do not take apart the product by yourself. • To prevent overheating, keep the product and AC power adapters away from any direct sunlight and heat sources such as radiators, heat registers, cooking devices (e.g., stoves and ovens) and other appliances that produce heat (e.g., amplifiers, televisions and stereos). • Ensure that the product is well ventilated during use. Avoid contact with pillows and furniture that may block ventilation. • Use only the AC adapters provided with the product, as other adapters may damage the product. Plug the adapters only into standard household current (100~240 volts AC). Place the AC adapters ...
- Page 3 Monitor. CAUTION Risk of explosion if battery is replaced by an incorrect type. Dispose of used batteries according to the instructions. Features: 5’’ portable LCD monitor 2.4 GHz digital wireless technology System expandable up to 4 cameras, signal display or quad display Multiple language selection HD(720P) camera with night vision and sound trigger Lullaby and temperature display 2 way audio‐monitor can talk back to camera Night light Digital zoom, pan & tilt Rechargeable Lithium battery for portable use Extended battery life with Power Save mode Secure, long‐range digital wireless signal up to 900 ft Camera with mounting bracket for wall / ceiling mounting What's Included 3 ...
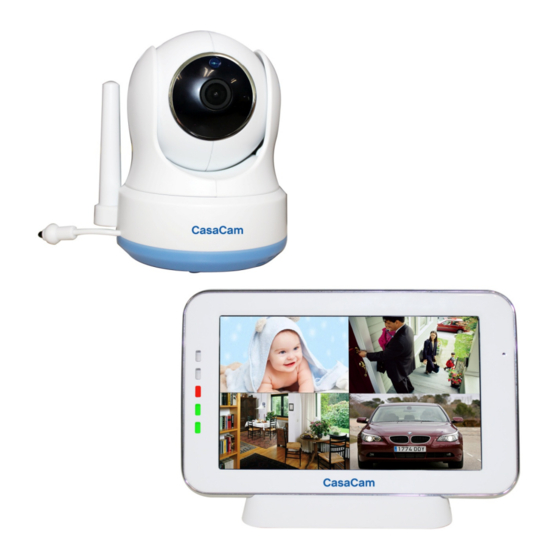
- Page 4 Product Overview Wireless Camera Wireless Monitor 4 ...
- Page 5 Getting Started Installing the Monitor & Camera 1. Fully charge the monitor via power adapter or charging cradle before use. Camera must be plugged in at all times. 2. Place the camera in the preferred position. You can place it on the table/cabinet, or mount it on a wall via mounting frame. 3. Press the power button for about 4‐5 second to turn on the monitor. 4. Press and hold the on/off button to switch the camera on. Pairing the Monitor & Camera The units already come paired for your convenience. If you have additional camera, pair your camera as follow: 1. Power on wireless monitor and wireless camera. 2. Touch the live view screen on the monitor to make the settings icon appear. 3. Press the [ ] button on the monitor. 4. Press [ ] icon and select camera number. (The monitor will search for the camera when set to pairing mode. A countdown clock will appear at the middle of the screen and will start counting from 30 to 0). 5. Press the [PAIR] button found on the bottom of the camera. 6. If the monitor successfully pairs with the camera within the 30 seconds, it will automatically switch to the camera's current view. Indicator Description Live View 5 ...
- Page 6 1. Signal indicator: Shows the strength of the signal being received from the camera. If an 'x' shows up on the signal bar, then the system is "out of range". 2. Digital Clock: Displays the time that is set on the monitor. 3. Camera number: Indicates which camera is being displayed on the current screen 4. Zoom mode: Indicates Zoom mode. x1/x1.5/x2 5. Monitor Speaker Mute: Indicates the monitor's speaker is muted 6. Battery Power Level: Shows the status of the battery • Battery Status A battery charge state indicator within the LCD will show the level of charge indicating five states, including alert (flashing red battery outline), 1/4, 1/2, 3/4 and full. Flashing Red Battery Frame ¼ Battery fill Red ½ Battery fill White ¾ Battery fill White Full Battery fill White (the power supply is not connected) Full Battery fill White and lightning bolt icon alternately (the power supply is connected) When the power supply is connected the lightning bolt icon displayed over the centre. 7. Temperature Display: Shows the temperature of the room. 8.
- Page 7 11. Talk Back: Press this button while talking. Note: “Talk Back” button only appear on single camera Live View mode Press and hold Talk Back button, can activate talk back function If camera unit was playing lullaby, it then it will be paused. The camera speaker loudness setting is same as lullaby play level. (select Menu >Sound >Camera Volume) If release Talk Back button, then go back to Live View mode. If Camera previously lullaby has been turned on, then it will resume play lullaby again. Operation Key By tapping any position on the screen then “Operation” keys come out If user tapes screen without touching any function key (or time is out after 10 seconds), then it will back to Live View mode. 1. Menu Setting: Menu setting includes monitor and camera settings 2. Monitor Volume: adjust the monitor volume 3. Zoom In / Out: You can have a closer look via this button 4. Lullaby: Press the Lullaby icon to turn lullabies ON/OFF. Plays 4 pre‐programmed songs 5. Navigation Controls: Use this icon to remotely Pan/Tilt the camera ...
- Page 8 Menu Page 1. Pair / Unpair Camera: You can connect up to 4 cameras to your system. 2. VOX: Set the VOX sensitivity to detect low or high sound levels. 3. Date & Time & Timer: Set up the system date & time & feed timer. 4. Language: Setting language for the monitor. 5. Brightness: You can adjust the brightness of each individual camera. 6. Temperature: You can set Celsius or Fahrenheit. 7. Camera & Alarm Volume: You can adjust the camera and alarm volume: 5 being the loudest and 0 being mute. 8. Default: Reset the monitor back to its factory settings. 9. Back: Save the settings and return to previous page. 10. Home: ...
- Page 9 Specification Kit Operating Frequency Range 2.4GHz TX Power 17dBm RX Sensitivity ‐88dBm Type of Spread Spectrum FHSS Used Type of Modulation Used GFSK Data Rate 4Mbps Communication Range 300M The transmission range of the wireless signal may weaken according to your environment. Camera Image sensor type 1/4" Color CMOS Image sensor Effective Pixel 1280 (H) x 1024 (V) Power requirement 5V DC 1.5A Image Resolution 10fps@1280*720 Lens 3.95mm F2.2 Viewing Angle (Diagonal) 55° (FOV) IR LED / Night Vision Range 5m 940nm Operation temperature ‐10~40°C Monitor LCD Panel size ...
-
Page 10: Fcc Statement
FCC Statement This equipment has been tested and found to comply with the limits for a Class B digital device, pursuant to part 15 of the FCC rules. These limits are designed to provide reasonable protection against harmful interference in a residential installation. - Page 11 such as a device case and a device holster are not composed of metal components. Keep your device 0 mm away from your body to meet the requirement earlier mentioned. This device was tested for typical body-worn operations. To comply with RF exposure requirements, a minimum separation distance of 0 mm must be maintained between the user’s body and the handset, including the antenna.
Need help?
Do you have a question about the BC200 and is the answer not in the manual?
Questions and answers