Table of Contents
Advertisement
Advertisement
Table of Contents

Summary of Contents for Manikin Electronic Schrittmacher
-
Page 1: User Manual
User Manual OS V1.0d... -
Page 3: Preface
Kathja and Niels, … as well as everybody else we may have forgotten to mention here. Note Manikin Electronic will not assume any responsibility for errors which may occur in this manual. The contents of these instructions is subject to change without prior notice. When this manual was created good care was taken to exclude any mistakes and contradictions. -
Page 4: Table Of Contents
Table of contents Preface..........................1 The Schrittmacher’s development team..................1 Our special thanks to......................1 Table of contents......................2 Operating elements & connections................4 Front panel..........................4 Back panel..........................5 Introduction........................6 About this manual........................6 Symbols used........................6 Marking of parameters......................6 General safety notes....................... 7 Suitable location......................... - Page 5 Init Preset..........................23 Dump Preset......................... 23 Other Functions......................24 Preload Preset........................24 Sync............................24 Loop............................24 Step mode..........................24 Global........................... 25 Updating the operating software...................26 Annex..........................29 Time and clock table......................29 Technical data........................30 MIDI implementation chart....................32 Glossary..........................33 Schrittmacher - Manual...
-
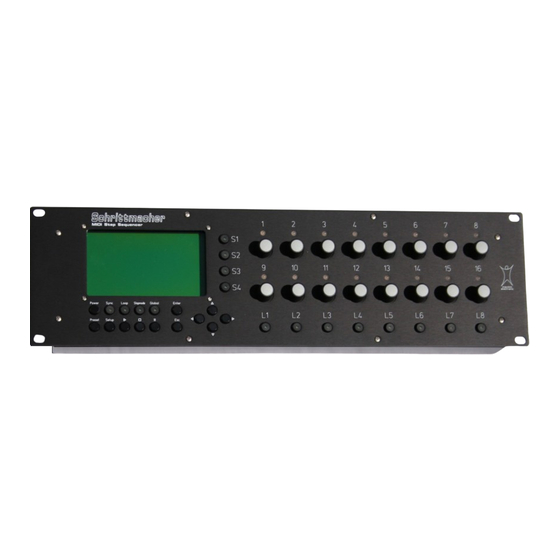
Page 6: Operating Elements & Connections
4. Cursor buttons 5. Line buttons to select the active line 6. Power button 7. Sync, Loop and Step mode button 8. Global button 9. Enter and Escape 10. Preset and Setup menus 11. Start, Stop and Pause Schrittmacher - Manual... -
Page 7: Back Panel
1. Voltage supply socket for the connection of the supplied power supply 2. LCD contrast 3. MIDI IN socket to receive MIDI data 4. MIDI OUT socket A to transmit MIDI data 5. MIDI OUT socket B to transmit MIDI data Schrittmacher - Manual... -
Page 8: Introduction
About this manual This manual is intended to make the first steps for using the Schrittmacher easier for you. Moreover it also provides support and tips to the experienced user for his daily work. For simplicity’s sake all technical terms in these instructions are identical with the Schrittmacher’s parameter designations. -
Page 9: General Safety Notes
They will damage the surfaces. Proper use This device is exclusively intended for creating and processing control signals according to the MIDI standard. Any other use is not permitted and will exclude any warranty claims towards Manikin Electronic. Schrittmacher - Manual... -
Page 10: Setup
2. Connect the supplied mains cable to the mains connector into a suitable mains outlet. 3. Connect the MIDI outputs of the Schrittmacher to the MIDI inputs of the sound generator. 4. Connect the MIDI input (MIDI IN) of the Schrittmacher to the MIDI output of a master keyboard (not required). -
Page 11: Basic Operation
Using the Stop button you will stop playing and reset the preset to the initial position. Input using the endless dials The endless dials used in the Schrittmacher do not have an end stop position – as opposed to potentiometers. They also have a pushbutton. Depending on the assigned function, parameters can... -
Page 12: Working With The Schrittmacher
16 steps as well as the line parameters. Selecting a line The Schrittmacher has 4 separated sequence ranges between which you can change using the Sequence buttons. In each range there are 8 lines between which can be changed using the Line buttons. -
Page 13: Editing The Line Parameters
(forward and with constant gate). The Note line gets the velocity from the Vel line asynchronously. C-1 (100) C-2 (50) C-3 (100) C-1 (50) C-2 (100) C-3 (50) The created sequence of notes is repeated after 6 steps. Schrittmacher - Manual... - Page 14 The Note line gets the velocity from the Vel line synchronously. C-1 (100) C-2 (50) C-3 (25) The sequence of notes created is repeated after 3 steps. Do experiment with the various possible links of the Schrittmacher and the available controlling means your sound generator.
-
Page 15: Line Parameters
Line Parameters A substantial characteristic of the Schrittmacher is that each of the 32 lines available can be freely configured. This allows the Schrittmacher to be adapted to different ways of working and ensures work in many types of music. -
Page 16: Mode
Sync Sync Midi Mode First Last Gate Mode Base Sync Sync Mode First Last Gate Mode Base Sync Sync Ctrl Mode First Last Gate Midi Mode Base Sync Sync Mode Mode First Last Gate Mode Base Mode Schrittmacher - Manual... -
Page 17: First, Last
Setting Len is limited by the Gate line parameter, i.e. a note is only held until a new note is struck. The Len line parameter can be linked with and controlled by a Len line, Key or Ctrl1-8. Schrittmacher - Manual... -
Page 18: Midi
The ID line parameter cannot be linked with and controlled by any other lines. If you edit the ID line parameter while playing the preset, it is possible that some settings of the connected sound generator are changed unintentionally. Therefore always edit ID in the stopped state. Schrittmacher - Manual... -
Page 19: Editing Aids
Using Rotate you shift all steps of a line to any position to the left or right. Since the step modes (play, mute/hold, skip) are not shifted, this function is also useful for live operation. And again: Try it out. Each experiment will reap a reward! Schrittmacher - Manual... -
Page 20: Setup Menu
Setup Menu If the Schrittmacher is in the stop or pause mode, you get into the setup menu by pressing the Setup button. Mark the requested menu item by means of the cursor buttons ▲ and ▼ or the endless dial 9. - Page 21 Off, On If a keyboard is to be used to control the Schrittmacher this use can be “activated” in the setup. The keyboard range to be used is defined by the settings Low, Center and High. If Key is set to OFF these settings are of no significance.
-
Page 22: Information
Besides entitling a controller by its number, a value range can be defined for each of the controllers. The Low parameter indicates the output value with “left touch“, the High parameter the output value with “right touch”. Information This menu item informs you about the currently installed software version. Schrittmacher - Manual... -
Page 23: Preset Menu
Preset Menu The menu is called by pressing the Preset button when the Schrittmacher is in the Stop or Pause status. Mark the requested menu item by means of the cursor buttons ▲ and ▼ or the endless dial 9. -
Page 24: Save Preset
In rare cases it is possible that the preset memory has to be reorganized during the saving process. However, this usually happens automatically and takes only a short time. During reorganization the Schrittmacher must never be switched off since otherwise all saved presets will in all probability get lost. -
Page 25: Init Preset
You can record the preset by means of a MIDI program that can receive and save SysEx messages. If you want to transmit the preset back to the Schrittmacher only the recorded SysEx message has to be played. Ensure that there is an operational MIDI connection between the Schrittmacher and the computer. -
Page 26: Other Functions
Other Functions Preload Preset The Schrittmacher allows loading of another preset while playing a sequence and starting it synchronously at the global Sync clock. This enables direct transition between two presets. To do so press the Preset button while a preset is being played. Selection of the preset to be loaded is effected in the same way as for the ”Load Preset“... -
Page 27: Global
The modes of the 8 controllers of the Schrittmacher are shown in the upper half of the display as dials. They can be changed by means of the endless dials 1-8. Below the dials you can see the value generated for the respective controller. -
Page 28: Updating The Operating Software
The Schrittmacher provides a maintenance-friendly function to update the internal operating software without having to replace parts. A software update is available as a standard MIDI file which can be installed in the Schrittmacher using a sequencer software. You can download this file from our website: http://www.manikin-electronic.com/schrittmacher... - Page 29 After successful update the Schrittmacher will start up automatically using the updated operating software. If the file transfer is aborted or if an error occurs, an error message is displayed. Press the Esc button and try again. It may be necessary to reduce the speed of your sequencer program.
- Page 30 Productsupport If you have any question about your Manikin Electronic-Product, please contact us. You have the coice between four possibilities: 1 Sent us a Email. support@manikin-electronic.com 2 Sent us a Telefax. +49 (0) 30 – 63 49 49 51 3 Sent us a letter.
-
Page 31: Annex
Annex Time and clock table The Schrittmacher works on an internal time resolution of 96 ppq (pulses per quarter note). The table below shows all values that can be set for the time-dependent parameters: Gate, Len and Sync Base. 1/32T... -
Page 32: Technical Data
AC 110V-230V / 50Hz-60Hz (auto-switching supply) Maximum current consumption 0.8A Maximum power consumption 7.2W MIDI Connections MIDI IN, 2x MIDI OUT Dimensions and weight Dimensions (width/height/depth) : 482mm x 132mm (3U) x 85mm 19“ x 5,2” x 3,3” Overall weight 2.5 kg Schrittmacher - Manual... - Page 33 Manual, meets FCC requirements. Modifications not expressly approved by Manikin Electronic may void your authority, granted by the FCC, to use this product. 2. IMPORTANT: When connecting this product to accessories and/or another product use only high quality shielded cables.
-
Page 34: Midi Implementation Chart
: Local ON/OFF : All Notes OFF Massages : Active Sense : Reset Notes Mode 1: OMNI ON, POLY Mode 2: OMNI ON, MONO o: yes Mode 3: OMNI OFF, POLY Mode 4: OMNI OFF, MONO x: no Schrittmacher - Manual... -
Page 35: Glossary
16. Beyond this range a device can be switched to Omni. Then it will receive on all 16 channels. MIDI Clock The time interval of the MIDI Clock message defines the tempo of a musical piece. It is used for synchronizing time-dependent processes. Schrittmacher - Manual... - Page 36 A trigger is a triggering signal for events. The nature of the trigger signal can vary considerably. A MIDI note or an audio signal can act as a trigger, for example. The event triggered can also vary considerably. A frequently used application is triggering an envelope. Schrittmacher - Manual...
Need help?
Do you have a question about the Schrittmacher and is the answer not in the manual?
Questions and answers