Advertisement
Quick Links
Advertisement

Subscribe to Our Youtube Channel
Summary of Contents for EXAGATE SYSGuard 3001
- Page 1 SYSGuard 3001 Quick Installation Guide...
-
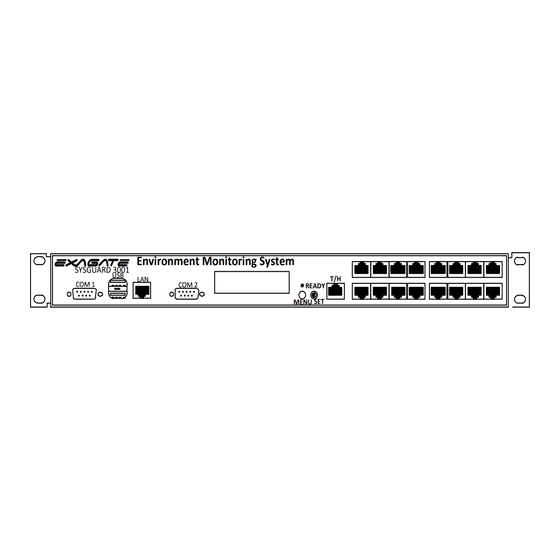
Page 2: Before Installation
12 V DC Adapter safely. Step 1 Plug-in 12 V DC Adapter to SYSGuard 3001 Main Unit. Wait for the buzzer sound. After the buzzer is heard SYSGuard 3001 Main Unit is ready to run. Step 2 Main unit is equipped with default IP address (192.168.1.141). - Page 3 When this process is complete clicking the “Update” button will activate the sensors. There is special configuration for internal sensors and modules assignment in the SYSGUARD 3001 system. Just activating the SYSGUARD 3001 Main Unit is enough SYSGuard 3001 Layout...
- Page 4 Operational Properties Power Supply Voltage 10,5 - 14,4 VDC typical 12 VDC Power Consumption 0,22 - 0,36 A typical 0,24 A 2,64 - 4,62 W typical 2,88 W Operational Temprature Range -10 +70 Operational Humidity Range 0 - 85 % Rh Storage Temprature Range -40 +85 Storage Humidity Range...
- Page 5 Dimensions Environment Monitoring System SYSGUARD 3001 1.73 in 44.14 mm 2.62 in 66.6 mm 16.92 in 430 mm 18.89 in 480 mm 3.97 in 101 mm 0.38 in 9.90 mm 0.24 in 6.30 mm + - + - + - + - + - + - + - + -...
-
Page 6: Air Conditioner
ANALOG/W-DETECT INPUTS RELAY OUTPUTS DRY CONTACT INPUTS RELAY OUT 1 RELAY OUT 2 RELAY OUT 3 RELAY OUT 4 POWER OUTPUTS CONTACTOR (IF NECESSARY) AIR CONDITIONER... -
Page 7: Installation Notes
Installation Notes: ………………………………………………………………………………………………………………………………………………..…………………………………………………………………………………………………………………………………………………. …………………………………………………………………………………………………………………………………………………. …………………………………………………………………………………………………………………………………………………. …………………………………………………………………………………………………………………………………………………. …………………………………………………………………………………………………………………………………………………. …………………………………………………………………………………………………………………………………………………. …………………………………………………………………………………………………………………………………………………. …………………………………………………………………………………………………………………………………………………. …………………………………………………………………………………………………………………………………………………. …………………………………………………………………………………………………………………………………………………. …………………………………………………………………………………………………………………………………………………. …………………………………………………………………………………………………………………………………………………. …………………………………………………………………………………………………………………………………………………. …………………………………………………………………………………………………………………………………………………. …………………………………………………………………………………………………………………………………………………. …………………………………………………………………………………………………………………………………………………. …………………………………………………………………………………………………………………………………………………. …………………………………………………………………………………………………………………………………………………. …………………………………………………………………………………………………………………………………………………. …………………………………………………………………………………………………………………………………………………. …………………………………………………………………………………………………………………………………………………. …………………………………………………………………………………………………………………………………………………. …………………………………………………………………………………………………………………………………………………. …………………………………………………………………………………………………………………………………………………. …………………………………………………………………………………………………………………………………………………. - Page 8 (Warranty duration may change depending on your country) Your sales or delivery receipt, showing the date of purchase of product is your proof of purchase. ExaGate is obliged to repair or replace the defective hardware (or any part of it’s) with no charge to owner.
Need help?
Do you have a question about the SYSGuard 3001 and is the answer not in the manual?
Questions and answers