Table of Contents
Advertisement
2
SeaTalk
Keyboard
Owner's Handbook
Introduction
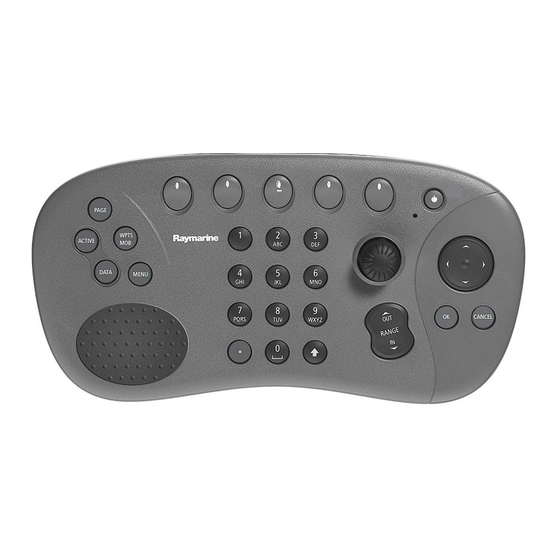
This handbook explains how to install, connect, operate and maintain your SeaTalk
Keyboard (E55061). This keyboard is also supplied with the Remote Station Kit (T82005) -
details of how to integrate these devices is given on Page 6.
Intended use
This keyboard is intended for use with Raymarine's E-Series display aboard leisure marine
boats and workboats not covered by IMO/SOLAS carriage requirements. It can be integrated
into an existing SeaTalk
Contents
Subject
Introduction
The controls
What's in the box?
Safety notices
Planning the installation
Integrating the Remote Station Kit
Installation
Accessories and spares
Removing/refitting
Maintenance
Important information
Technical support and contact details
PAGE
WPTS
ACTIVE
MOB
DATA
MENU
.
2
system, if required.
OK
1
www.raymarine.com
CANCEL
2
Page
1
2
3
3
4
6
7
9
10
10
11
12
Advertisement
Table of Contents

Summary of Contents for Raymarine E55061
- Page 1 DATA This handbook explains how to install, connect, operate and maintain your SeaTalk Keyboard (E55061). This keyboard is also supplied with the Remote Station Kit (T82005) - details of how to integrate these devices is given on Page 6. Intended use This keyboard is intended for use with Raymarine's E-Series display aboard leisure marine boats and workboats not covered by IMO/SOLAS carriage requirements.
-
Page 2: The Controls
The controls WPTS To manage waypoints and initiate MOB. PAGE To change page and configure page sets. PAGE WPTS ACTIVE DATA MENU ACTIVE MENU To select the To access set up active window. menus and help information. DATA To access the ruler, chart vectors, archive and transfer, data bar on/off functions etc. -
Page 3: Safety Notices
CANCEL This handbook explains how to install, connect, operate and maintain your SeaTalk Keyboard (E55061). This keyboard is also supplied with the Remote Station Kit (T82005) - details of how to integrate these devices is given on Page 6. Intended use... -
Page 4: Planning The Installation
Planning the installation Where can the SeaTalk The Seatalk keyboard can be flush or trunnion mounted either indoors or outdoors. It is waterproof to CFR-46 standard. Important: The drain tube is not required if the keyboard is mounted indoors or in an area protected from rain and/or sea spray. - Page 5 Configuration 2 Cable length between E-Series Display and keyboard exceeds 4.5m and Not linking into an existing SeaTalk Supplied in the box SeaTalk Keyboard SeaTalk extension cable (see 'Accessories') Terminator Additional junction box Configuration 3 Integrating the keyboard into an existing SeaTalk Supplied in the box SeaTalk Keyboard...
-
Page 6: Integrating The Remote Station Kit
Integrating the Remote Station Kit Station 1 Other SeaTalk devices connected Alarm supply Other SeaTalk devices Station 2 Refer to 'Planning the Installation', diagrams on pages 4 and 5. Junction box Remote Station Kit Not supplied/accessory/existing system No other SeaTalk devices connected Alarm Drain... -
Page 7: Installation
Installation Note: Before installing the keyboard, please read 'Planning the installation' on Pages 4 & 5. What tools do I need to install the keyboard? Drill 10 mm ( drill bit How do I install the keyboard? Using self-adhesive or masking tape, fix the template in the required position. - Page 8 Installation - continued Peel the backing from the gasket and stick it to the underside of the cradle. Finger tighten the studs into position. If mounting the keyboard in an area unprotected from rain and/or sea spray, fit the drain tube and ensure that it runs to a suitable exit point below the level of the keyboard and the studs.
-
Page 9: Accessories And Spares
Accessories and spares What accessories are available? ... Description SeaTalk power/RF ground cable (1.5m) Auxiliary alarm M1500 monitor kit (includes 5m VGA Out cable) Terminator Junction box SeaTalk extension cables: 1 metre 3 metres 5 metres 10 metres 20 metres E-Series SeaTalk cable (1.5m) VGA Out cables (waterproof):... -
Page 10: Maintenance
Removing/refitting How do I remove the keyboard? ... Switch off the power. Slide and hold the latch. How do I refit the keyboard? ... Position the top edge of the keyboard under the lip of the cradle. Maintenance What routine checks and servicing can I do? ... On a regular basis, examine all cables for signs of damage, such as chafing, cuts or nicks and check that all cables are securely connected. -
Page 11: Emc Conformance
The Waste Electrical and Electronic Equipment (WEEE) Directive requires the recycling of waste electrical and electronic equipment. Whilst the WEEE Directive does not apply to some of Raymarine's products we support its policy and ask you to be aware of how to dispose of this product. -
Page 12: Technical Support & Contact Information
Technical support & contact information www.raymarine.com Visit the Customer Support area of our website for Frequently Asked Questions, servicing information, e-mail access to the Raymarine Technical Support Department and details of Raymarine agents, worldwide. United States For accessories and parts contact: Your authorized Raymarine dealer. - Page 13 cable SeaTalk cable cable SeaTalk cable D8056-1 cable SeaTalk cable SeaTalk SeaTalk D8056-1 cable SeaTalk cable SeaTalk SeaTalk...


Need help?
Do you have a question about the E55061 and is the answer not in the manual?
Questions and answers