Table of Contents
Advertisement
Quick Links
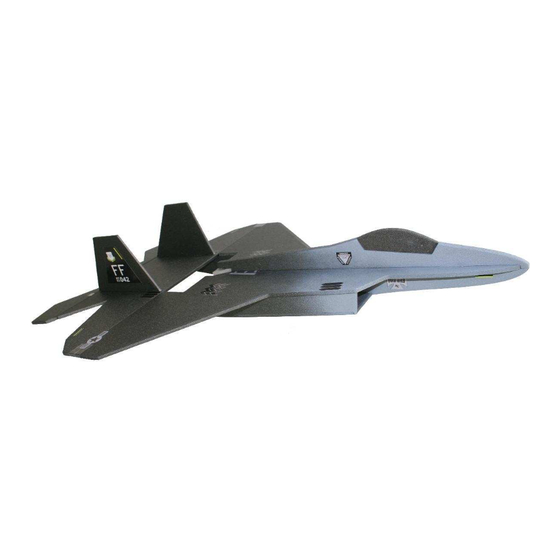
YB-22 Park Jet
INSTRUCTION MANUAL
The contents of this kit are guaranteed to be free of defects at time and date of purchase. The warranty doesn't cover
modifications to kit, or damage to Components used in combination with this product. Yardbird RC will only cover the
Yarbird RC has NO control over final assembly of this product and or materials used in the final assembly process.
YardBird RC assumes NO liability for the final user assembled product. The user of this product assumes all
liability for the final assembly of this product and any damage caused in its operation and use.
Please return this kit to the place of purchase in a new and unused condition for refund, if the purchaser is not prepared
Read this assembly manual before starting construction. It contains Tips, and important
construction instructions. Please read all information enclosed in this manual and
information enclosed in products to be used in combination with this product.
Wing Span: 24 Inches.
Length: 34.5 Inches.
Flying Weight: 9.5-13.5 Ounces.
Radio: Requires Three Channels, V-Tail Mixing.
Recommended Motor: DUALSKY XM2826CA-12 Brushless Outrunner.
Warranty
replacement of this kit for defects at time of purchase.
Liability
to accept liability for the operation and use of this product.
YardBird RC
39 E. Gaslight PL
The Woodlands, TX 77382
Productsupport@yardbirdrc.com
Phone/Fax: (281) 298 -5862
Advertisement
Table of Contents

Summary of Contents for YardBird RC YB-22 Park Jet
-
Page 1: Instruction Manual
The contents of this kit are guaranteed to be free of defects at time and date of purchase. The warranty doesn’t cover modifications to kit, or damage to Components used in combination with this product. Yardbird RC will only cover the replacement of this kit for defects at time of purchase. -
Page 2: Table Of Contents
Thank You Thank you for your purchase of the Yardbird RC YB-22 Park Jet. It is our sincere hope that this product Test Fit: Means to assemble the pieces without will bring you many hours of fun and safe enjoyment. -
Page 3: Kit Contents
Kit Contents Part Name Part # Canopy 0122 Upper Fuselage 0222 Upper Fuselage 0222 Lower Fuselage 0322 Lower Fuselage 0322 Left Wing Deck 04L22 Right Wing Deck 05R22 Aft Wing Deck 06L22 L Vertical Stabilizer 06R22 R Vertical Stabilizer 07L22 Left Elevon 08R22 Right Elevon... -
Page 4: Kit Construction
Kit Construction Step 1. Step 4. Use care when working with the X-ACTO knife! Glue the flat side of the 24 inch carbon fiber wing spar to the aft wing deck. Step 5. Use the X-ACTO knife to remove the milling tabs on all the foam parts. - Page 5 Step 8. Step 10. Use the X-ACTO knife to cut 2 separate ½ inch long slots in the end of the access door opposite of the round hole. Then install fiber hinges. Do not glue. Take your time. Make sure the cuts are parallel to the edge as seen in the lower portion of the above picture.
- Page 6 Step 12. Step 14. Glue the two lower fuselage pieces together. Cut a 1 inch section from the Velcro strip. Attach it to the inside of the access door aft of the round hole. Note: You can wait to install the Velcro until step 31.
-
Page 7: Upper Fuselage
Step 17. Step 21. With the elevons in position. Use the same technique as step 11 to Mark the locations each fiber hinge contacts the aft deck. Cut twelve separate ½ slots for the opposite end of the fiber hinges. Now slip the fiber hinges into the aft Test fit and glue the vertical stabilizers as shown in the picture above. -
Page 8: Paint And Decal Installation
Paint and Decal Installation Step 24. Paint Paint is optional. Paint adds weight and painting the entire model is not recommended. The model represented below has its nose section lightly frosted with light gray. Always use foam safe paint. Test all paints on the test piece before applying to the model. -
Page 9: Servo And Push Rod Installation
Servo and Push Rod Installation Step 26. Step 30. Attach the motor to the engine mount using the motor mount screws. Test fit and glue the cockpit in place as shown in the Position the motor so the three wires exit the bottom side of the airframe. above picture. -
Page 10: Setup
Setup Step 33. Step 35. Setting Control Direction Take care around the prop. You may wish to remove or wait to install the prop until after the control direction setup. Power Up the transmitter and receiver. Center all the trim levers. With the trim levers centered check the two elevons. -
Page 11: Preflight
The alternate launch method is to lightly grasp the model with you right hand. Your thumb YB-22 Park Jet in the gap between the two elevons and your fingers spread under the aft wing deck. Hold the aircraft at a 30 degree nose high attitude...
Need help?
Do you have a question about the YB-22 Park Jet and is the answer not in the manual?
Questions and answers