
Summary of Contents for myLIFTER GARAGE SMART
- Page 1 USER’S MANUAL Save this manual for future reference. For a digital version of this manual, visit www.mylifter.com/installation.
-
Page 2: Table Of Contents
TABLE OF CONTENTS 4 INSTALLING THE PULLEY SYSTEM FOR LIFTING 100 POUNDS 5 PAIRING YOUR MYLIFTER UNIT WITH YOUR IOS OR ANDROID DEVICE SAFETY INFORMATION 6 EDITING AND DELETING MYLIFTER UNITS ABOUT MYLIFTER 7 USING THE APP TO LIFT LOADS... -
Page 3: Safety Information
2. Use a stud finder to mount the myLIFTER unit to a sturdy ceiling joist. 3. Do not operate the myLIFTER system while hands or other body parts are near the system. 4. Do not use the myLIFTER unit to lift people or animals. - Page 4 Angled cables can limit To reduce the risk of electric shock or injury, use indoors only. lifting capacity and cause excessive sideways strain on the myLIFTER unit and mounting bracket, resulting in possible property damage, serious per- sonal injury, or death.
-
Page 5: About Mylifter
The myLIFTER system is designed for home and garage use; it is not to be used in commercial or mined by turning the equipment off and on, the user is encouraged to try to correct the interfer- industrial applications. -
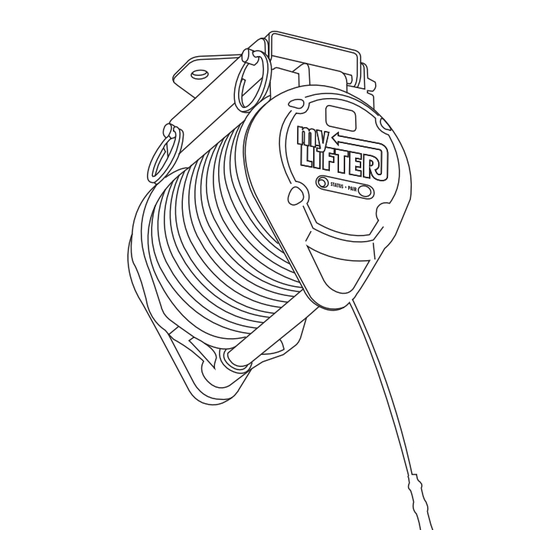
Page 6: Parts Identifier
Note: You will also need a ladder, stud finder, cordless drill, ½" wrench, Phillips screwdriver, and pencil. All hardware pieces on page 9 are to scale. Do not attempt to install the system if parts are damaged or miss- ing. If any of your parts are damaged or missing, please call 1-909-493-LIFT, or email support@mylifter.com. Eye screw... -
Page 7: Quick Start Guide
1 Mounting the Bracket and myLIFTER Unit to the Ceiling 2. Download the myLIFTER app to your smart device from either Google Play or the App Store. 1. Use a stud finder to locate the ceiling joist to which you want to mount your myLIFTER (Figure 1.1). - Page 8 WARNING Inserting lag screws into a ceiling joist without first 2. Consider which way you want your lifted item and myLIFTER Figure 1.3 Figure 1.2a drilling pilot holes may split the wood and result in unit to face, and mount the bracket accordingly.
-
Page 9: Installing The Ac Adapter Mount
4. Place the mount’s large holes over the screws and slide the 8. Align the myLIFTER unit with the mounting bracket, and bracket downward until it locks in place inside the smaller... -
Page 10: Installing The Ac Adapter
1. Insert the AC adapter into the AC adapter mount with 4. Starting at the myLIFTER unit and working toward the AC the two-pronged hole on the bottom and the indicator light on adapter, place adhesive cable mounts 3–4 feet apart, form- the top. -
Page 11: Installing The Pulley System For Lifting 100 Pounds
2. Ensure that your eye screw is placed appropriately for the item you will be lifting. Cables must be parallel to allow full lifting capacity and to prevent strain on the myLIFTER unit. If your unit is mounted parallel to the joist, the eye Refer to page 6 for correct and incorrect eye screw placements. -
Page 12: Pairing Your Mylifter Unit With Your Ios Or Android Device
Eye screw myLIFTER unit and causing cable damage. 2. The indicator light on your myLIFTER unit should be a slow Figure 4.2b blinking yellow, indicating that the unit is idle. Open the app,... -
Page 13: Editing And Deleting Mylifter Units
6 Editing and Deleting myLIFTER Units indicator light should change to a blinking green, ending with a fast green-blink sequence that confirms the pairing. 1. To change the name of your lifter, return to the myLIFTER app's main screen by tapping the back arrow Edit in the top left corner, and then tap in the top right corner. -
Page 14: Using The App To Lift Loads
1. Once your myLIFTER unit has been paired with your smart device, return to the myLIFTER SET HIGH OR LOW Tap these buttons to lift and app's main screen, and tap on the name of the myLIFTER you want to use. Figure 7.1 illus- lower your items to your Use these buttons preset high and low points. - Page 15 SMART LIFT button. NOTE The lifter will lift or lower until it reaches your preset position. If your myLIFTER is loaded beyond its capacity (more SET LOW SET HIGH Clear 6. To clear your preferred low or high point, tap...
-
Page 16: Creating A Locked Group
7. From the control screen, tap the dotted icon in the top right corner, and then tap Calibrate. 2. Ensure that all myLIFTER units you want to group in a locked group are paired with your smart device, as explained in Sec- tion 5. Figure 8.1... -
Page 17: Creating A Flex Group
Create Group screen. If you reset the calibration on your locked group, any 2. Ensure that all myLIFTER units you want to group in a flex group are paired with your smart preset high or low points will automatically be cleared. - Page 18 “Groups,” select your group to lift or lower all items within the group. Under the heading “Individual,” select an individual lifter to operate only that unit (Figure 9.1). 7. To add a myLIFTER unit to a flex group, navigate to the home Edit pencil screen, and tap in the top right corner.
-
Page 19: Limited Warranty
Limited Three-Year Warranty on Hardware cial entity. MyLifter offers a limited three-year warranty on the hardware components of its lift system. If a What Is Covered defect in the hardware, or any component thereof, appears at any time during the first three years... - Page 20 To obtain information regarding this warranty, you may contact us by mail, The myLIFTER lift system is intended for personal, indoor, home use. MyLifter does not warrant its e-mail, or phone: lift system for commercial use, and any such use voids the warranty.
- Page 21 DAMAGES ARISING FROM OR IN CONNECTION WITH THE USE OF ANY MYLIFTER PROD- UCT. (SOME STATES DO NOT ALLOW THE EXCLUSION OR LIMITATION OF INCIDENTAL OR CONSEQUENTIAL DAMAGES, SO THE ABOVE LIMITATION OR EXCLUSION MAY NOT APPLY TO YOU.) Other Legal Rights This warranty gives you specific legal rights and you may also have other rights which vary from state to state.
Need help?
Do you have a question about the GARAGE SMART and is the answer not in the manual?
Questions and answers