Advertisement
Table of Contents
MANUAL
YJHB-2 Micro Repair Welder
We appreciate that you have chosen our YJHB-2 Micro Repair Welder. Customer
satisfaction is our priority. We strive to provide the most efficient machine, and a good
after-sales service.
Kindly contact us, if you need any assistance in operating the machine. We welcome all
suggestions that can improve the machine performance.
Before using the welder, pls read through this manual, to enable you a smooth start and a
satisfactory performance.
Contact Information:
Yuyao Yijing Electric Co., Ltd.
Simen West Industrial Estate, Yuyao City,
315470, Zhejiang Province, P.R. China
Tel: 0086-574-6215 3034
Fax: 0086-574-6215 1870
E-mail: oversea@chinayijing.com
Website: http://www.chinayijing.com
Advertisement
Table of Contents

Summary of Contents for Yijing Electric YJHB-2
- Page 1 MANUAL YJHB-2 Micro Repair Welder We appreciate that you have chosen our YJHB-2 Micro Repair Welder. Customer satisfaction is our priority. We strive to provide the most efficient machine, and a good after-sales service. Kindly contact us, if you need any assistance in operating the machine. We welcome all suggestions that can improve the machine performance.
- Page 2 WARNINGS Misuse of the welder may cause danger to the users. Therefore, the equipment will be used only in compliance with relevant safety regulations. Special attention should be paid to the following: Electric Shock: - Welding equipment must be installed properly. - Isolate yourself from the ground and weld the topic (eg use of footwear with rubber sole).
-
Page 3: General Introduction
General introduction YJHB-2 is a micro repair welder with TIG-like welding pulses. The welder can generate very precise welding pulse to produce fine-sized and –positioned welding spots. The machine can weld a variety of materials incl. all types of steel and iron, Aluminum, copper, brass, bronze. -
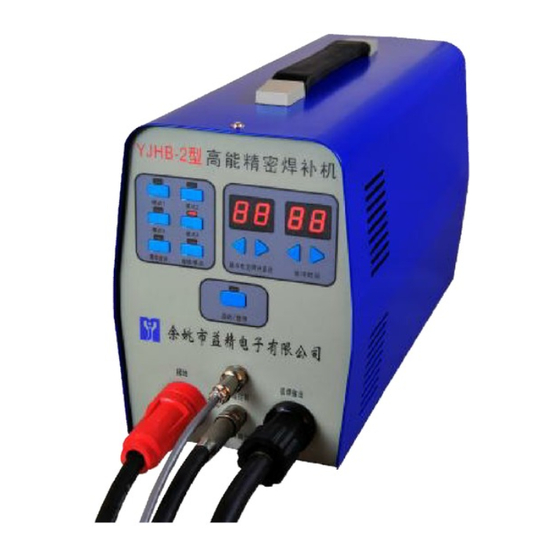
Page 4: Front Panel
Front Panel 1: Mode buttons. 2: Set Filler Mode button 3: a pulse or continuously by pressing the foot pedal switch. 4: Pulse currency display and setting. 5: Pulse time display and setting. 6: On-Off. 7: Foot pedal connection. 8: TIG Welding torch connections. 9: Ground cable connections. - Page 5 Tungsten Tip In the welding torch, there is a mounted tip, which is made of tungsten. The design of the tip varies as the welding task changes. Pls see the following pictures. *NOTE: 1. Dull pin is the most stable shape of tungsten pin. We suggest the use of this shape as much as possible.
- Page 6 Welding on Flat Surface Theoretically the arc is formed between the tungsten tip and the workpiece, while the nearby filler is melt and drawn to cover the spot. So it is important that the tungsten tip is in a precise position, and it should always be closer to the surface and farther from the filler.
- Page 7 Welding multiple seams The pin-filler distance should be about the filler diameter. The filler should be put tightly against the privous seam. Set Filler Function: To get an even and flat welded surface, we can pre-weld the fillers, as shown in the left picture.
- Page 8 The rest of a Corner Set Filler Function: To get an more stable welding result, we suggest that you use the Set Filler Function to pre-weld the filler precisely on top of the edge of the corner. Hence you can free your hand from stabilizing the filler and especially helps if the space is narrow.
- Page 9 Machine Settings: How much needs to Pulse Pulse be repaired (mm) MODE Currency Time...
Need help?
Do you have a question about the YJHB-2 and is the answer not in the manual?
Questions and answers