Table of Contents
Advertisement
Advertisement
Table of Contents

Related Manuals for Spitzer RL150

Summary of Contents for Spitzer RL150
- Page 1 SPITZER RL150 Remote Controlled Electric Golf Caddy User Manual WARNING: PLEASE FOLLOW ALL ASSEMBLY INSTRUCTIONS AND READ AND UNDERSTAND THE OPERATING INSTRUCTIONS BEFORE YOU OPERATE THE CADDY, EITHER MANUALLY OR BY REMOTE CONTROL. User Manual version 2.1...
- Page 2 PLEASE READ BEFORE RETURNING THIS PRODUCT FOR ANY REASON: If you have a question or experience a problem with your Spitzer Golf Caddy, call 1-800-814-6536 to speak with a support representative. Or for fast response, email us at support@spitzerproducts.com **DISCLAIMER SAFETY WARNING** OPERATORS ARE SOLELY RESPONSIBLE FOR SAFE OPERATION and MAINTENANCE OF THIS DEVICE.
-
Page 3: Table Of Contents
7.1 Free-Wheel Mode ......................17 7.2 Controller/Remote Frequency Adjustment ..............17 7.3 Tracking Adjustment ...................... 18 8.0 General Maintenance ......................19 9.0 Electronic Systems ......................20 10.0 Technical Specifications RL150 ..................21 11.0 Frequently Asked Questions (FAQ) .................. 23 12.0 Support Information ......................25... -
Page 4: Introduction
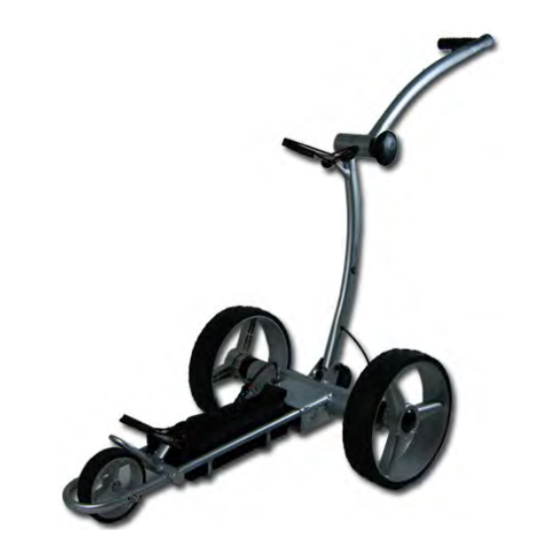
1.0 Introduction 1.1 Features The SPITZER Remote Control Golf Trolley/Caddy features manual and remote controls to provide the user with: An electrically assisted manually controlled movement of the cart while you walk-along with it. This operation is controlled through the manual control handle on the cart. - Page 5 1. Manual Rheostat Speed Control 9. Lower Bag Support 2. Upper Bag Support 10. Front Wheel 3. Bag Support Strap 11. Upper Arm Frame Lock Knob 4. Battery (with Bag) 12. Manual Handle Controls may not be exactly as shown 5.
-
Page 6: Assembly Instructions
2.0 Assembly Instructions 1. Unpack all items carefully and check parts inventory. Place frame structure (one piece) on soft and clean ground to protect frame from being scratched. Attach wheels to axles by pushing wheel locking button on the outside of the wheel and inserting the axle extension into the wheel. Make sure to keep the locking button on the outside of the wheel pushed in during this process, in order to enable the axle extensions, including the two pins, to be inserted all the way into the wheel. - Page 7 4. Unfold and lock the upper arm by turning the Upper Arm Frame Lock knob. 5. Place battery pack on battery tray and fasten Velcro strap around battery tightly. Insert battery plug into caddy outlet. Note: BEFORE CONNECTING make sure that Main On/Off switch on handle is in OFF (0) position and the remote control is stored securely!!! 6.
- Page 8 8. Unpack remote control and install batteries as indicated in the diagram in the receiver compartment of the unit. Now you are ready to learn and understand the functions of the manual and remote controls.
-
Page 9: Manual Handle Control
3.0 Manual Handle Control Symbol Function Description Battery Power Green LED: Battery is operational Red LED: Battery is low and requires recharging. Stop/Start This button starts and stops the cart. Once you are ready to go, press the button, and the caddy will automatically travel at the same speed that it was previously set at (except if you change the variable speed control knob position). -
Page 10: Variable Speed Control Knob
3.1Variable Speed Control Knob The manual handle controls also features a Variable Speed Control knob to increase or decrease the speed of the cart when you choose to walk-along the cart. To speed up the cart when you are walking: - Turn the knob forward (clockwise) to control the forward movement speed of the caddy. -
Page 11: Remote Control
4.0 Remote Control 4.1 Functions A. Brake : The red button in the middle of the directional arrows should be used for braking the caddy. B. Timer: Pause and GO at the same speed as last set. C. Backward Arrow: Pressing the back arrow will set the caddy in backward motion. Increase speed by pushing multiple times. -
Page 12: Important Notes - Please Read Carefully
4.2 Important Notes – PLEASE READ CAREFULLY Change the remote control batteries once the indicator LED gets weak The remote control uses two 1.5V AAA batteries available in any supermarket, drug store or electronics store It is recommended to keep a set of extra batteries ready as replacement To change the batteries open up the battery compartment cover and place the batteries according to the diagram in the battery compartment The remote control system is designed, so it does not interfere with other electric... -
Page 13: Operating Instructions
400-600 charges, depending on charging frequency, storage conditions and discharge history. Replacement batteries are available from your authorized SPITZER dealer or directly from SPITZER. RECOMMENDATIONS FOR BATTERY CHARGING & MAINTENANCE a. Fully charge the battery for 12 hours before the first use b. -
Page 14: Caddy Self-Test (Important)
6.1 Non-Moving Test (Initial Test) Before actually using the SPITZER cart for the first time, it is recommended you operate the golf cart elevated at the drive wheels to familiarize yourself with how the cart works for both remote and handle control functions. Elevate your cart with a paint can or a similar sized and strength item allowing your cart’s drive wheels to freely move without touching... -
Page 15: Moving Test (Prior To Each Use)
6.2 Moving Test (Prior to each use) Make sure this test is performed with the caddy in a wide and safe area, free of obstructions or valuables, such as people, parked automobiles, flowing traffic, furniture or water bodies (rivers, swimming pools etc.), steep hills, cliffs or similar hazards. a. -
Page 16: Recommendations For Efficient And Safe Operation
The remote is designed to have a reach of approximately 80-120 yards, but we strongly recommend to operate the caddy in closer ranges of 10-30 yards (not exceeding 50 yards) to be able to react to any unforeseen events, such as other golfers crossing your path or to avoid hidden obstructions (creeks, bunkers, GUR, etc.) or an unexpected disconnection in remote operation. -
Page 17: Additional Functions
7.0 Additional Functions 7.1 Free-Wheel Mode The caddy can be operated without power. In order to activate the free wheel mode turn the main power switch into “Off” (0) position. The caddy now can be pushed manually without resistance from the drive shaft. The freewheeling mode on some models can also be activated by pulling out both rear wheels by an inch (2cm) and relocking them back into the second axle groove. -
Page 18: Tracking Adjustment
7.3 Tracking Adjustment You can adjust the tracking of your caddy by loosening the axle and the adjustment bar on the right side of the front wheel and shifting the axle accordingly. Loosen the nuts (#3 in diagram) on the front wheel and align it. Keep the nuts (#1 and #2) on the alignment bar un-tightened. -
Page 19: General Maintenance
8.0 General Maintenance The steps below will ensure that you get a prolonged and reliable life out of your SPITZER RL150. 1) The Caddy has been designed so that the user can concentrate on playing golf, while the caddy does the work of carrying your bag. In order to keep your SPITZER RL150 looking at its best, we advise that you wipe any mud or grass from the frame, wheels and chassis after every round with a damp cloth or paper towel. -
Page 20: Electronic Systems
9.0 Electronic Systems Remote Control Range: We recommend not to exceed 50 yards distance. The greater • the distance between you and caddy, the greater the chance of losing contact with it Microcomputer: The remote caddy has 3 microcomputer controls: The first is in •... -
Page 21: Technical Specifications Rl150
10.0 Technical Specifications RL150 Feature Specification • Remote Control (range up to 100 Yards) and Manual Speed Control • Function: Forward & Backward, Left & Right • Power: 2 x 200 Watt (400 Watt) Motor • 24 V DC Electric •... - Page 22 • Rain Cover • Scorecard Holder Warranty • 1 Year on Parts • Type: Cardboard Box, Styrofoam or Cardboard Cushioning Packaging • Dimensions: 34 x 24" x 13” (88 x 60 x 31 cm) • Gross Weight: (20 kg)
-
Page 23: Frequently Asked Questions (Faq)
11.0 Frequently Asked Questions (FAQ) 1. Question: I lost my remote control handset. What shall I do? Reply You can purchase a new remote handset from www.spitzergolf.com. After you : receive your new remote control, please connect the battery to the trolley. Turn the main switch to ON position and press and hold the forward for 6-10 seconds. - Page 24 6. Question: The trolley stops by itself. Reply: Please check the battery charge. Also the controller box has a shut-down function, if the battery is too low or the controller is overheating or the caddy does not receive a signal for a while. 7.
-
Page 25: Support Information
12.0 Support Information SUPPORT INFORMATION FOR ANY FURTHER INFORMATION OR SUPPORT ISSUES, PLEASE CALL SPITZER GOLF AT 1-800-814-6536 OR EMAILS WILL BE PROMPTLY RESPONDED TO AT SUPPORT@SPITZERPRODUCTS.COM...
Need help?
Do you have a question about the RL150 and is the answer not in the manual?
Questions and answers