Table of Contents
Advertisement
FATMAN
TL Audio
by
User Manual
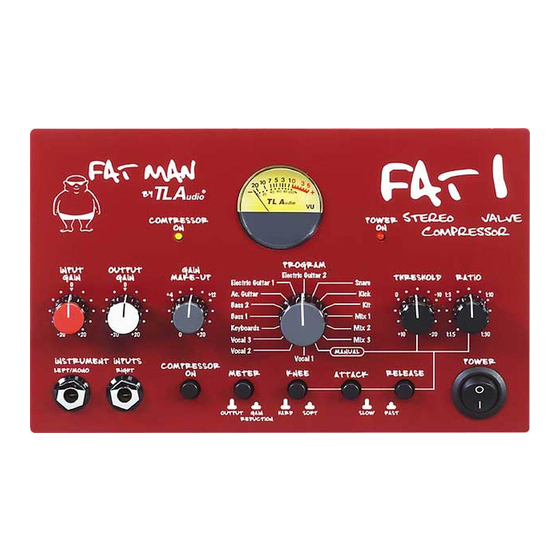
FAT 1 STEREO VALVE COMPRESSOR
TL Audio Limited,
Sonic Touch,
Iceni Court,
Icknield Way,
Letchworth, SG6 1TN,
England.
Tel: +44(0)1462 680888, Fax: +44(0)1462 680999
E-Mail: info@tlaudio.co.uk
www.tlaudio.co.uk
interstage
Phistersvej 31, 2900 Hellerup, Danmark
Telefon 3946 0000, fax 3946 0040
www.interstage.dk
- pro audio with a smile
Advertisement
Table of Contents

Subscribe to Our Youtube Channel
Summary of Contents for TL Audio FATMAN FAT 1
-
Page 1: User Manual
FATMAN TL Audio User Manual FAT 1 STEREO VALVE COMPRESSOR TL Audio Limited, Sonic Touch, Iceni Court, Icknield Way, Letchworth, SG6 1TN, England. Tel: +44(0)1462 680888, Fax: +44(0)1462 680999 E-Mail: info@tlaudio.co.uk www.tlaudio.co.uk interstage Phistersvej 31, 2900 Hellerup, Danmark Telefon 3946 0000, fax 3946 0040 www.interstage.dk... -
Page 2: Table Of Contents
CONTENTS INTRODUCTION PRECAUTIONS INSTALLATION A.C. Mains Supply Line Inputs Instrument Inputs Outputs Operating Level Ventilation OPERATION What is Compression? Why Valve Compression? Overview of Compressor Operation Input Gain Output Gain Gain Make Up Program Control Threshold Ratio 4.10 Attack and Release 4.11 Knee 4.12... -
Page 3: Introduction
INTRODUCTION Congratulations on purchasing the Fatman FAT 1 stereo valve compressor by TL Audio! The FAT 1 is the first valve compressor to combine fully adjustable controls with fifteen preset compression programs, allowing you the choice of creating your own unique settings or opting for our wide selection of factory programmed presets. -
Page 5: Precautions
PRECAUTIONS The FAT 1 Stereo Compressor requires very little installation, but like all electrical equipment, care must be taken to ensure reliable, safe operation. The following points should always be observed: - All mains wiring should be installed and checked by a qualified electrician, - Ensure the correct operating voltage is indicated on the rear panel before connecting to the mains supply,... -
Page 6: Line Inputs
Line Inputs. Each channel has a 3 pin TRS jack socket on the rear panel, which will accept balanced or unbalanced line inputs providing the mating plug is suitably wired: Balanced inputs: - Screen = Ground, - Tip = Signal Phase (“+” or “hot”), - Ring = Signal Non-Phase (“-”... -
Page 9: Operating Level
- Tip = Signal Phase (“+” or “hot”), - Ring = Signal Non-Phase (“-” or “cold”). Unbalanced outputs: - Screen = Ground, - Tip = Signal Phase (“+” or “hot”), - Ring = Ground. Nominal Operating Level. A switch on the rear panel allows the line inputs and outputs to be matched to equipment at a nominal operating level of +4dBu or -10dBu. -
Page 10: Why Valve Compression
Many instruments and voices have a very wide dynamic range which needs to be controlled. A singer, for instance, may be singing quietly one moment and very loudly the next, and unless compression is applied the vocal won’t “sit” correctly in the mix, in addition to the problems of distortion on loud passages and noise on quiet ones. -
Page 11: Input Gain
once it has risen above the threshold, while the Release switch controls how quickly the signal returns to normal once it has dropped back below the threshold level. The Knee switch controls the shape of the FAT 1 compression curve. In “Soft Knee” mode, the response curve of the compressor around the threshold is gentle, so that the compression effect is more subtle and musical. -
Page 12: Gain Make Up
Gain Make Up. While the subjective sound quality of the signal can be improved by compression, the overall signal level will be reduced when gain reduction is taking place. The Gain Make Up control is designed to boost the compressed signal by between 0 and 20dB, in order to bring back the level to the same loudness as the uncompressed signal. - Page 13 detailed the settings for each preset in Figure 4, should you wish to re-create any of the presets in manual mode, and adjust them to suit your own application.
-
Page 14: Threshold
Table 1: Presets. Number Preset Title Typical Applications Vocal 1 Light, subtle compression softer vocal performances. Soft knee, fast attack and release. Vocal 2 Medium compression for more obvious control. Soft knee, fast attack and slow release. Vocal 3 Hard compression for powerful performances. Hard knee, fast attack and slow release. -
Page 16: Ratio
The FAT 1 has a variable Threshold control, adjustable between +10dBu and -20dBu. Unlike some compressors, the Threshold control on the FAT 1 starts at a ‘plus’ value in the counter-clockwise position, and decreases to a ‘minus’ value as you rotate the control clockwise. -
Page 17: Knee
Adjustment of the attack and release times allows unobtrusive compression to be applied to virtually any audio signal, but should very short transients occur the time constants become signal dependent, generally reduced, to prevent a slow release leaving a ‘hole’ in the signal after the transient. -
Page 18: Getting Started
GETTING STARTED Connections. There are various ways that the FAT 1 can be connected into your audio system. The three most common are: As an instrument front end Connected to a channel insert point Connected to a group or master insert point To use the FAT 1 as an instrument front end, connect the output(s) of the FAT 1 directly to the line (not mic) input of your console, recorder or sound card. -
Page 19: In Use
In Use. Having connected the FAT 1, it’s time to put it into action! Here’s a simple step by step guide: The first stage is to set up the gains of the unit. With the Compressor switched out, start with the Input and Output Gains and Gain Make-Up at 0dB. With the Meter set to read ‘Output’, adjust the Input Gain to achieve a peak reading of around 0VU with the chosen source material. -
Page 20: Frequently Asked Questions (Faq)
Frequently Asked Questions (FAQs). The FAT 1 is a stereo unit yet there is only one set of controls, Why is this? The FAT 1’s single set of controls affect both channels simultaneously, since the unit always works in linked stereo mode. To operate in mono mode, simply run your mono signal through the left channel input/output (either the line input, or the instrument input if applicable). -
Page 21: Service
Please record the following details, and retain proof of purchase: Serial Number......Date purchased......Dealer......... TL Audio Limited, Sonic Touch, Iceni Court, Icknield Way, Letchworth, SG6 1TN, England.
Need help?
Do you have a question about the FATMAN FAT 1 and is the answer not in the manual?
Questions and answers