
Summary of Contents for Ellie SENTRY 200
- Page 1 F L U O R E S C E N C E P O L A R I Z A T I O N I N S T R U M E N T S S e n t r y 2 0 0 M A N U A L...
- Page 2 This document has been prepared for the use of the customers and personnel of Ellie LLC. The information contained in this manual is proprietary. The manual may not be copied, reproduced, translated or transmitted in any form without the express written permission of Ellie.
-
Page 3: Table Of Contents
Viewing Test Data on the SENTRY 200 Screen ® Erasing Data Available Memory DATA TRANSFER Installation of Sentry Tools on Personal Computer Using the Assay Retrieval Tool Using the Sentry Commander AddIn TROUBLESHOOTING ELLIE SENTRY 200 FP INSTRUMENT SPECIFICATIONS ® WARRANTY Contacts... -
Page 4: Table Of Contents Features Of The Sentry 200 Instrument
This machine contains high voltage components. Never attempt any maintenance procedure not described in this manual. Incorrect maintenance procedures may damage instrument or cause electrical shock. Please allow Ellie to perform all maintenance, repairs and servicing. Electrical Power... -
Page 5: Screen
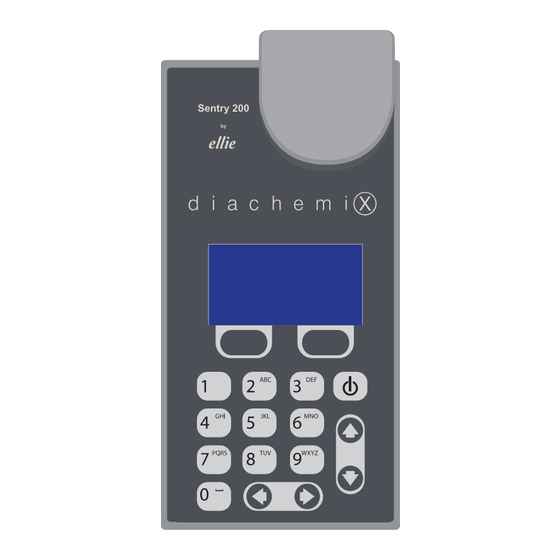
Screen All information necessary to operate the SENTRY 200 is displayed on its Liquid Crystal Display screen. The ® contrast between the screen and displayed information may be adjusted by accessing the SETUP menu, explained later in this Manual. Keyboard The keyboard consists of seventeen (17) keys displayed on the top surface of the instrument. -
Page 6: Setup Of The Sentry 200
“Sentry 200” will appear on the display. 3. After the bootup sequence is complete, the main screen will be displayed. ‘Sentry 200 v3.2.’ appears at the top of the main screen, followed by four lines of text displaying the ‘Run Assay’, ‘Data Manager’, ‘Calibrate’, and ‘Setup’... -
Page 7: Date
This value is set during instrument factory calibration. Typical values for PMT are in the range 085-127. Do not adjust the PMT value unless instructed by Ellie or other authorized service personnel. Assay Time: The displayed value is the amount of time (in half of seconds) instrument readings are Figure 4 Assay time. - Page 8 The ‘BT Device Pairing’ entry presents you with the Search for devices menu, allowing you to pair the BT Pairing: device with other Bluetooth. Selection of this entry will enter your SENTRY 200 reader into ‘Search ® for devices’ mode. This option allows you to pair your device with a Bluetooth printer, or any other device that can be used to accept data sent from the SENTRY...
- Page 9 If an error occurs during pairing you will be presented with a screen showing ‘Pairing failed’ error. (Figure 9) When finished press the ‘Back’ button to return to the ‘...Setup’ screen. Figure 9 ‘Pairing failed’ error. PLEASE NOTE: If you are using serial connection to your device, turn off Bluetooth support (see ‘Bluetooth’ setup’ pg.
-
Page 10: Calibration Of The Sentry 200
Ellie produces three types of fluorescence polarization standards. The Low Polarization Standard is used to determine basic functioning of the machine, to set the base reading for the instrument and adjust the G-factor. The Medium Polarization Standard provides information about instruments range in the most used part of the reading spectrum. -
Page 11: Testing With Sentry 200
® TESTING WITH SENTRY Main Screen 1. Beginning on the main screen, use the up or down arrows to highlight the ‘Run Assay’ line. 2. Press the ‘Select’ key to move to the ‘…Run Assay’ screen. PLEASE NOTE: Pressing the ‘Back’ key at any point in the Editing process will erase the data entered in the current screens and return the instrument to the Main Menu screen. -
Page 12: Running Fluorescence Polarization Assay
To input the Location where the test is being performed (optional): 1. Use the up or down arrows if necessary to move to select the ‘Location:’ line. 2. Press the ‘Edit’ key. 3. Use the alpha-numeric keyboard to enter the location where the test is performed or an appropriate lab code using the text entry procedures. - Page 13 To measure the Tracer Intensities: 1. From any line, press the #1 key or use the left arrow to go back to the first ‘ A ssay #’. 2. Use the up or down arrow to move to select the ‘Tracer Read’ line if it is not already highlighted. 3.
-
Page 14: Data Manager
DATA MANAGER Test results are stored in the SENTRY 200 memory until they ® are erased or the memory capacity is exceeded. Approximately 30,000 accumulated test results can be stored in the memory. Test results may be reviewed on the SENTRY 200 LCD screen. -
Page 15: Erasing Data
Erasing Data 1. Use the up or down arrows to move to select the ‘Erase Data’ line. 2. Press the ‘Erase’ key to erase the test results data presently contained in the SENTRY 200 instrument. ® 3. Respond to the ‘Erase ?’ dialogue screen by confirming your intention to erase the data by selecting the ‘Yes’... -
Page 16: Data Transfer
You can run Sentry Tools on the Microsoft Windows XP/7/8, with Microsoft Office Excel 2003/2007/2010 installed. ELLIE LLC Sentry Tools requires 200 MB of available hard-disk space. Hard disk requirements vary, depending on your configuration. Custom installation choices may require more or less hard disk space. -
Page 17: Using The Assay Retrieval Tool
Retrieval Tool. Please use the following steps when retrieving assay data. Using the Assay Retrieval Tool 1. To run the program, click on ‘Ellie > Assay Retrieval Tool’ in the “Start” - “All Programs” menus from your personal computer. 2. The ‘Ellie Assay Retrieval Tool’ dialogue box is displayed. -
Page 18: Using The Sentry Commander Addin
Using the Sentry Commander AddIn Sentry Commander AddIn for Microsoft Excel gives you ability to configure connection to your SENTRY 200 device ® and perform measurement. When you start Microsoft Excel application, you should see the message saying ‘SentryCommander: Press F3 to perform reading or <CTRL+F3>... - Page 19 200 instument. It is users responsibility to write ® functions that are going to calculate polarization value from this data. ELLIE LLC is going to provide sample Microsoft Excel worksheet to users for reference. Please contact Ellie at info@ellie.com for more informations.
-
Page 20: Troubleshooting
No tracer (conjugate) added. Add new sample to buffer and read blank intensity then add tracer (conjugate) and read the sample intensity. If problem persists contact Ellie instrument service (contact information is located at the bottom of this page). If the housing of the instrument has been removed and the optics compromised, stray light may have found its way into the chamber. -
Page 21: Ellie Sentry 200 Fp Instrument Specifications
® Light Source: Light Emitting Diode ELLIE SENTRY 200 FP INSTRUMENT SPECIFICATION LIST Detector: Photomultiplier Tube Operating Temperature: 4 to 46˚C (39 to 115 ˚F) User Interface: Custom Membrane Keypad Graphic LCD Display (128 x 64 dots) Data Storage: 4 MB (approximately 30,000 tests) -
Page 22: Warranty
OF MERCHANTABILITY OF FITNESS FOR A PARTICULAR PURPOSE AND ALL OTHER EXPRESS OR IMPLIED REPRESENTAITONS AND WARRANTIES. The warranties will not apply if it is determined by Ellie that the Instrument became defective due to accident or because the purchaser failed to exercise due responsibility, abused, misused, misapplied or permitted alterations of the Instrument, power surge, unusual voltage conditions, tampering, or damage during repair work or attempted repair work made by anyone other than personnel expressly authorized by seller.
Need help?
Do you have a question about the SENTRY 200 and is the answer not in the manual?
Questions and answers