Table of Contents
Advertisement
Quick Links
Advertisement
Table of Contents

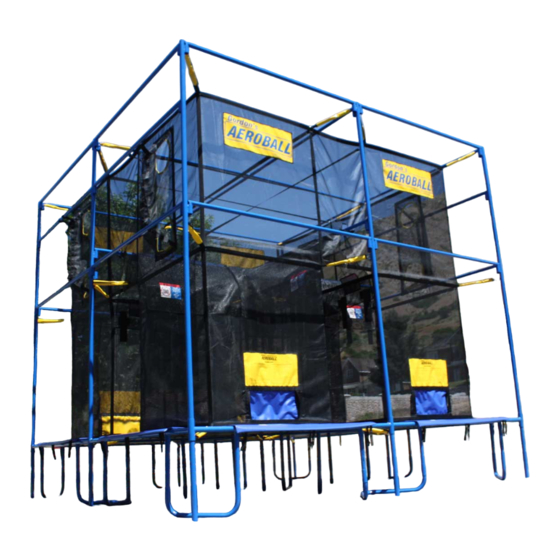
Summary of Contents for Aeroball Sr.2
- Page 1 Aeroball Senior 2 Manual AEROBALL Sr.2 Product Manual WARNING! Please read this manual fully before you start assembly or use of the Aeroball. Follow all instructions while assembling or using the equipment and routine maintenance of the equipment.
-
Page 2: Table Of Contents
Aeroball Senior 2 Manual TABLE OF CONTENTS Safety Assembly Operator/employee User/player Maintenance instructions Required Equipment Parts list Assembly instruction Structure Trampoline Housings & Roof Disassembly instruction... -
Page 3: Assembly
Have the correct tools on hand, as prescribed by the manual. Do not modify any parts of the Aeroball in ways not prescribed in the manual. This includes using tools other than those mentioned in this manual. (Doing so may void the warranty). -
Page 4: Operator/Employee
SAFETY RULES FOR OPERATORS / EMPLOYEES Adult supervision is required at all times. Have users sign hold-harmless waivers prior to using the Aeroball. If users are under legal age, have a parent or guardian sign for them. Do not allow anyone under the influence of drugs, alcohol or other inhibiting substance to use the Aeroball. -
Page 5: User/Player
Adult supervision is required at all times. Use common sense and good judgment when using this product. Do not use the Aeroball if you are under the influence of drugs, alcohol or other inhibiting substance. Do not use if you have any serious pre-existing injuries or medical conditions, including but not limited to: back or joint problems, heart condition, pregnancy, etc. -
Page 6: Maintenance Instructions
Spray or rinse with a garden hose. If used outdoors, make sure the Aeroball is properly anchored at every corner. (Note: anchors are not included in the Aeroball kit. Trees, large shrubs, or buildings may be used as anchor points. -
Page 7: Required Equipment
Aeroball Senior 2 Manual REQUIRED EQUIPMENT (NOT INCLUDED IN AEROBALL KIT) Ladder (8 feet minimum) Rubber mallet o IMPORTANT! Do not use a metal hammer to strike the metal frame. This can dent the frame and damage the structure. - Page 8 Aeroball Senior 2 Manual Top vertical riser- center Top vertical riser - Left Top vertical riser- Right HORIZONTAL STRUCTURE Lower horizontal bed support- center Lower horizontal bed support- sides Junction support – sides & center Junction support – corners Upper horizontal supports...
- Page 9 Aeroball Senior 2 Manual Horizontal supports – ends TRAMPOLINE Trampoline springs- small Blue padded spring cover- center Blue padded spring cover- sides Trampoline mat COURT & HOUSING Trampoline springs- large Padded court separator- center Yellow housing spring wraps...
- Page 10 Aeroball Senior 2 Manual Left housing (with Velcro strap) Right housing Court roof OTHER Game ball Spring tool Notes for easy reference * Part numbers ending in "0" are generic. No specific orientation (00,10,40,50,60) Part numbers ending in "1" are strictly for the center of the unit (01,21,31,51,61) * "L"...
-
Page 11: Structure
Aeroball Senior 2 Manual STEPS 1 TO 11: BUILDING THE STRUCTURE Step 1: Connect the lower horizontal bed supports (#31 – center; #32 – sides) to all the junction supports (#33 – center; #34 – sides), as shown below: Step 2: Insert the corner base legs (part #04) into the sleeves found at each corner (underneath #34). - Page 12 Aeroball Senior 2 Manual Step 4: Insert the single vertical support (part #01) into one of the base plates (#00). Connect in the very middle of the structure, as shown below: Step 5: Insert the lower vertical risers (part #10) through each of the holes in the 6 junctions.
- Page 13 Aeroball Senior 2 Manual Step 6: Insert the 2 top vertical center risers (part #21), as shown below:...
- Page 14 Aeroball Senior 2 Manual Step 7: Fit the 4 top vertical corner risers into all 4 bottom corner risers (part #12) (Note that #22R and #22L go in opposite corners.
- Page 15 Aeroball Senior 2 Manual By the end of Step 7, the entire vertical structure should be set up. Step 8: Pass 1 of the horizontal supports (part #40) through the padded court separator (part #61). This will fit in the center structure in Step 9.
- Page 16 Aeroball Senior 2 Manual Step 9: Fit 4 horizontal supports into the sleeves at mid-height of the structure, as shown below: Step 10: Fit 2 horizontal supports for the ends (part #42), one above the other, on each side of the Aeroball.
-
Page 17: Trampoline
Aeroball Senior 2 Manual By the end of Step 11, the entire structure of the Aeroball should be set up. STEPS 12 TO 14: ASSEMBLING THE TRAMPOLINE Step 12: Clip the first spring (part #50) on each side of the trampoline mat (part #53) to the structure, as shown below. - Page 18 Step 13: Clip the remaining springs to the structure. (There are 16 springs per side, 64 for each trampoline mat). Repeat for both trampoline mats. Step 14: Attach each of the 6 blue padded spring covers (part #52) to the sides of the Aeroball. Then attach the center cover (part #51) up the middle.
-
Page 19: Housings & Roof
Aeroball Senior 2 Manual STEPS 15 TO 21: ASSEMBLING THE HOUSINGS & ROOF Step 15: Attach one large spring (part #60) each of the circular-shaped loops on the verticals, as shown below. There are 12 loops on each side, 24 total. - Page 20 Aeroball Senior 2 Manual Attach the housing to the loops. Use the spring tool to stretch the springs if needed. Start with from top and move down. Repeat for the other housing. Step 17: Bond the Velcro at the bottom of each housing to all 4 edges of each trampoline mat.
- Page 21 Aeroball Senior 2 Manual Step 18: Attach the left and right housings at the top. Pass the Velcro strap of the left housing through the metal buckle at the top of the right housing. Pull to tighten. Step 19: Bond the Velcro that attaches the housings to the padded court divider.
-
Page 22: Disassembly Instruction
Aeroball Senior 2 Manual INSTRUCTIONS FOR DISASSEMBLY Detach the Velcro that bound the housings to the roof. Remove and put away the roof (reverse step 21). Detach each housing from the center court separator. Detach left housing from the right housing by undoing the straps at the top (reverse steps 19 through 17).
Need help?
Do you have a question about the Sr.2 and is the answer not in the manual?
Questions and answers