Table of Contents
Advertisement
Quick Links
Advertisement
Table of Contents

Related Manuals for Furious FPV Moskito 70

Summary of Contents for Furious FPV Moskito 70
- Page 1 MOSKITO 70 BNB 70‐size FPV racer – Rev. FrSky...
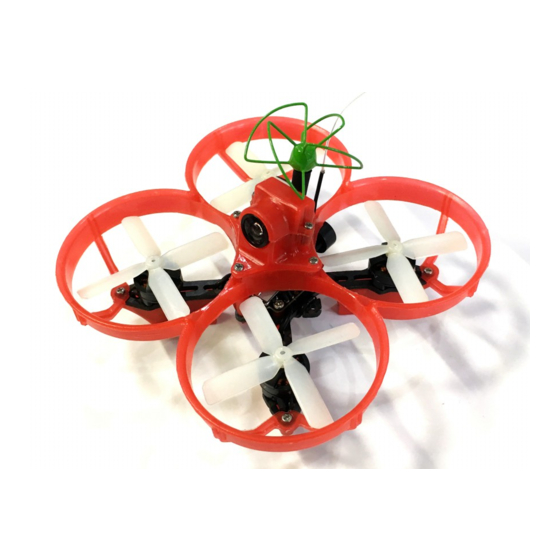
- Page 2 Uber small and micron light, Furious FPV debuts the lightest and smallest brushless quad copter that has ever seen flight. Enter the insanity of the Moskito 70 - the itch that feels oh, so good. Integration is the key to success, and with the Moskito 70, we have packaged this little beast to perform.
-
Page 3: Table Of Contents
Contents Specifications: ............................... 4 Attention ............................... 4 Disclaimer..............................5 Overview ............................... 6 Quick Start Guide - BNB set .......................... 8 Let’s go! ..............................8 How to do Bind Moskito with Tanaris ......................9 Guide configuration transmitter for Moskito70 ..................13 Guide configuraton transmitter : ...................... -
Page 4: Specifications
When setting up mini-quads, there is always a remote chance that a configuration change can spin up motors unexpectedly. Furious FPV accepts no responsibility, or liability, for any injury, or damage, to persons or property, caused by the use of the Moskito70. -
Page 5: Disclaimer
It is your responsibility to use it reasonably and according to your experience level. Use common sense. Fly safe. You are on your own. Furious FPV has no liability for use of this aircraft. -
Page 6: Overview
Overview The following diagram shows the main features of the Moskito and the internal layout. -
Page 8: Quick Start Guide - Bnb Set
Quick Start Guide - BNB set The following steps will get you setup and ready to fly quickly. It is a condensed version intended for experienced pilots. Each step is elaborated in more detail in this manual if you are new to this. You will need to mount the arms, install a R/C receiver, configure the flight control, potentially adjust VTX frequency, insert the battery and install the propellers. -
Page 9: How To Do Bind Moskito With Tanaris
How to do Bind Moskito with Tanaris In the Taranis: Step 1. Press Menu button, TX go to Mode Selection. TX go to Mode Selection:... - Page 10 Step 2. Press Page button go to MODE SETUP (page 2) in the model configuration. Step 3: Press “+” button go to Mode inside Internal RF and select D8. Step 4: Press “-” button go to Receiver and select Bind.
- Page 11 On the Moskito70. Step 4: Press and hold Bind button on Receiver. Step 6: Plug Battery 2 cell for Moskito70. Hold Bind button while you plug battery, when you plug Battery at the Top Side you will see Green LED turn on. After plug Battery release Bind button.
- Page 12 You will see [BIND] text on screen blink. After that. BLUE LED turn off. That mean is Bind success. Step 8: Un Plug battery and re-plug battery for Moskito70. BLUE LED Turn On and on Home Display have Telemetry like bellow Picture.
-
Page 13: Guide Configuration Transmitter For Moskito70
Guide configuration transmitter for Moskito70 By default, factory-built aircraft had been installed for flight, but you must configuration compatible your channel transmitter. Guide configuraton transmitter : Step 1: Open Betaflight and Connect Moskito70 via USB port. Step 2: Go to Receiver tab, change your kind Transmitter at Channel Map box. Which FrSky we choose Default at Channel Map. - Page 14 - Push 2 gimbal your transmitter UP– RIGHT, channel ROLL, PITCH, YAW, THROTTLE on interface of Betaflight go to Min = ~ 2000. Your aircraft will can’t take off if value of channel Roll, Pitch, Yaw, Throttle don’t go from ~1000 to ~2000.
- Page 15 6: Press and Hold ENT button to can change value. You will use ADD or MINUS button to change so value on interface of Betaflight from ~1000 to ~2000. After that press EXIT Repeat with another channel. Next we will setup channels for Moskito. The AUX channels depending on configuration you Transmitter.
- Page 16 Press ENT to go to menu EDIT. 3. In this menu, you can define Input name for channel and choose Switch Input for channel at Source tab. Use ADD or MINUS to change value, ENT to comfim. Repeat with channel 6 and 7. Step 5: Go to Mode tab, click Add Range and select AUX channel .
-
Page 18: Meaning Of Flight Mode
Meaning of flight mode: ANGLE mode is the easiest to learn. When the sticks are centered, the flight controller is always working to level the quad. The deviation of the Roll/Pitch controls from neutral defines the angle of the quad in flight. Not a great mode for racing, but definitely the mode to use for the maiden flight. -
Page 19: Guide Change Frequency Video Transmitter Of Moskito70
Guide change frequency Video Transmitter of Moskito70 How to to change Band and Channels. First RED LED for Channel 1, other 5 BLUE LED for frequency band. 1. Single press channel/band button to change channel LED always keep RED for 1 channel of any band, for other channel, channel LED OFF. -
Page 21: Race Guidelines - Flying With Friends
ImmersionRC product please contact them first. For support on issues involving equipment from other brands and also general support for FuriousFPV products, the best place to go is the Furious FPV section of FuriousFPV.com We actively monitor this forum and provide support here.
Need help?
Do you have a question about the Moskito 70 and is the answer not in the manual?
Questions and answers